« April 2007 |
Main
| June 2007 »
[River in Summer - 12] - Printing to begin!
Continued from [River in Summer - 11] | Starting point of the thread is [River in Summer]

This email came in a few minutes ago, from one of the long-time collectors:
What's up? You were posting daily progress reports and it made for compelling reading, but then about a week ago, you stopped. Problems? Deep into proof printing?
Here's what I replied:
Exactly. And I just didn't want to go through that process in public ...
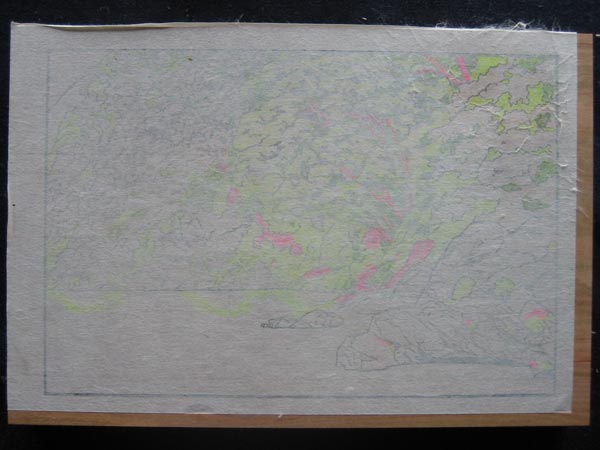
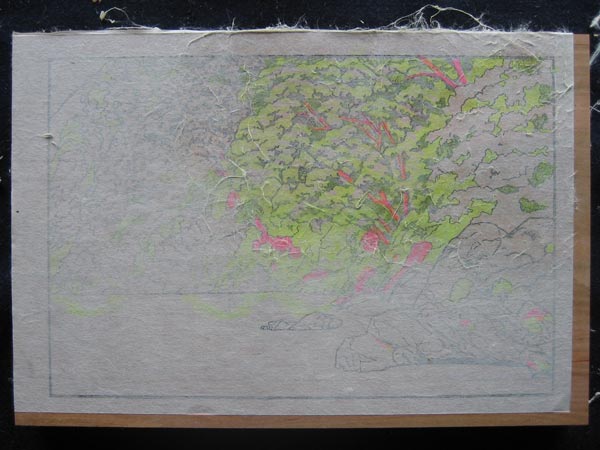
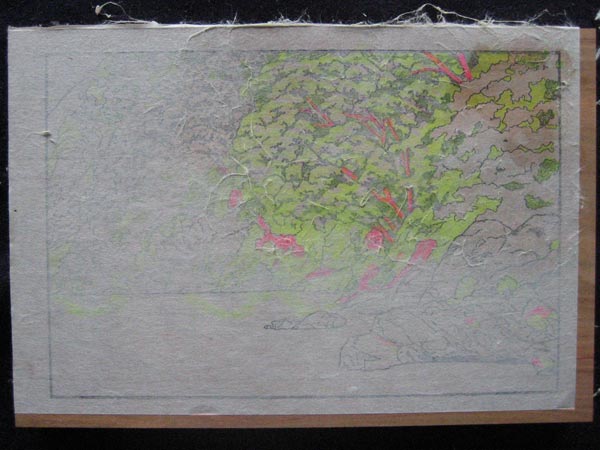
It has basically come together during the past week, and although I guess it could still be improved with more proofing, the cut-off day imposed by the publisher :-) came this afternoon, and paper is now wet for the first batch of 100 or so sheets. Printing starts in the morning.
I'll be scanning/uploading daily during the printing, showing every stage along the way.
Thanks for following along!
The thread continues in [River in Summer - 13] ...
Posted by Dave Bull at 11:43 PM
| Comments (0)
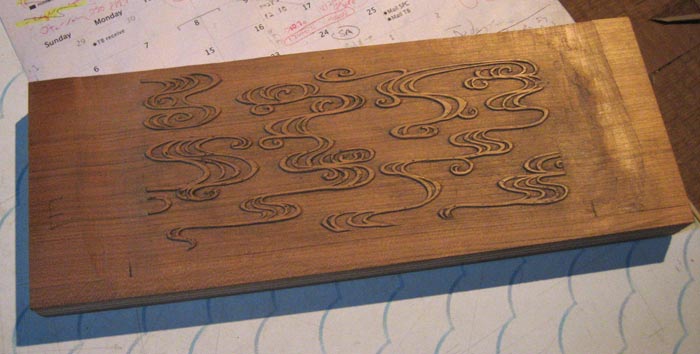
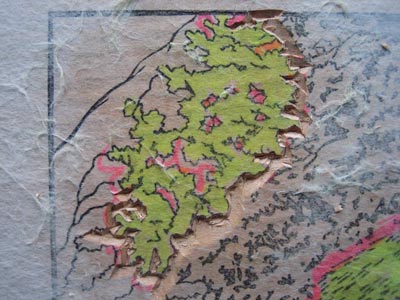
Mystery pattern revealed ...
Do you remember the 'mystery' block from a few days ago?
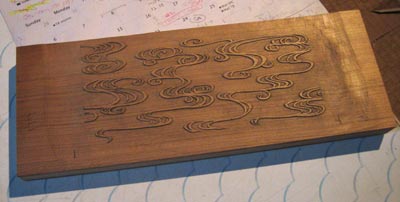
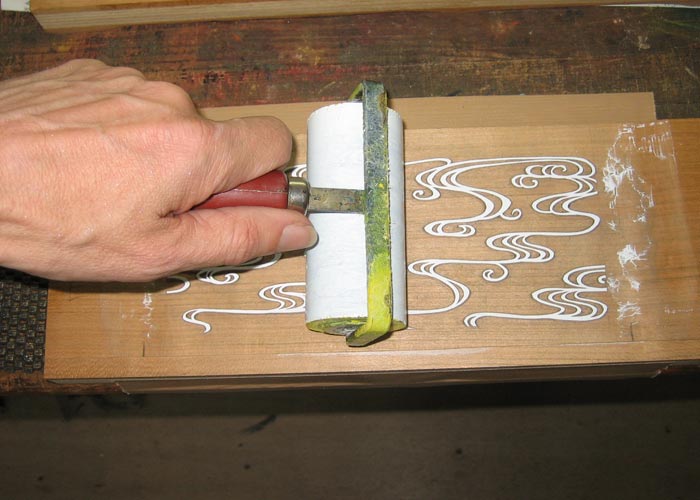
Well, today was the day to test it out. It is - of course - for printing a pattern on the book covers. There will be three such blocks carved for this project; this is the one for the 'river' episodes. Here is a sequence of photos taken during today's test run. The pattern area just 'happens' to fit the width of my best roller:

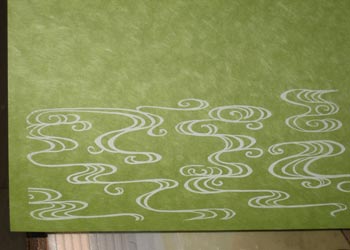
The ink is normal litho ink, in white. The paper - dry - fits into the registration mark and is rubbed the usual way:

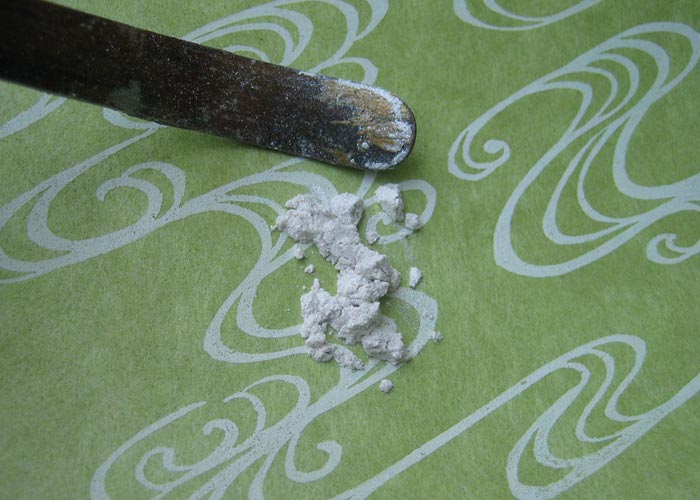
That gives us quite a nice result, but I don't want just the 'bare' white ...
So, a little scoop of powdered 'pearl' powder (seems like it might be a mix of mica and ground shell, not quite sure ...) goes on top ...

... and then gets brushed off with a soft brush:
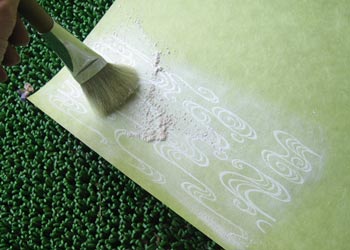
Final result is a nice sparkle to the pattern, giving - hopefully - a little bit of 'luxe' feeling to the books when they are bound!

The paper for this test is green, and this will be the colour used for the three stories set in the summer. Other colours will represent the other seasons, so the rotation of four colours and three patterns will result in all 12 books having a different cover ...
Posted by Dave Bull at 7:58 PM
| Comments (8)
[River in Summer - 11] - Texturing colour blocks
Continued from [River in Summer - 10] | Starting point of the thread is [River in Summer]
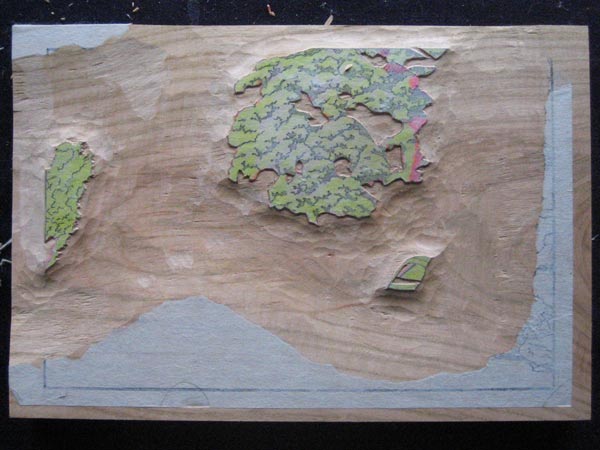
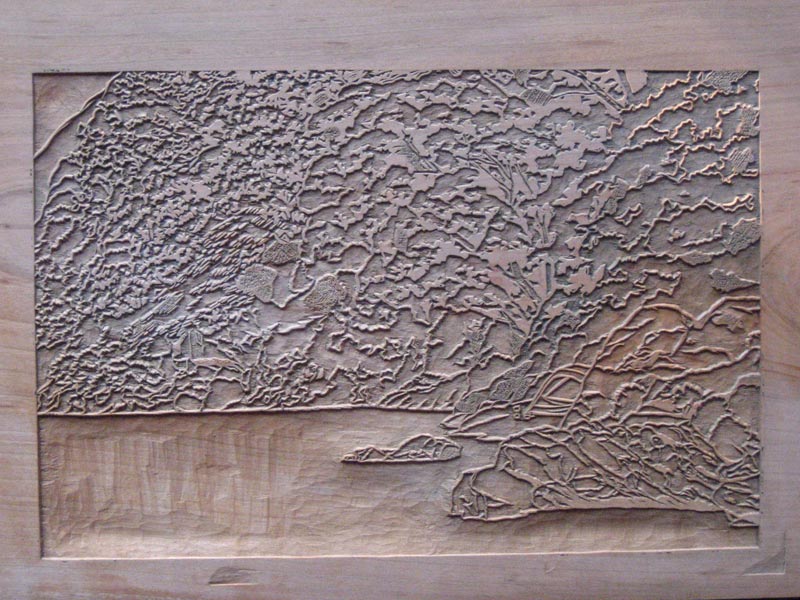
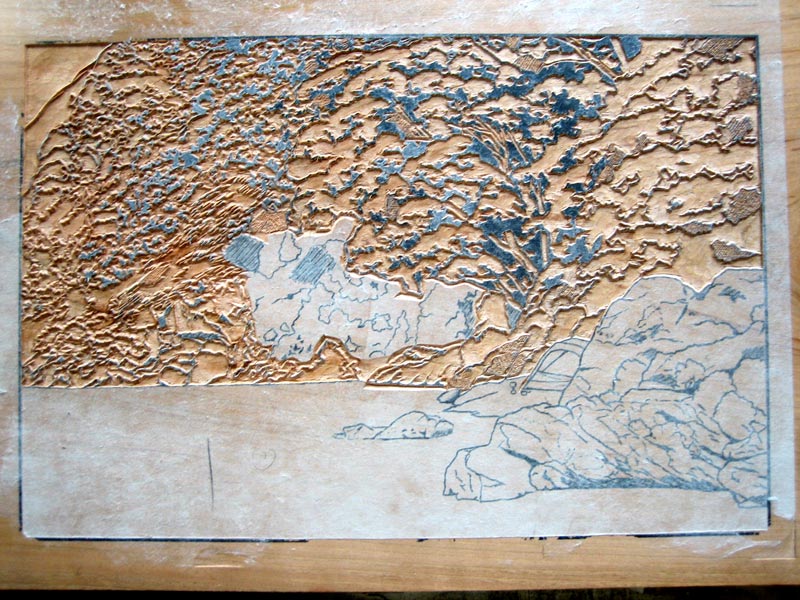
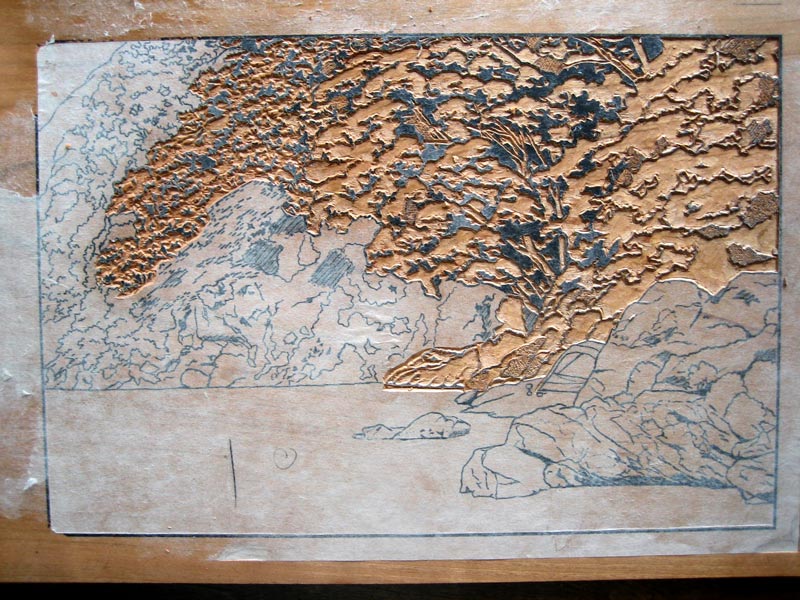
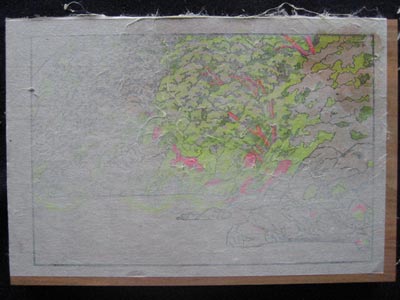
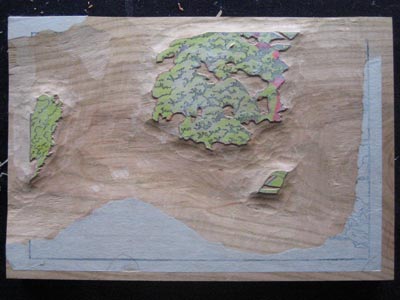
With the bulk of the carving on a number of the colour blocks now 'finished' - or approaching completion - I can start to 'play' with them a bit. Here's a block with the carving done:
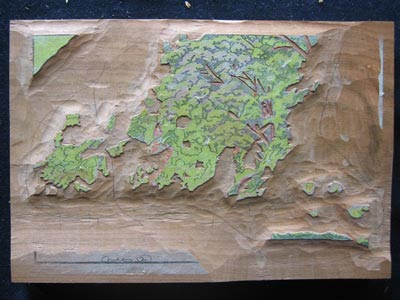
Here it is with the kyogo remnants washed off:
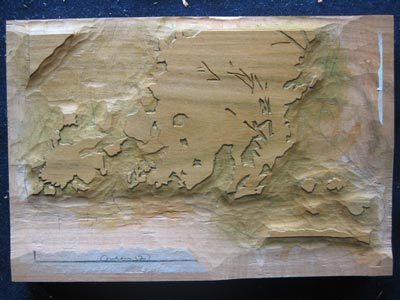
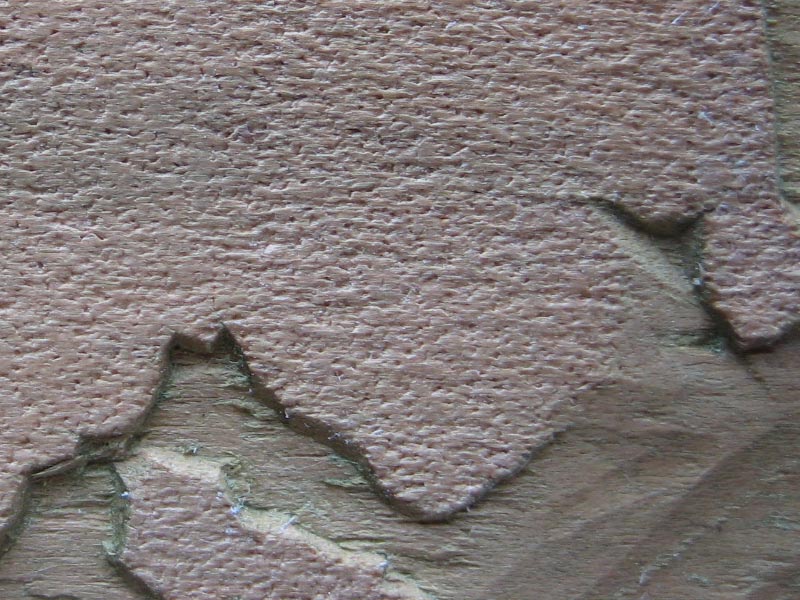
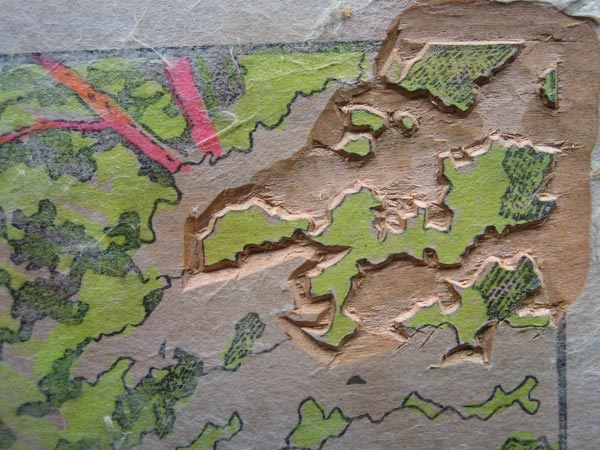
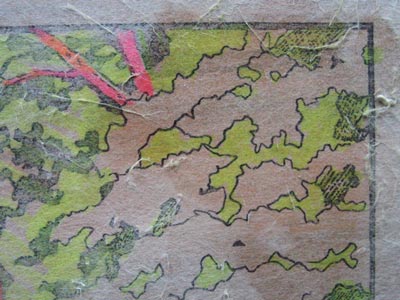
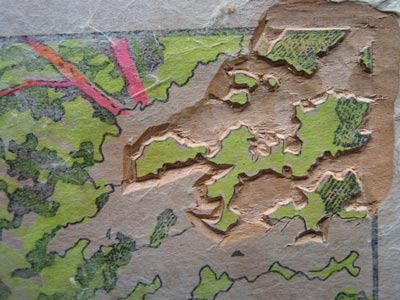
Seems basically ready for printing, and if this were a print of the ukiyo-e type, it would be. But this is a landscape image, and one with many overlays of colour. I want it to have more 'texture' than a traditional 'flat' print. So ... here's the same block - a few minutes later - after texturing:
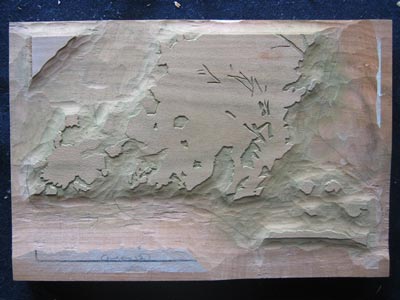
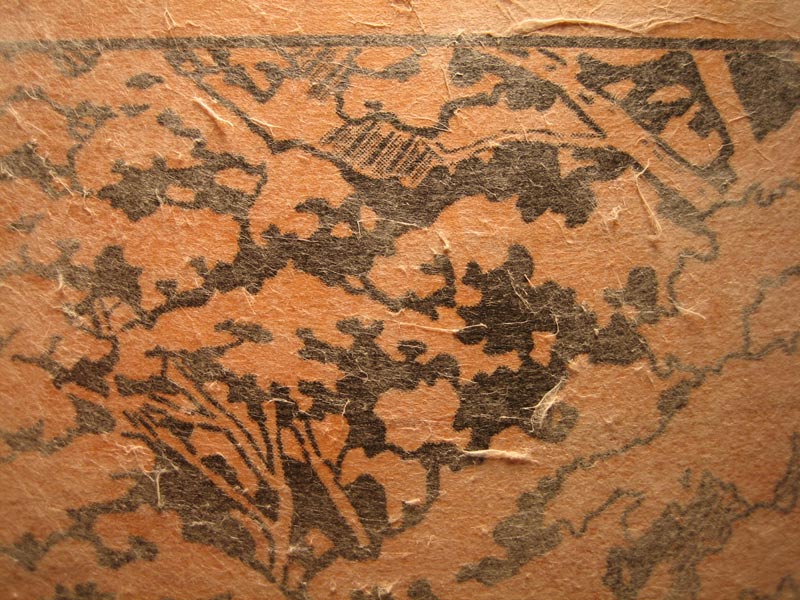
Hmm ... not too visible. Let's zoom in:
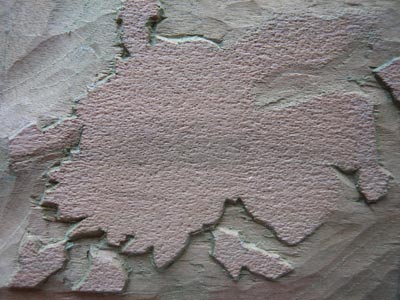
And if you click for an enlargement of this photo, you get a very close-up shot of a small area of the wood.
When printing begins, some of the impressions will be smooth and flat colour, others will be printed in a textured manner, and others will be printed from textured blocks like this. Test printing - with such an infinite range of possibilities available - is going to be 'fun'!
The thread continues in [River in Summer - 12] ...
Posted by Dave Bull at 7:41 PM
| Comments (5)
[River in Summer - 10] - Lots of colour blocks!
Continued from [River in Summer - 9] | Starting point of the thread is [River in Summer]
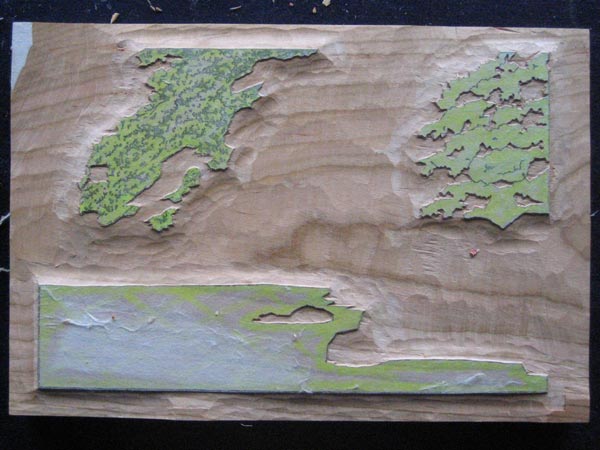
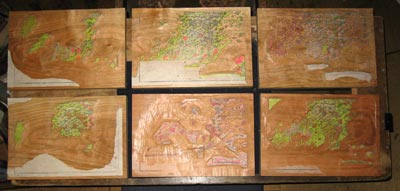
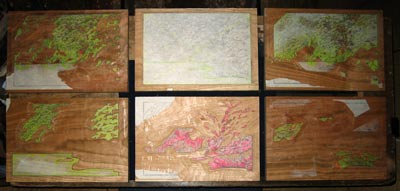
Haven't posted an update for a couple of days, but there has been plenty of work getting done! Here are a couple of snapshots of the growing stack of colour blocks. (Not great photos ... it's kind of late this evening, and it would be better to shoot these by natural light instead of under the flash, but anyway, this should serve to give an idea ... )
Six pieces of wood so far, covering most of the greenery and the rocks (more to come later for the water ...), carved on both sides (2nd photo shows them flipped over). Not all of these are actually finished; if you look closely here and there (click for enlargements), you will see quite a few areas that still need finishing work in places. I do it this way - getting them all to roughly the same stage together - so that it will be easier to compare back and forth when doing that final trimming/cutting.
The thread continues in [River in Summer - 11] ...
Posted by Dave Bull at 12:11 AM
| Comments (2)
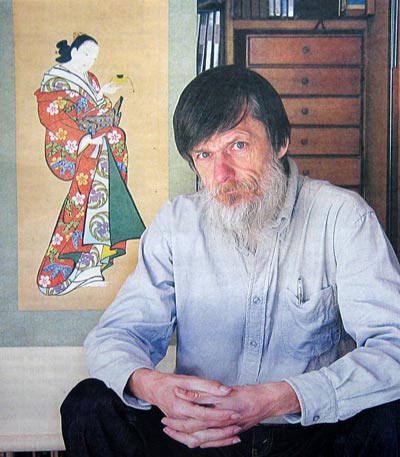
Newspaper clipping ... Asahi Weekly
The weekly newspaper 'Asahi Weekly' ran a full-page feature on my work a couple of weeks ago. The interviewer/photographer was an Austrian man living here in Japan ... unusual for me to be interviewed in English!
The story and photos are now up here in my 'Woodblock Shimbun'.
Posted by Dave Bull at 2:12 PM
| Comments (0)
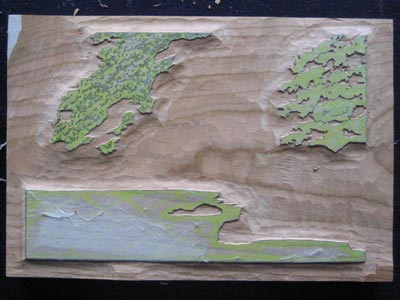
My Solitudes project ... Mystery pattern ...
Bit of a change from the colour block carving we've seen over the past couple of days ... here's the result of part of today's work ... a mystery block! What part of the project will this be for?
Posted by Dave Bull at 11:01 PM
| Comments (3)
[River in Summer - 9] - Colour block oiling ...
Continued from [River in Summer - 8] | Starting point of the thread is [River in Summer]
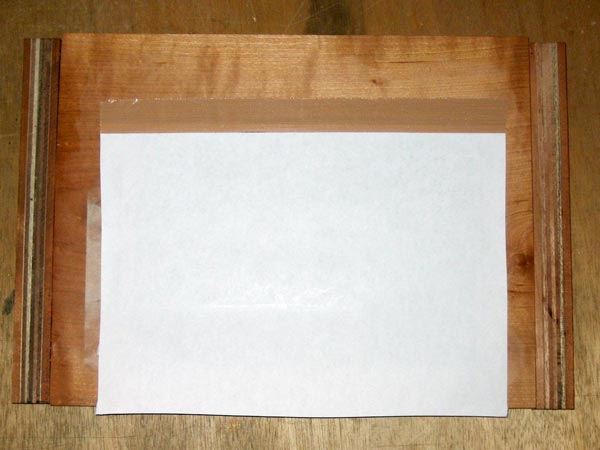
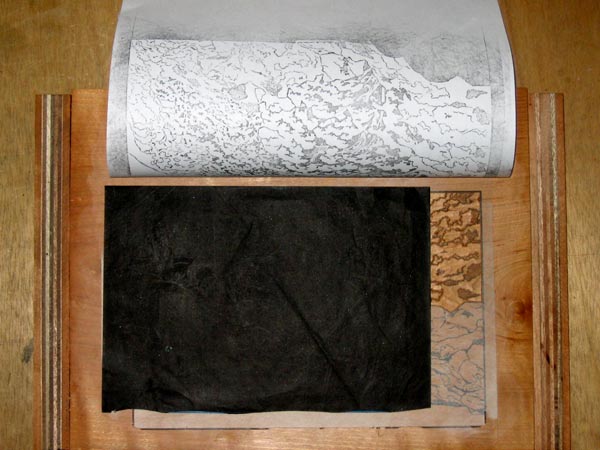
This will be the routine for quite some time now ... day after day of work on these detailed colour blocks. Here's a set of photos showing the drill ... First, the block with the kyogo pasted face down:
The lines are not so clearly visible. In the 'old days' the carvers used an extremely thin paper to make these transfers, but I have learned that I just don't have their skill at getting thin kyogo pasted down without distortion.
So I use a somewhat thicker paper - it's a type called hodomura. It seems quite dimensionally stable, which is the most important thing I want at this point. Any stretching, expansion/shrinkage, or other distortion of these sheets between the time they are printed and the time they are pasted down, makes subsequent registration impossible.
I also watch the weather. I printed these on a bright sunny day, spent the next day or so working out the separations and colouring in the required areas, and then got them pasted down before the weather changed. If I wait too long, and the weather becomes rainy, the sheets will expand from the extra humidity in the air, and I'll be in trouble.
The next step is to rub with moistened fingers, until the fibers of the paper start to pull off. (Actually, you can see in the top right corner of the previous photo, where I started to do this before remembering to take the photo first ...)
Again, this is slightly different from the procedure followed by the men in older times. They did this rubbing while the paper was still damp from being glued down; the moisture from the glue made the paper soft, and the fibres pull off very easily. Unfortunately for those of us with less skill/experience, when you rub with the glue still damp, it is very easy to cause the paper to slip slightly on the wood surface. You don't realize what you've done, but when printing begins ... oops!
So I play it very safe; I let the glue dry thorougly first, and then peel later. It's more troublesome this way, as the paper now has glue in the fibres, but it minimizes problems later. Here's the same sheet after I've rubbed away a lot of the fibres:

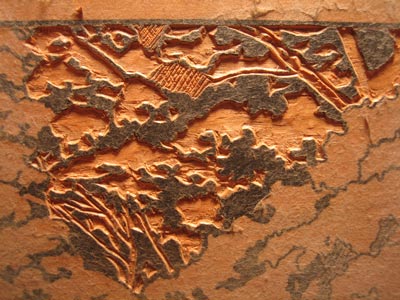
The lines are now much more clearly visible, but there is an additional step to take that makes things even easier for carving - I take a dab of camellia oil, and rub it over the area that I am about to carve:
It's not such a good idea to rub oil over a larger area, because it just starts to get a bit messy, and it can also loosen the glue holding the paper down. Just work a couple of 'minutes' ahead of the carving. Here's a zoom-in on the corner where I will start carving:
And here we are, after a few minutes work ...
The thread continues in [River in Summer - 10] ...
Posted by Dave Bull at 6:52 PM
| Comments (7)
[River in Summer - 8] - First colour blocks ready
Continued from [River in Summer - 7] | Starting point of the thread is [River in Summer]
Although all the kyogo aren't ready yet, I want to get started on the colour block carving. (While I'm working, I'll be thinking about the separations I haven't figured out yet ...)
Had a clear run at it this afternoon, so here is the first finished colour block ... one side (three colours):
... and the other (three more):
For a little 'bonus' shot, here's a closeup of the next one under way. That area of tree is about 5cm long ... it's pretty finicky work ...
The thread continues in [River in Summer - 9] ...
Posted by Dave Bull at 7:29 PM
| Comments (2)
[River in Summer - 7] - Colour separations
Continued from [River in Summer - 6] | Starting point of the thread is [River in Summer]
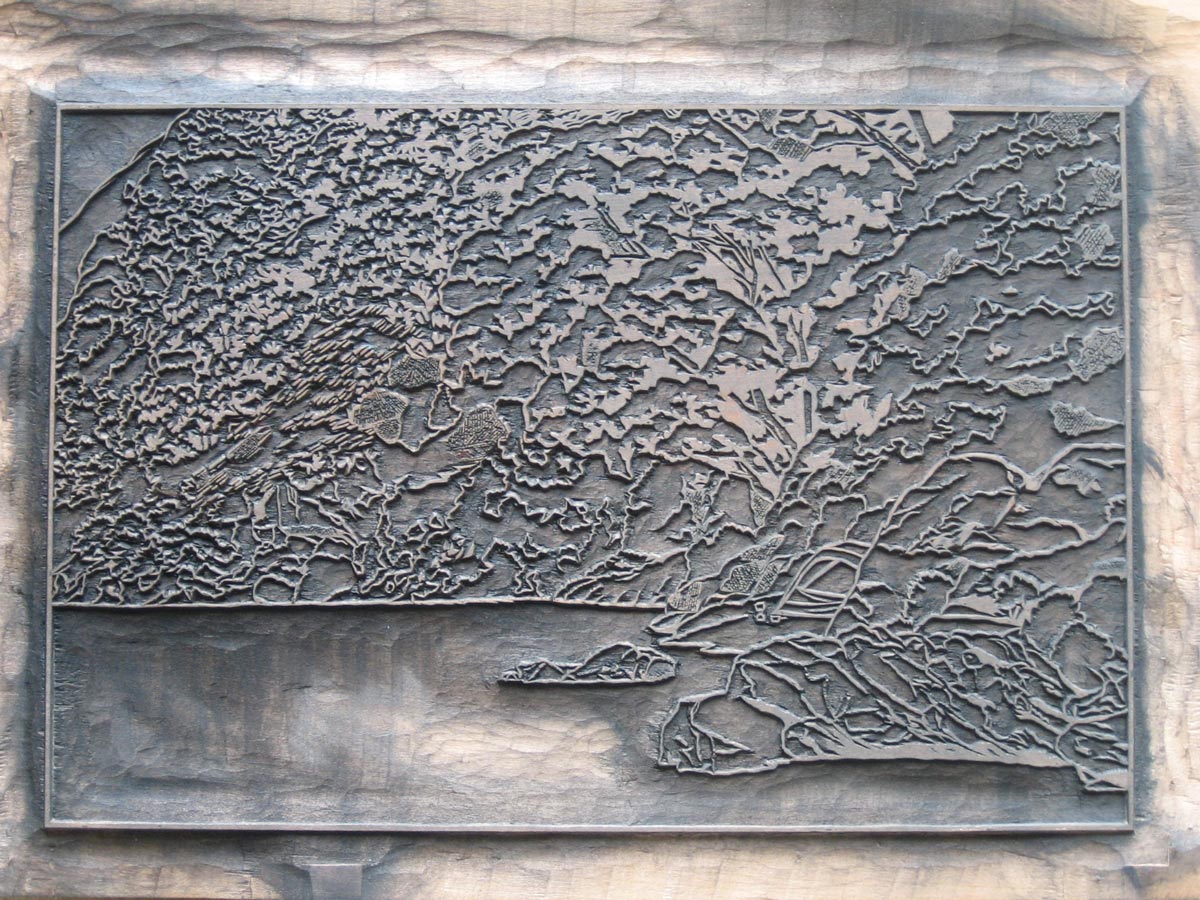
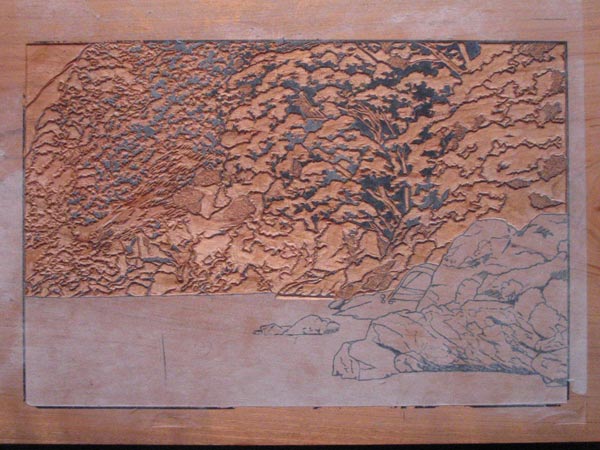
With the keyblock now finished, work on making the colour separations can begin. First step is to take a batch of impressions from the key, using a thin, strongly-sized paper. Here's the key block after this printing ... it's much easier to see the lines of the design, now that it has been inked once:
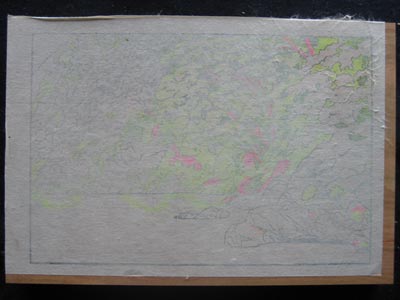
The impressions taken from the key block are called kyogo. I pull a few dozen of them, and then start to work out what colour blocks I need. I use one sheet for each colour block, using a yellow highlighter to colour in the areas that will need to be carved on each block. Here's the first batch of them - the ones covering the greenery on the mountainside (maybe around half of what I will use in all ...):
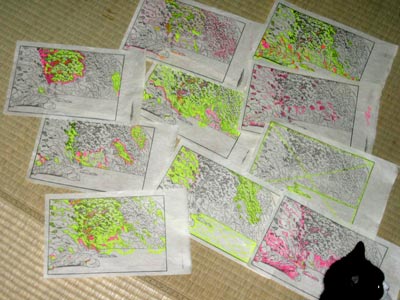
For most of these, the yellow represents wood that will be retained, while the red areas simply help make those areas more visible. But a couple of the sheets are the other way around (my red marker has a finer tip than the yellow, so I used that for some of the more detailed work). Hope I don't get them confused when I start carving tomorrow!
If you take a look at the enlargement, you should be able to see how various blocks will define particular trees (or groups of trees). Can you start to make a mental picture of what the print will look like?
The thread continues in [River in Summer - 8] ...
Posted by Dave Bull at 1:04 AM
| Comments (8)
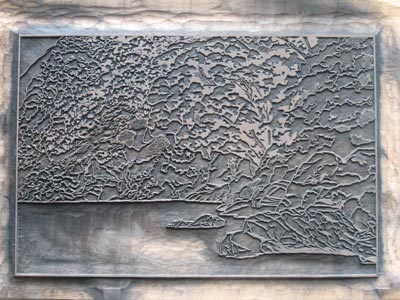
[River in Summer - 6] - Key block finished
Continued from [River in Summer - 5] | Starting point of the thread is [River in Summer]
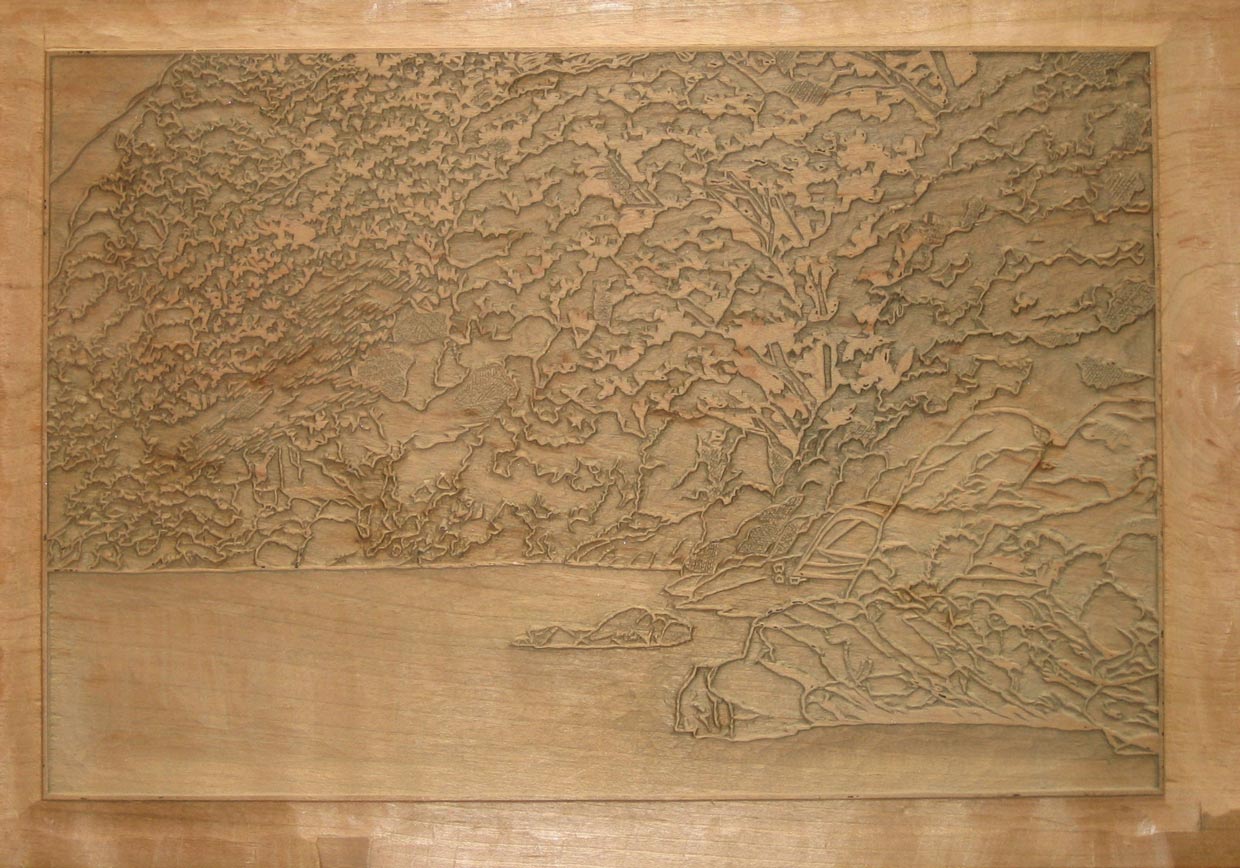
Keyblock is finished ... and waiting for the transfer printing to colour blocks to begin ... (click this image for a desktop-size enlargement!)
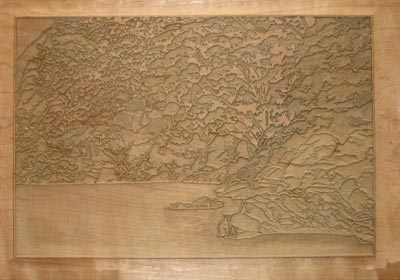
The thread continues in [River in Summer - 7] ...
Posted by Dave Bull at 9:04 AM
| Comments (4)
[River in Summer - 5] - Key block nearly done
Continued from [River in Summer - 4] | Starting point of the thread is [River in Summer]
Had a good clear run at it today, and got all the main carving on the key block done. Tomorrow, there is lots of other work waiting to interfere, but I'll try and get the outer borderline finished off then ...

The thread continues in [River in Summer - 6] ...
Posted by Dave Bull at 8:34 PM
| Comments (0)
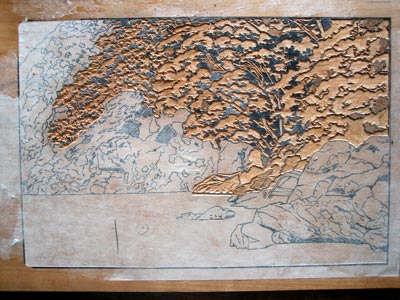
[River in Summer - 4] - Checking the carving
Continued from [River in Summer - 3] | Starting point of the thread is [River in Summer]
Here's where I got to, the day after getting back from the trip to the woods ...

It's time, I think, to check up on how the carving is actually going. I'd like to print a proof of the part I've done so far, but I don't want to get pigment all over the block. Trying to mask out the untouched areas would just be a mess, so I'll use carbon paper to pull a rough 'proof'.
First step is to tape a sheet of paper securely over the carved area.

I then slip a sheet of carbon paper between the wood and the paper ... face up. (This sheet is a bit too small, but I'll move it around bit by bit so I can cover the whole area).

Then I rub the surface of the paper just as I would when making a normal print. It comes up pretty clear, and I can get reasonable feedback on how the cutting looks:

One thing worth mentioning is that it's important to clean off the block carefully with a stiff brush before doing this. Any small wood chips left lying on the surface can make dents in uncarved areas if pressed by the baren ...
The thread continues in [River in Summer - 5] ...
Posted by Dave Bull at 8:17 PM
| Comments (2)
[River in Summer - 3] - Carving continues
Continued from [River in Summer - 2] | Starting point of the thread is [River in Summer]
Chewing away at it ...

If I had a couple of clear days, I could finish it off, but I've got to 'down tools' now, and switch over to another waiting job. The wistaria is in bloom, the forest is full of fresh leaves sprouting out everywhere, and I've got to get the 'Forest in Spring' story 'researched', so that when spring '08 rolls around I'll be ready.
The backpack is packed and ready in the entranceway, and as soon as the muffins come out of the oven, I'll be off for 24 hours up there ... Hee-hee ... time to go to work! :-)
Also, nothing to do with the current project, but just for fun ... here's a quick shot of my house this morning:
The junk in the foreground belongs to my neighbour the man who runs the noodle shop across the street. This is his parking lot, and general 'storeroom'.
The thread continues in [River in Summer - 4] ...
Posted by Dave Bull at 1:31 PM
| Comments (3)
My Solitudes project ... Foreword now online ...
Just a quick note ... the Foreword to the My Solitudes book - introducing the concept - is now uploaded to the site ...
Posted by Dave Bull at 11:36 PM
| Comments (0)
[River in Summer - 2] - Carving continues
Continued from [River in Summer - 1] | Starting point of the thread is [River in Summer]
After another day's work, we've come this far ...
I had mixed feelings about how much of the image I should show at this stage, but decided 'what the hell', why not let them see it. I think that people will have varied reactions; I've already had experience here in my room of people seeing it and saying "Eh? Is that it?"
The subsequent conversation goes something like this (this is imaginary, but you get the idea) ...
Dave: "Yep. That's it. But remember ... there are many things that you can't see there yet ... none of the beautiful deep colours in the water, or the multiple layers of vegetation. So of course it looks boring still."
Guest: "But just a minute; don't you remember telling me a couple of years ago about 'the line?' You were adamant that even before any of the colours were applied to a print - when nothing was visible but the outlines - that the 'heart' of the image was already present!"
Dave: "Yes, of course I did ... and I was telling you the truth! But remember that we were talking about ukiyo-e. For prints in that genre, the line is indeed the most important thing, and all else can be considered almost decoration. But this is not ukiyo-e, this is more along the lines of a shin-hanga print. I'm not about to pretend that the 'line' ... the core image ... in such prints is not important, but it absolutely plays a more subservient role. (And indeed, in some cases, the outlines are printed so lightly that they may be almost invisible.) Shin hanga is not about 'line'; it is about atmosphere ... light ... and depth. And none of those things are present yet."
Guest: "Well I don't know .. Of course I'm trying to see it that way - I can imagine the blue water, the green trees, the grey rocks ... But even so, it still looks pretty boring."
Dave: "Hee-hee! Yes, I can tell you - the photographs of the river scene that I took on a recent trip down there are coloured pretty much just as you describe ... and yes, they are very boring. But when I sit down with my brushes and barens, it will be my job to pick up where 'boring' reality leaves off. I don't want to 'give away' too much yet, but as you see this block coming clear bit by bit over the next few days, try and see the scene at 4:30 on a summer morning ... the sun has just poked up over the mountains off to the right somewhere ... Atmosphere ... light ... depth ..."
Guest: "OK ... I get the idea. We're waiting!"
The thread continues in [River in Summer - 3] ...
Posted by Dave Bull at 12:49 PM
| Comments (5)
[River in Summer - 1] - Carving begins
Continued from [River in Summer]
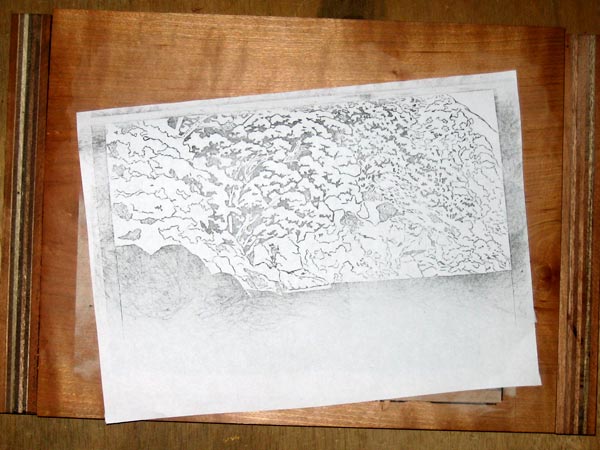
Here are the first images of the carving process. The hanshita (the sheet containing all the outlines of the design) is printed on a tissue-thin gampi paper, as outlined in a set of process photos that I prepared for a simple print many years ago. I use spray adhesive to 'tack' a sheet of the extremely thin gampi to a sheet of normal copy paper, and then print the image onto this laminate.
The laminate is then pasted face down onto the cherry wood, and the copy paper peeled away, leaving the gampi securely in place. After the glue is dry, the paper can be gently rubbed with a moistened finger, to peel away some of the fibers, leaving the image clearly visible.
Here's a closeup of one part of the image; you can see where I have rubbed ...:
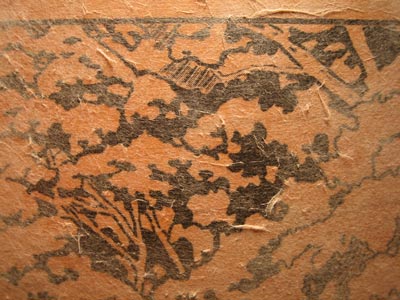
It's possible to get the image even clearer, by dabbing a tiny touch of camellia oil onto the surface, making everything transparent ...:
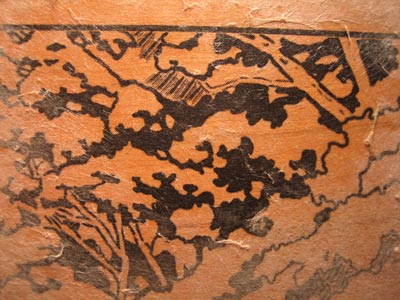
And ... an hour or so later, here's what she looks like ...
The thread continues in [River in Summer - 2] ...
Posted by Dave Bull at 2:02 AM
| Comments (2)
[River in Summer] - How the print is made
Over the next six weeks or so, I am going to show the complete process of how one of my woodblock prints is made. The print in question is the first one from my new 'My Solitudes' series - the River in Summer.
We're going to start here - with the basic outline drawing:
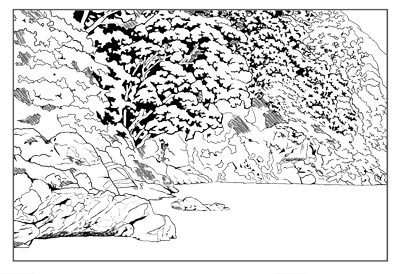
That doesn't look like much yet, but six weeks is a long time, and there are going to be a lot of steps along the way. Here's an outline of what to expect:
- This drawing will be pasted onto a plank of wood.
- I will then carve the design, taking away all the surrounding wood, and leaving just the lines standing.
- From that completed 'key block', I will pull a number of impressions on thin paper.
- Using one of those 'prints' for each colour that I wish to appear in the completed print, I will mark them up as a guide for how the colour blocks should be carved.
- Those sheets are then pasted down on fresh pieces of wood, and carved.
- Once the complete set of blocks is ready (around the beginning of June), I will start printing.
- The key block will be printed first, and then the colour blocks one by one (maybe around 30 of them) until the complete image comes together.
- To produce the 200 prints that I plan to make of this design, will take around a month of printing.
I hope you enjoy following along with me, as the print comes to life over the coming weeks ...
The thread continues in [River in Summer - 1] ..
Posted by Dave Bull at 3:49 PM
| Comments (2)
My Solitudes project ... off and running!
After a month or so of preparation, today saw the first work actually involving wood!
The first chapter of the book is written and now being translated by Sadako; the book design is pretty much finalized; the paper(s) for the books have been selected and ordered; the heavy paper-folding machine arrived last week (for use in the bookbinding stage), and the jigs that Ichikawa-san will use to sew the books together are built and ready for testing ...
Let's see ... what else was there ... ?? Oh yes, the first design is down on paper!
I'm not going to put that out here in public just yet - you'll have to let me get a bit further along first - but I do intend to be showing plenty of the process as we go along, so you'll have plenty of chances to see it ...
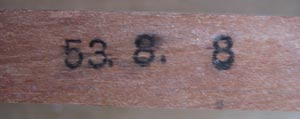
The process starts with the bare wood of course, and the plank I've selected for this print is a bit special ... it's a piece I've had for nearly 30 years!
On one side of the wood there are two 'stamps'; one is the date - 53.8.8 (that's August 8th 1978 ... Showa 53), and the second is the mark of the publishing house Yuyudo.
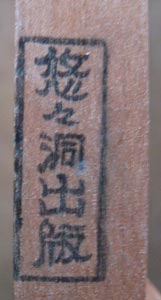
So what's this all about?
On my first trip to Japan, back in the winter of 1981, I visited the Yuyudo company and met Saeki-san, the owner. The purpose of my visit was two-fold: in a display in a department store I had seen the Okada Yoshio prints that Yuyudo had published, and wanted to purchase a set, and I also wanted to glean what information I could about printmaking. At this time I had only made a couple of test prints (back in Canada), and was a bit desperate to learn more about 'real' printmaking.
Anyway, long story short, I did get the prints that day, but Saeki-san also let me purchase a few planks of wood from his stock - a very nice gesture indeed. Upon my return to Canada, I used these planks for my next printmaking attempts, and then put the blocks aside ...
The years went by ... in 1986 I moved to Japan to get serious about learning printmaking, but left nearly all my possessions in storage back in Canada. Sometime in the mid 1990's I had them all sent over ... books, musical instruments, tools, etc. etc., and ... a box with the blocks used for those early printmaking experiments.
More years go by, and the blocks quietly sleep in their box ... until last year, when I was going through some of the boxes and came across them. The carving is rough and amateur, and there is no point at all in preserving the work, but the wood! Saeki-san really gave me good stuff! I hadn't realized it at the time, but the wood is dense, fine-grained, and well seasoned. It is also thick enough to allow them to be re-used, so that is what I have done.
I got my planes out, and selecting one of the planks, cut away the carved part of one face, planing down until I reached a flat surface of untouched wood. I then dressed it smooth with a scraper blade, and here she is ... a beautiful piece of cherry, nicely seasoned for nearly thirty years!
(It's interesting to think about somebody coming across this block many years from now ... a design by David purportedly published in 2007, but the evidence of this mark would seem to imply a Yuyudo edition of the late 1970's ... I guess they'll have fun trying to figure it all out!)
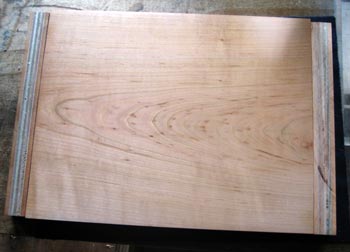
Because of the planing, it's now a bit thinner than usual, so to avoid warping problems once I start printing, I've screwed a piece of wood to each end of it. I've made these a bit large on one side, so they will keep the underside of the plank also safe from scratching.
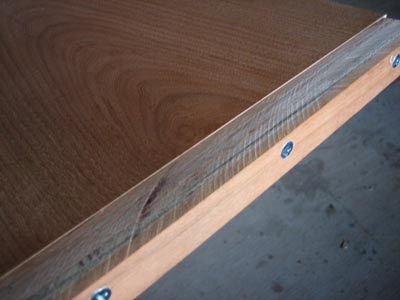
Next step will be to paste down the tracing and get carving!
Posted by Dave Bull at 8:15 PM
| Comments (1)