Posted by Dave Bull at 1:04 AM, May 16, 2007
Continued from [River in Summer - 6] | Starting point of the thread is [River in Summer]

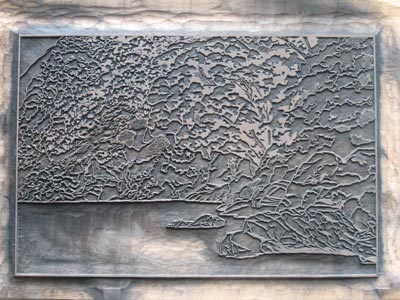
With the keyblock now finished, work on making the colour separations can begin. First step is to take a batch of impressions from the key, using a thin, strongly-sized paper. Here's the key block after this printing ... it's much easier to see the lines of the design, now that it has been inked once:

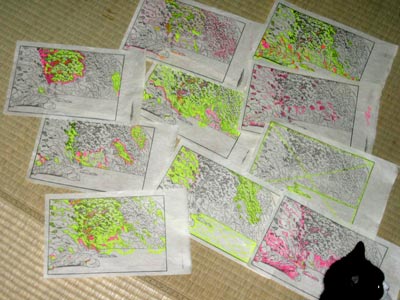
The impressions taken from the key block are called kyogo. I pull a few dozen of them, and then start to work out what colour blocks I need. I use one sheet for each colour block, using a yellow highlighter to colour in the areas that will need to be carved on each block. Here's the first batch of them - the ones covering the greenery on the mountainside (maybe around half of what I will use in all ...):

For most of these, the yellow represents wood that will be retained, while the red areas simply help make those areas more visible. But a couple of the sheets are the other way around (my red marker has a finer tip than the yellow, so I used that for some of the more detailed work). Hope I don't get them confused when I start carving tomorrow!
If you take a look at the enlargement, you should be able to see how various blocks will define particular trees (or groups of trees). Can you start to make a mental picture of what the print will look like?

The thread continues in [River in Summer - 8] ...
Dave,
You cannot imagine how much fun it is to watch this happening...I am eagerly awaiting each day to see if you have uploaded any new info....Seems like the old days when the site for Woodblock.com and the Baren were "young". I have really missed seeing your work come together like this...I guess it was because it took so long to do the scroll. At any rate, I am hooked, like usual.
Barbara

I guess it was because it took so long to do the scroll
Tell me about it! My chisels are rusty ... I'm rusty ... I've almost forgotten how to do this!
It was late last summer when last I did any block carving like this, and it's taking a real effort to get back into the swing of things. But with 12 prints in this series, and each one taking a zillion blocks/impressions like this, I guess it won't take too long to get back in harness!

Beautiful, Dave...
So will you be cutting a total of 10 more plates? Or can some of these areas be printed on the same plate? Thank you for a wonderful tutorial!
Diane

So will you be cutting a total of 10 more plates? Or can some of these areas be printed on the same plate?
At the moment, I'm thinking that there will be 8 pieces of wood, 7 of which will use both sides, giving 15 'plates'.
As you can see from that photo, most of the kyogo are pretty 'full', and there isn't really any way to combine them on a single piece of wood. But plenty of 'combining' has already been done; if you look at the sheet at the top left of that photo, for example, it has _three_ different colour areas: the large tree, a smaller tree, and the tent. These will be printed in different colours, although two of them (I can't usually handle three together) may be printed in one pass.

I agree with Barbara, this is really fascinating, Dave, like a daily tutorial.
Your cat seems to like it too!

I don't have a cat ... That's Boots-chan! (Although seeing her here in this photo doesn't count towards the contest!)

So much fun to watch! Will you keep all of the linework on the final keyblock, or will you carve some away? (Sorry if I'm rushing the story!)

Will you keep all of the linework on the final keyblock
Answered here.


