« April 2011 |
Main
| June 2011 »
Sizing update - another setback
In the previous 'episode' of this quest to find good materials for the paper sizing, I talked about some glues that I obtained from overseas. I mentioned that I would use them in some tests, and can now report (on the first glue).
It's going to be 'no go'.
When I ran the second batch of the Mystique #13 print, I used my normal nikawa for most of the paper, but took the opportunity to also test one of the imported products. After sizing the first 50 sheets, I cleaned up the left-over size, mixed up a fresh batch using the jelly-like hide glue ...
... and used that for the final 10 sheets.
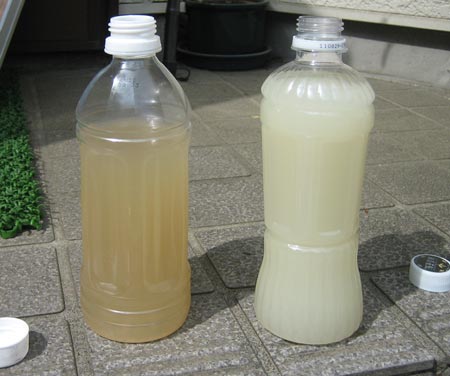
I had no idea how to formulate the mix, as the strength of this 'concentrate' was completely unknown. I assumed that because it was jelly-like, and fairly soft, it must be quite a bit more dilute than the hard granular nikawa, so I doubled the amount (measuring by weight) to: 1 liter water, 85gm jelly, 9gm alum.
It melted very easily and smoothly, in just a few seconds (at 50 degrees centigrade). The overall appearance of the liquid was quite different from the usual nikawa mix (on the left); this was a bit milky (the bottle on the right), not the usual light brown.
But it felt reasonably 'sticky' to the touch, so I went ahead with it. After all 60 sheets were dry, I cut them in half (lengthwise) to make 120 printing sheets, put nail polish on the registration corners, and prepared them for printing. (The ones done with the experimental sizing were identified by a small mark I made on the back, and these were positioned as the final 20 sheets in the stack.)
As those of you who watched the Webcam during those sessions know, there was a very dramatic difference in the way that those sheets behaved during printing.
They 'took' the water in pretty much the same way as all the others in the stack, but when it came time for the first impression, it was clear that these were going to be different. They were soft. Soft. Soft. Soft.
(At one point later in the process, this message flashed by on the webcam Message Board:
... hope we don't get another episode of Dave saying, "Whoa, that's soft!!!" ;-)
But as excessively soft as the paper was, it still took the impressions ... and perfectly. Only a very light touch on the baren was needed, and the pigment was taken up very smoothly. The paper was a bit difficult to handle, but the nail polish did its job, and the registration was also perfect.
So at that point, the experiment was looking like a complete success. The glue was working, and it would be easy to adjust the mix next time to perhaps make it a bit stronger, if that seemed to be necessary.
We step ahead to the third day of printing. I came down to the workshop as usual, mixed up the colour for the green impression, and began work. The first 100 sheets (the ones with the 'normal' sizing) passed by with no trouble, but when I flipped over the interleaving newsprint to expose the final group of 20 sheets (the ones with the experimental size), I saw trouble. Big trouble.
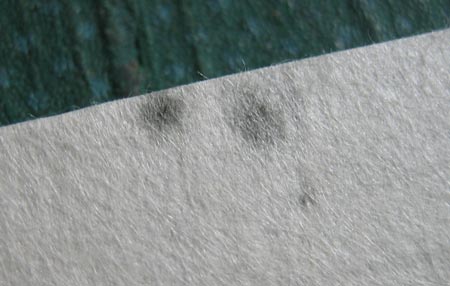
The sheets had become moldy overnight. Not 'all over', but just at the far left and right edges, well away from the printing area.
First thing to do was protect the rest of the stack, so I instantly took out the 100 earlier sheets, wrapped them in fresh newsprint, and got them upstairs into the freezer, where they could wait safely while I figured out what was going on with the others.
It was really quite puzzling. Mold normally begins to form (if you have been careless with time/temperature/etc.) on areas of the sheet that have received heavy impressions. And it is nearly always detectable first by smell, well before it becomes visible.
But this fit neither of those patterns; there was absolutely no odor, and the mold was limited to the extreme edges of the sheets. Now although these sheets were at this point 'dead', and could never be issued as prints, I quickly went through the rest of the impressions with them, and set them aside to dry. The next day, after cleaning up around the workbench, I retrieved the other sheets from the freezer, let them defrost, and finished them off. They showed (and show) absolutely no trace of any kind of mold, nor have any odor. I think they are 'safe' to go out.
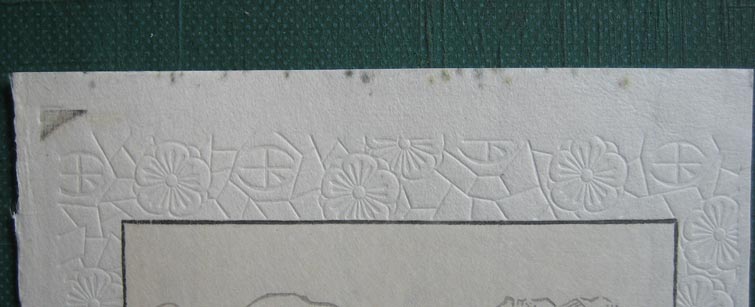
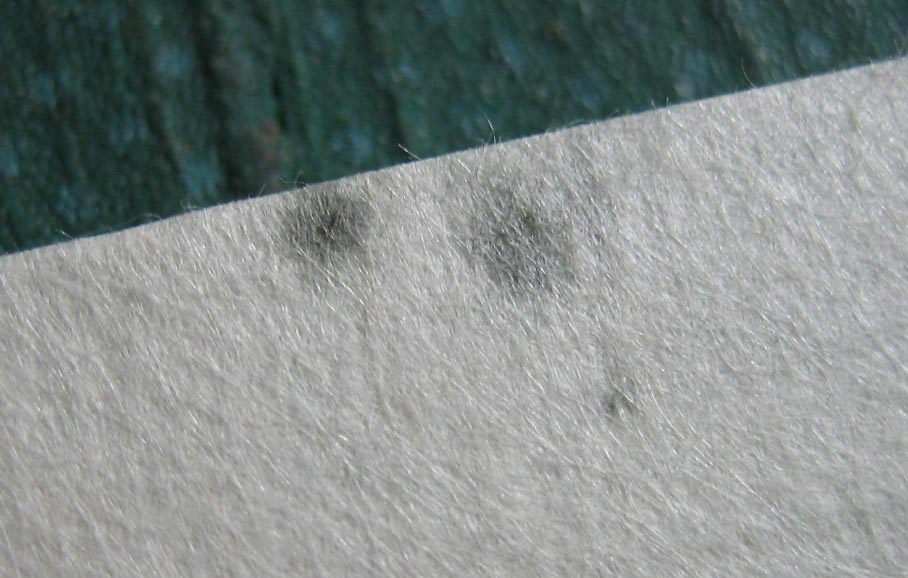
So let's have a look at some of the bad sheets. Here are the worst ones:
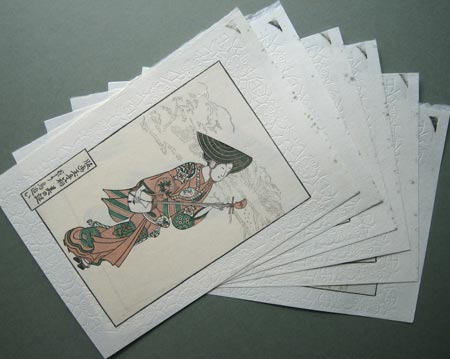
A bit closer (clickable):
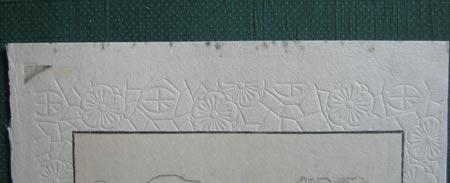
And ...
When we look closely, we see that the mold seems to be coming up from inside the paper; it is not something lightly dusted on top. It is clearly not coming from the newsprint. And given that none of the sheets in the rest of the stack show any traces, it is pretty clear that our hide glue must be the cause.
The most reasonable assumption would be that whereas the Japanese nikawa is prepared in a fairly hygienic environment - which would make sense given that the makers know that it will be used in the preparation of what are intended to be long-lasting works (prints and paintings) - the hide glue from overseas - which is intended to be used as glue - was perhaps prepared under 'standards' that are fairly loose. Hygiene is probably not important to the people who prepare this product, and it seems that the block of jelly is actually full of mold, and who knows what else. There is no practical way to sterilize it, as the use of high temperatures (boiling, etc.) would destroy its function for sizing.
So out it goes.
Next month, I'll run another test, using the granulated form:
But I'm going to be very much on the lookout for trouble, you can be sure!
Posted by Dave Bull at 1:59 AM
| Comments (15)
Woodblock Webcam - now with 'full size' video
The 'new improved' Woodblock Webcam has had yet another update today - the size of the video window has been increased, and viewers now see a 'full' 640 x 480 image (click this to see the actual size of the new video feed).
It's not HD (yet!), but the larger screen makes it even easier to watch what is going on. I hooked up a new microphone too, and the sounds from the bench are coming through very clearly, at least according to a report from one viewer: "I can hear your brushes, the knife, peeling the paper off the block, the rustle of the plastic when you grab or put away a sheet of paper. Excellent!"
Posted by Dave Bull at 6:41 AM
| Comments (4)
Mystique Series #13 : proofing questions
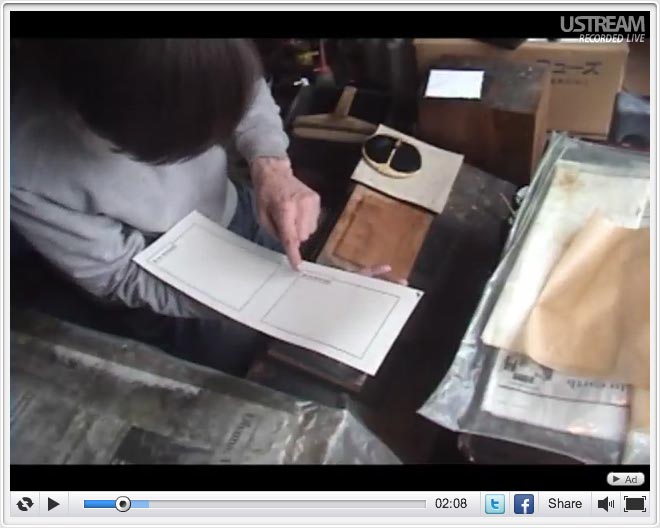
Apologies to those who wanted to watch a 'replay' of this morning's Woodblock Webcam session - proofing Mystique print #13. In the kerfuffle of getting the new microphone set up and balanced properly, I neglected to hit the 'Record' button, so when it came time to turn it off an hour or so later, found that it had been off all along ... But there will be many more chances to come, and in any case, the proofing on this print wasn't much to see - mostly a simple registration test really ...
As I mentioned during the session, the main question with this image is which of two very different approaches to take with the colour mixing.
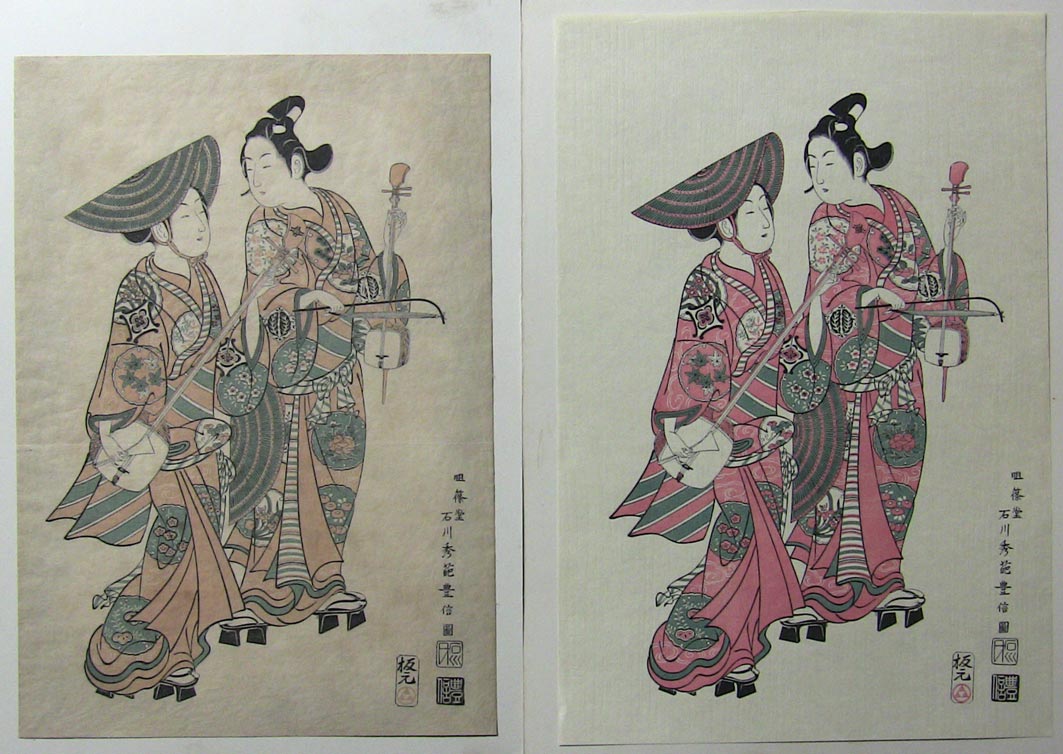
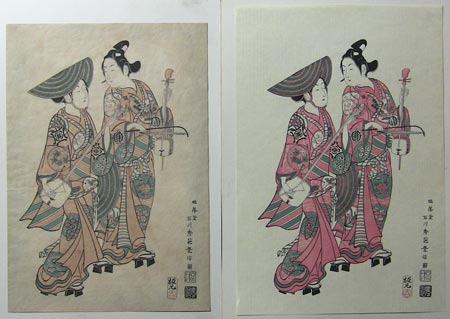
Have a look at these two prints (these images are all clickable) - on the left is a version of the Toyonobu print issued by the Takamizawa Company, sometime in the pre-war period (1920s ?), and on the right is one published by the Adachi Company, post-war (late 70s I would guess):
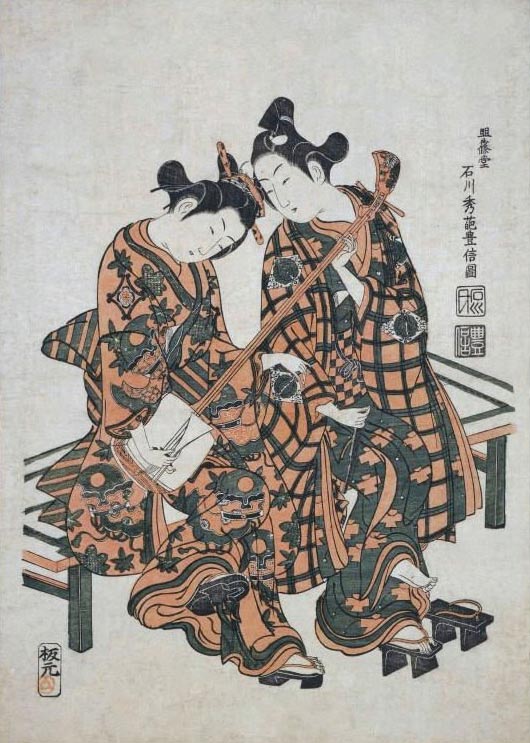
Now I don't have a decent image of the original for comparison, but here are two other benizuri-e (originals), both by the same designer, and both issued by the same publisher, in the same era. And one of them is even of the same two kabuki actors in the same scene from the same play (although with them seated instead of strolling):
As you can see, there was no 'standardization' of the tones and tints used for the two colours. And indeed, the word beni here is obviously being used in a general sense, and not with particular reference to the substance itself (the actual rose/red pigment used for makeup, kimono dyeing, etc.), because neither of these seems to have used it.
I think all this leaves me with a pretty free hand to basically do whatever I want here, without stepping on anybody's toes. So let's look back at the two reproductions, and consider the different approach that the two publishers have taken.
Although it seems to have been different in the pre-war period, Adachi's 'policy' in modern times has been clear - make prints that are as close in appearance as possible to what the original would have looked like at the moment of original publication. Bright unfaded colours; crisp white paper.
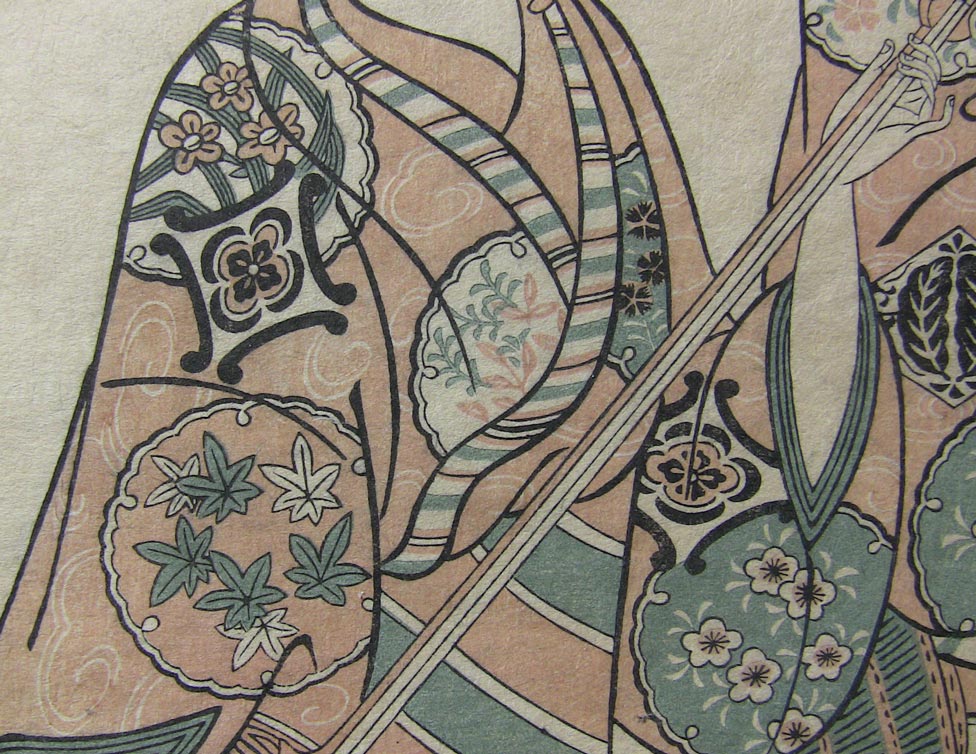
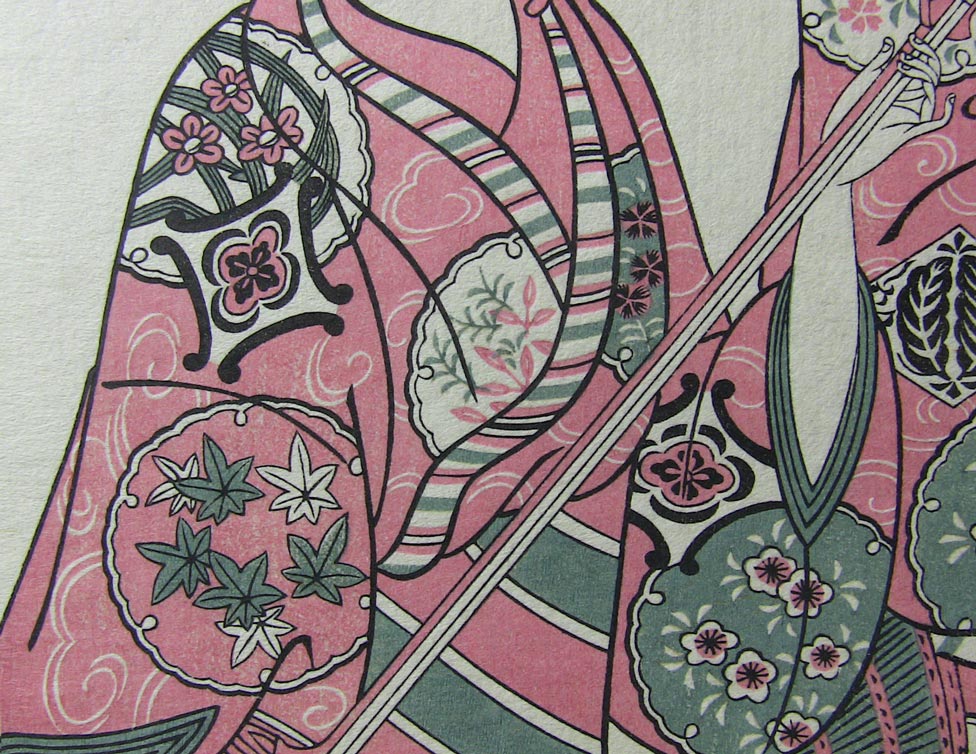
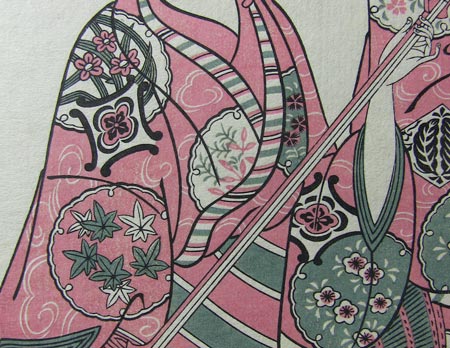
Takamizawa, on the other hand, clearly took another tack - make prints that, from the start, invoke the feeling of ineffable beauty that comes after 'some' time has passed. We clearly see the difference in the results in the first image above; the Adachi print is clean and bright, and the Takamizawa version is much more subdued. Here are closeups of the same area on the two prints:

Now back in Meiji times, there was a very big business in creating artificially 'antiqued' prints - taking reproductions, ageing them to look like Edo period originals, and foisting them on unsuspecting foreign buyers. There were many special techniques for this, involving the use of certain plum juices, dusting with cobwebs, etc. and etc. This is not what we are talking about here. Takamizawa was not taking a finished print and making it look old, they were simply trying to produce work didn't have the 'rawness' normally present on a new print.
Most of the people I have talked to about this clearly show a preference for the Takamizawa approach, but there is one very large problem with it. When you make your print look a hundred years old at the time you send it to your customers, what happens when a hundred years really have passed?
The answer of course, is that it ends up looking duller, gloomier and more faded than it should. And actually, that's what we are seeing in our sample above, which has had an 'extra' 100 years or so tacked on. At the time it was issued, it must have been quite a bit less 'gloomy' - nothing like the Adachi version, but perhaps something in between.
So the question now becomes, "Who are these prints for?" I have joked many times (it's not a joke!) that my collectors are not buying the prints for themselves, but for their grand-children. I tell people, "If you think my prints are too bright and clean, then just grit your teeth and wait ... Somewhere just around 100 years or so will do nicely!"
Anyway, to the question at hand, which of the two approaches will I take? As those who watched the proofing session this morning already know, I am giving my print the more gentle and 'toned' style of Takamizawa, but without - I hope - the gloominess. I'm going easy on the amount of sumi I drop into the colour bowls, and will use only a very light toning on the background. I think I can walk a good balance between the 2011 collectors and their heirs!
Printing will begin tomorrow morning ...

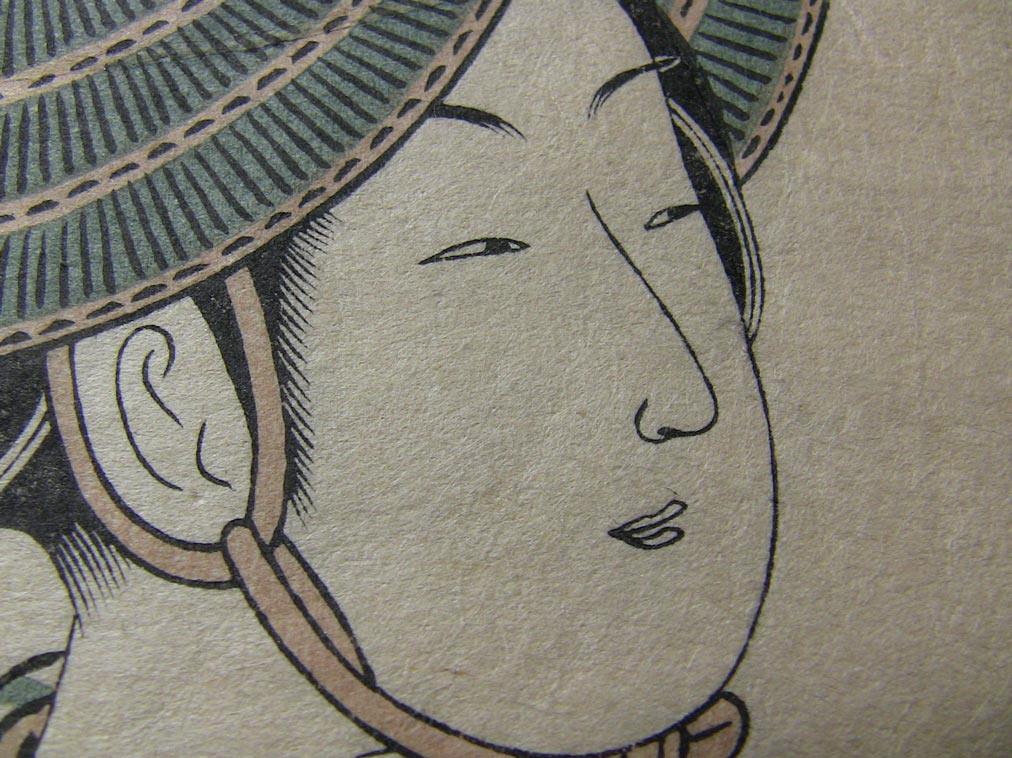
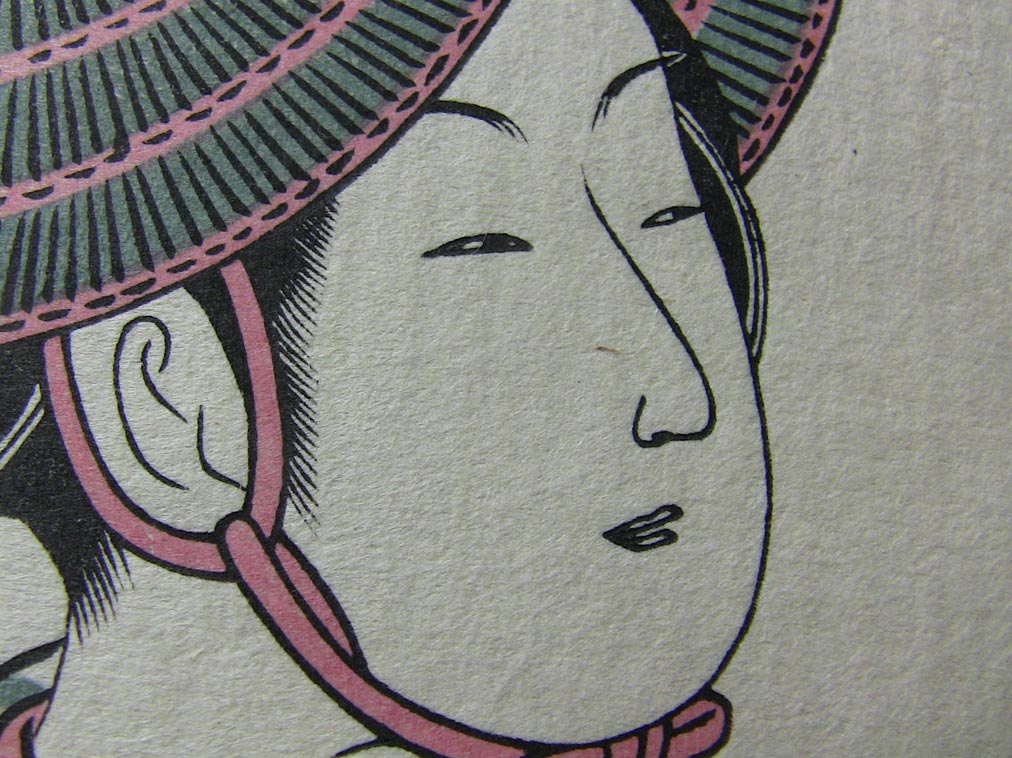
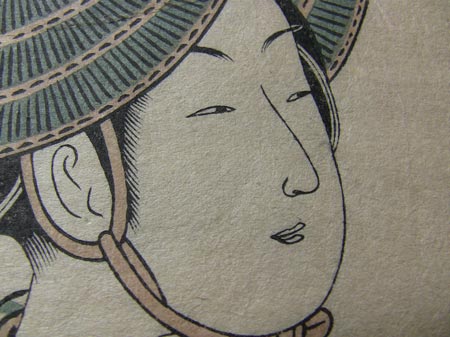
Got time for a bit more? Here are a couple more closeups:

What we're seeing here is not 'philosophical' difference in style, but an out and out collapse of craftsmanship. From 1920 to 1970, that's what happened. (Remember, these are the two 'biggest names' in the business here, both claiming to be inheritors of the old traditions.)
Posted by Dave Bull at 4:49 AM
| Comments (5)
Glue and Sizing questions ...
It has been nearly a year since I made the decision to take on the job of sizing the paper for my printmaking. As I wrote early last year, the quality of the sizing work from the professional workshop I was using had degraded to the point where the paper was becoming unusable, so I felt that I had no choice. Last summer I prepared some tools and materials, made some initial experiments, and since then have been sizing the paper batch by batch for each particular job that comes up. So far, so good. Problem faced, problem basically solved.
But a couple of months ago I got a phone call from printer Numabe-san that seemed to put me back to square one.
He was calling to let me know that he had just heard that the prime company supplying nikawa ( 膠 ), Japanese gelatine glue [reference], had gone out of business. When I didn't react particularly strongly to this news - after all, I hear that sort of thing all the time - he reformulated it, saying something to the effect of, "Dave, you don't understand. Not just the major nikawa supplier, the only one."
Even so, at first I didn't quite believe him. After all, nikawa is used in many other fields, not just printmaking. It is very important in Japanese traditional painting, lacquer work, doll making, etc. and etc. Surely this was not a case of a company folding because of a lost market. But it turned out that his news was correct. I called Misawa-san - the man who used to do my sizing - and he at first thought that this news was not credible, and that I must have misunderstood. He called back not ten minutes later; it was true. The company, his only supplier, had disappeared, and without giving him a chance to stock up.
That was all some months ago, and since then this news has buzzed and buzzed around the world of traditional crafts in Japan. Nobody seems to know just what happened, but it also seems quite clear that the company isn't coming back. Phone calls to all sources of nikawa all meet with the same response, "Sorry, nothing here".
I have on hand enough nikawa to last me (probably) to the end of the Mystique series, although if I use some of it for the new Senshafuda project, it may not actually last that long. Time for Plan B.
And Plan B might actually be quite simple. A million years ago, give or take a few years, I used to make guitars. As is the habit with violin makers (as I understand it), at least one 'face' of the instrument has to be glued in place with a reversible glue, to allow access to the interior of the instrument for maintenance and repairs. The glue for this has traditionally been one or another of the various hide glues, with 'rabbit skin glue' being the most common. I remember these quite well, and it seems to me that the composition of those glues was not all that different from our nikawa.
A bit of online research seems to confirm this; they are all basically the same thing - animal collagens. When used as glue, they are obviously mixed in a stronger form than we do for sizing, but it certainly does seem to be the same basic product.
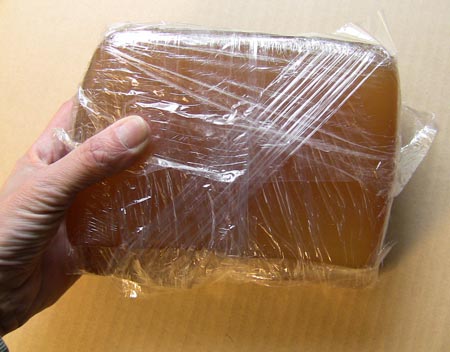
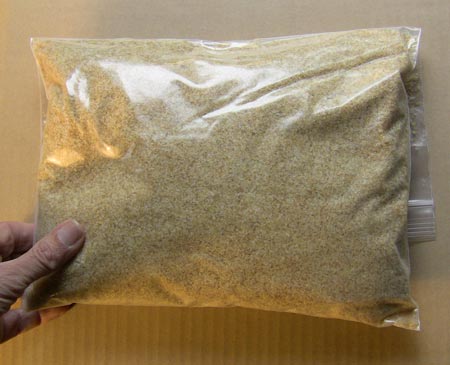
So I searched a few overseas suppliers of materials for musical instrument makers, found some hide glues, and placed some orders. A couple of the samples have now arrived, and - here we go again! - when it comes time to size the paper for Mystique #13 in a week or so, I'll have to do some tests with these to see if they seem suitable.
Here's a rubbery five-pound 'cake' of hide glue:
And ten pounds (love those funny units the US suppliers all use!) of a granulated hide glue.
In closeup:
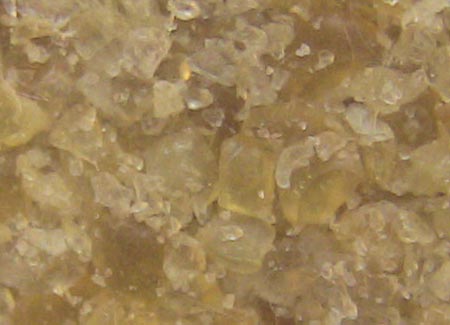
I would certainly like to have a lot more information on just what these glues are made from (as in which animals, etc.), but given that there is no such information available for our nikawa for comparison, I suppose it doesn't much matter. (That granular one in particular is pretty much identical to my packages of nikawa in structure, feel and smell.)
But of one thing I am very glad - that I had a chance to get a good bit of experience at doing my own paper sizing before this crisis developed. If I were now starting completely from scratch, I honestly wouldn't know where to start ...
More later, as the situation develops!
Posted by Dave Bull at 6:23 AM
| Comments (7)
Mystique Series #13 : key block finished
Look at that - the keyblock to #13 is done already, and you didn't even know it had started!
It has been a crazy busy few days here:
- got the senshafuda orders up and running
- finished the colour brochure for them and got it off to the printer
- selected the image for Mystique #13, scanned the print (this will be a reproduction), traced it, and got it pasted down for carving
- finished up the final layout on the spring issue of the newsletter, and got it off to the printer
- put the newsletter online (both English and Japanese versions)
- made a trip to the tax office to register for the tax deductions I will have to be making on the payments to the Mokuhankan 'staff' for their work on the Senshafuda project
- got a bit sidetracked by a computer sale pamphlet, ordered a new (used) laptop for the workshop downstairs, and tested some video streaming
- the video tests looked good, so went ahead and rebuilt the Woodblock Webcam - now full motion video!
- re-wrote the php scripts for the webcam Message Board - which is now more of a 'Chat Board' (including more than two completely wasted hours of debugging that turned out to be a misplaced comma!)
- got 350+ envelopes ready for newsletter mailing, stuffed and mailed them all ... (including the colour brochure for the Senshafuda project)
- something else ... can't quite remember what it was ... Oh yes, cut that keyblock!
And for the first time, nearly all the cutting work was done 'live and online', in full view of millions of viewers! Well, it could have been millions, but some of them were busy with other things, it seems. To those who did check in, thanks for watching, and for the comments and suggestions.
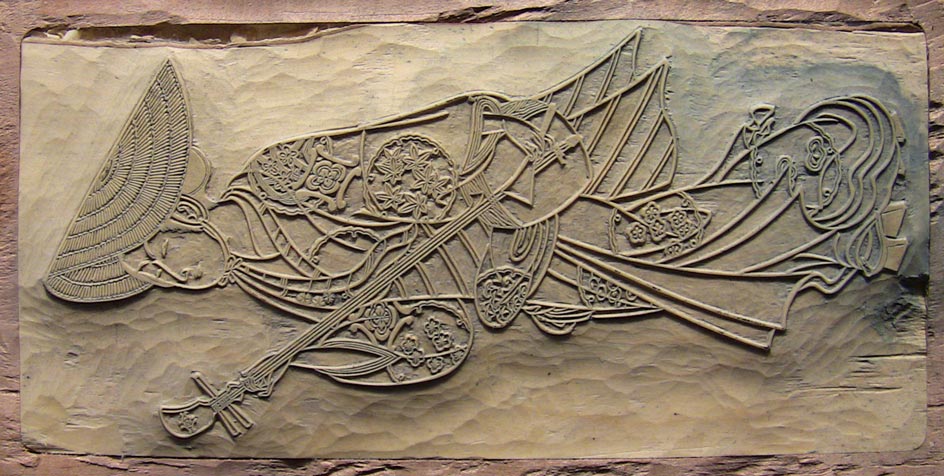
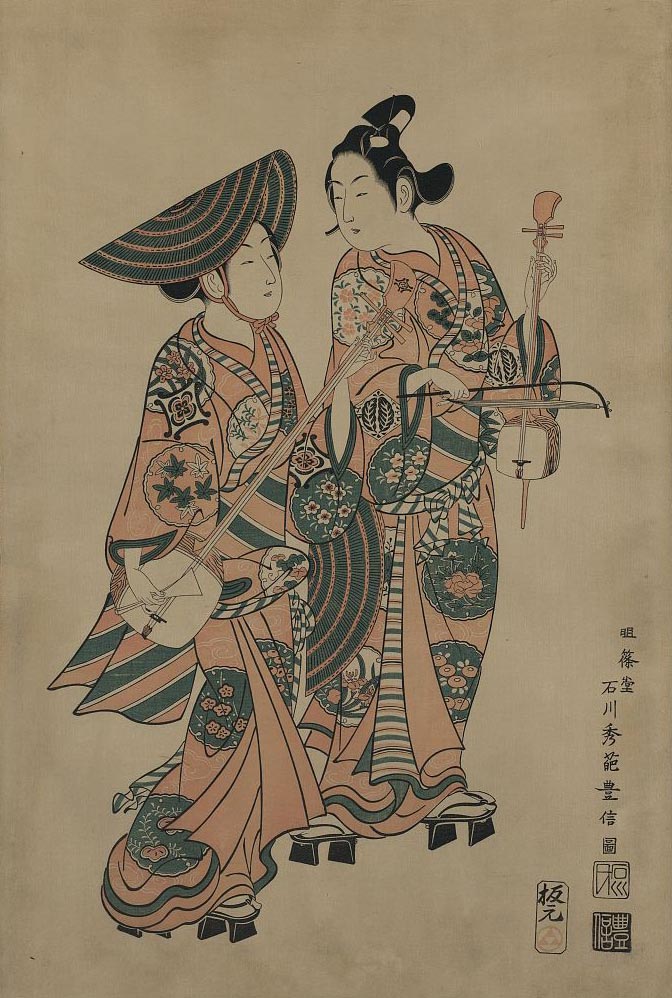
About this print. As I mentioned this one is a reproduction, but I have adapted it quite a bit from the original. Here's an image; this is the Library of Congress copy, which itself is a reproduction, and which they have mis-attributed - their copy was made by the Takamizawa Company, not Adachi. I have the - microscopically - identical print.
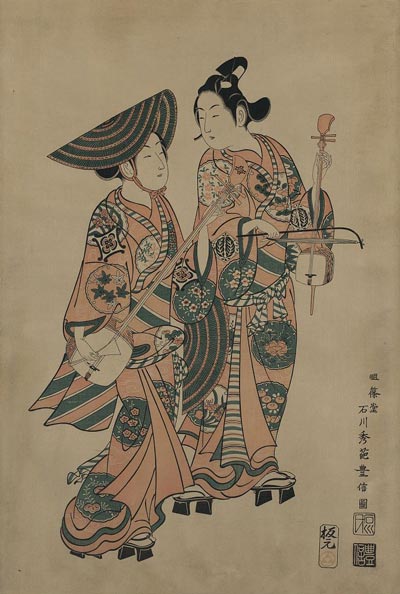
What looks at first like a genre view of a couple with musical instruments is - by the presence of an actor's mon on each person's clothing - shown to be a scene from a kabuki play. The research tells us that the shamisen player is the actor Nakamura Kiyosaburō, and it is his portion of the print that I have 'trimmed' for my own use.
The original is the type of print known as a benizuri-e (literally: red-printed picture, but actually always done in red, green and black). It was a kind of 'in between' step between prints done in black (with optional hand-colouring) and the full- colour work. When it comes time for me to print it, I will have to decide between two radically different approaches to printing, but more on that later, when we get there ...
Posted by Dave Bull at 6:48 AM
| Comments (2)
Woodblock Webcam goes 'live'
A quick, easy announcement this morning - the Woodblock Webcam has now gone 'live', as in 'full motion video'.

Details on the schedule, how to watch, and how you can see pre-recorded streams even when I'm not at the bench, are on this information page.
It was in the autumn of 2001 - nearly ten years ago - that the Woodblock Webcam first went live. I had only a very restricted internet connection back then, so the 'stream' that was broadcast consisted of a series of snapshots from the camera, uploaded one by one, at intervals of around ten seconds.
But even so, it still became a popular feature of the site. Of course! For anybody interested in traditional Japanese printmaking - and especially those wanting to learn how prints are made - a view directly down onto a craftsman's workbench can be a very valuable resource.
Some years ago, the telephone company got their fiber optic lines out this far, and I signed up immediately, giving me a 1Gb (that is not a typo - it's 'one gigabit') connection to the internet. Now although that is the nominal value, they don't actually let me use that much, and my router isn't capable of it anyway, but the point stands - I have a fat pipe!
But I couldn't switch to live video right away, because the (very old) computer down in my workroom just couldn't handle it. Last week though, browsing the websites of a few of the major Akihabara electronics retailers, I discovered that there has been a major price plunge on laptop computers (I think mostly due to the overwhelming success of the iPad in the market). I grabbed a good one, and with all the pieces now in place, set up live streaming video from my workbench to the world.
I'm using the Ustream system, and this allows both live stuff, and the broadcast of 'pre-recorded' video. You can see the schedule on the previously mentioned webcam information page; if you're visiting at a 'live' time, then when you click through to the actual webcam page you should be seeing me working. During times when I'm not 'live', the page will display a pre-recorded version (the previous session).
I have also updated the Message Board on the webcam page; it is also now 'live' - messages appear within seconds - so it can act as a kind of 'chat', between viewers and myself. My new laptop is positioned at the side of my workbench, so - working conditions permitting - I can respond immediately to questions, etc. that appear on the Message Board.
There is a downside to all this goodness, and that is the fact that Ustream is not 'free'. They do have paid services, but the minimum plan starts at $99 monthly, more than I can afford to pay for this at present. So I signed up for their free service, which is of course subsidized by advertising on the stream. I myself can't see the ads, because they aren't shown to the owner of a stream (I wonder why :-), but others will, and I have already received strong feedback from one long-time friend/collector that this cheapens my site and that it would be better if I didn't go ahead with this.
I'm a bit more ambivalent - didn't we all grow up with all TV content sponsored by ads, many of them quite bothersome? - but I'm open to hearing from the viewers about this. If indeed, the consensus is on the side of that friend, then I can easily pull the plug on this, or pony up the $ for a paid stream.
(It may also be that the world of streaming video is about to change dramatically. A few weeks ago, YouTube jumped into the live streaming business, so I suspect the cost of entry is about to drop still further ... we'll see.)
Please let me know what you think about this, and please check out the stream!
Posted by Dave Bull at 4:42 AM
| Comments (1)