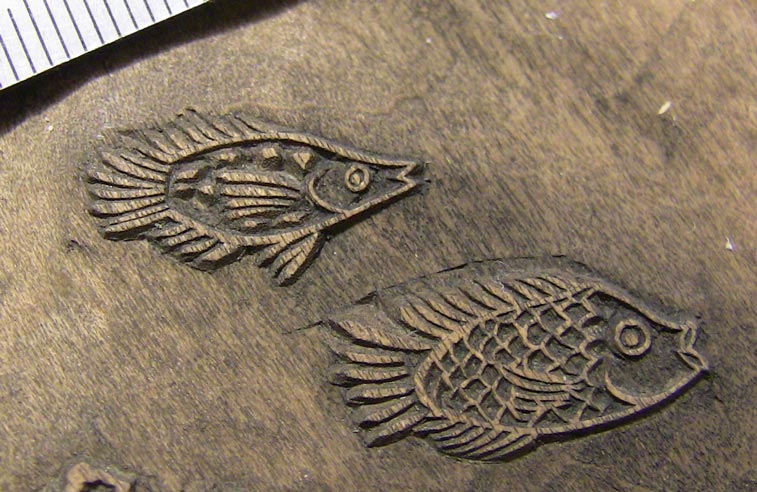
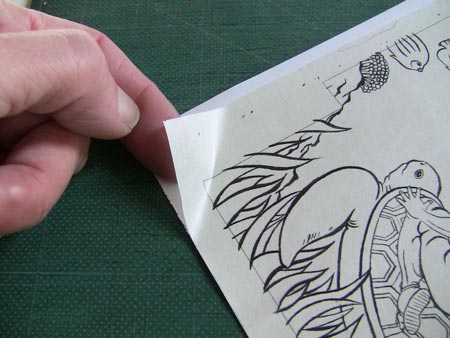
A commenter to the previous entry asked to see a close-up of the little fish ... so here we are (clickable):
They aren't actually all that elegantly carved, but I think at this scale - the ruler divisions are millimetres - it'll do!
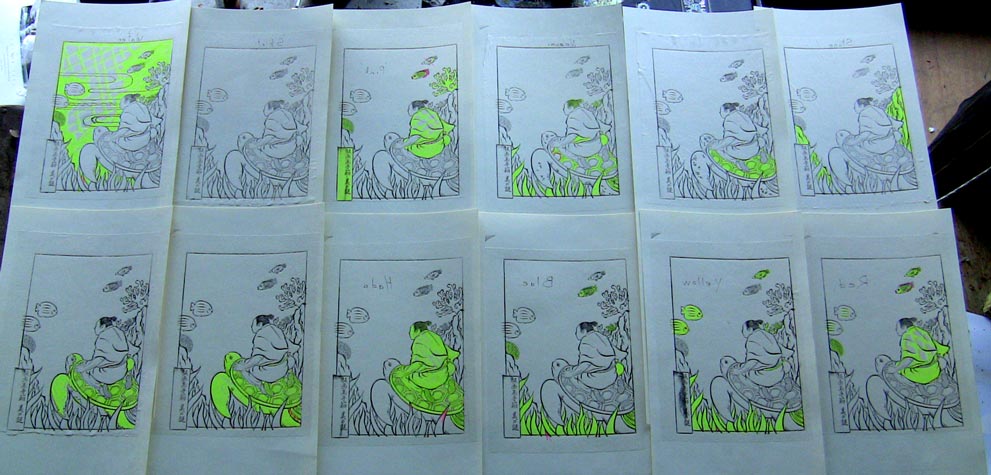
So with the key block done, the next step is to work out some colour separations. Seki-san gave me a guide to work with, showing the kind of colours she has in mind for this, and I worked out a block set that should get us close.
I say 'close' because I'm not going to simply cut one block to match each of her colours; I'm going to build them with overlays. She wants some green tones for the sea grasses at the bottom, but I won't be using any green pigment at all when I start printing. She called for a murasaki purple on some of the plants and one of the fish, but I won't be mixing that either.
All the pigments I will be using are transparent, so it'll all be done with A + B ... and +C ... and etc. etc. If you click to bring up the enlargement of that last photo, you'll see that there are very few areas of the image that are covered by only one block, and some of them are 'hit' by three or even four.
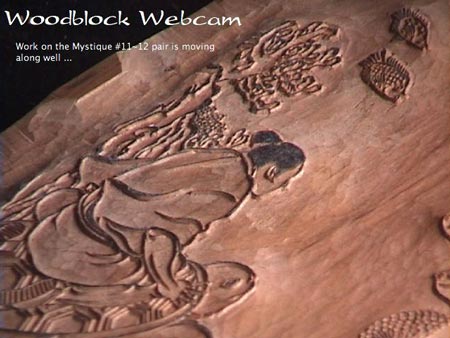
Lots done over the past few days, but not too much that I can show here, beyond this quick webcam capture of the key block for #1 - Seki-san's design of the Urashima Taro legend.
As you can see, the key block is nearly done; I just have to work out his hair.
Among the other activities that have eaten up the time have been getting the winter newsletter out the door (it'll be up on the site perhaps in a couple of days), and making a trip to Tokyo for the new year meeting of the craftsmen's association. That went well this year, as you can read in the Story A Week published this morning.
I was also down in Tokyo a couple of days earlier, making a visit to young printer Hirokazu Tetsui, and to drop off some blocks with him! I had promised myself that once the mortgage payments were 'history' I would start using some of that money for advancing the Mokuhankan venture, and here we go ... (I'll be posting more details about Tetsui-san and this job sometime soon over on the 'Mokuhankan Conversations' website, which I have been neglecting recently. I'm not quite sure how to handle the distribution of the 'news' from now on ... and there might be a bit too much cross-posting ... We'll see.)
Anyway, his first job will be to run up a batch of 100 copies of the Heron and Crow print from the Mokuhankan catalogue. Doing postcard-size prints certainly isn't the kind of work that he hopes to get from me, but this is where we will start, and if he brings in a good job, I'll feed him some stuff that will offer a bit more challenge. I don't have any opportunity to carve anything new for him, but we'll work on getting a number of my Surimono Album designs done. The first album in that series has been out of print for a couple of years, and the second is now on its last few sets; getting all 20 of those prints into the catalogue will take a while, but it will be a good addition once done.
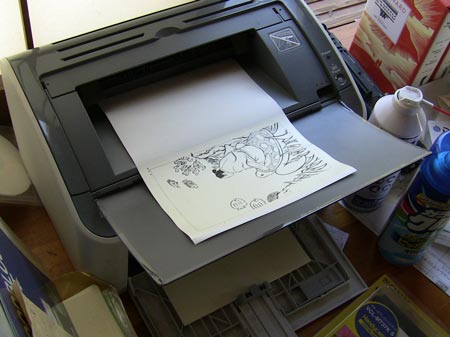
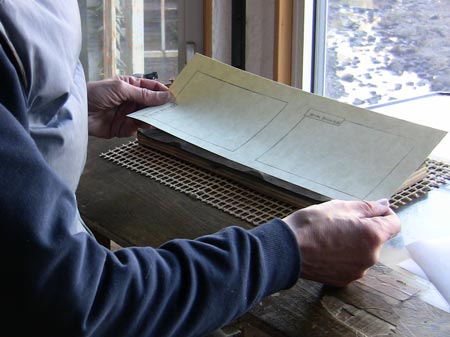
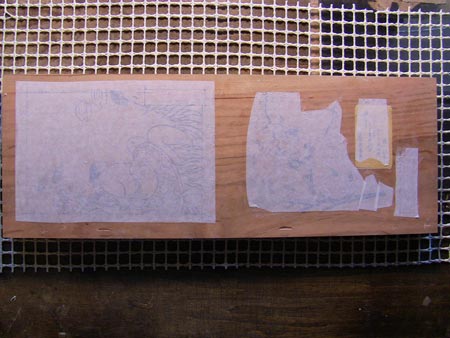
Today saw the rest of the image and block preparation, and carving has finally begun. After the Photoshop tracings were finished, I scaled the two images to the proper size, de-saturated them (to print cleanly on my monochrome laser printer), and printed them out onto my homemade hanshita paper - a laminate of standard copy paper and very thin gampi washi:
The thin gampi is only lightly attached to the backing sheet (with 'low tack' spray glue) and is easily separated after printout.
Then it was down to the workshop for the rest of the process ...
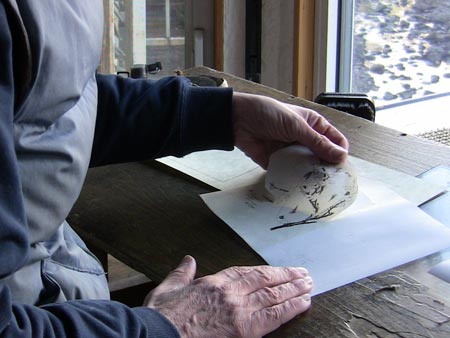
I printed out a copy of the 'outline block' onto a thick stable sheet:
That gives me the location of the image areas. I then peeled the thin gampi off its backing sheet ...
... and laid each piece in place on the outlines. Here is the finished hanshita, ready for pasting onto the wood. (I haven't received the calligraphy for the two image titles from Tauchi-san yet, so have just left those spots blank. I will paste those down separately later.)
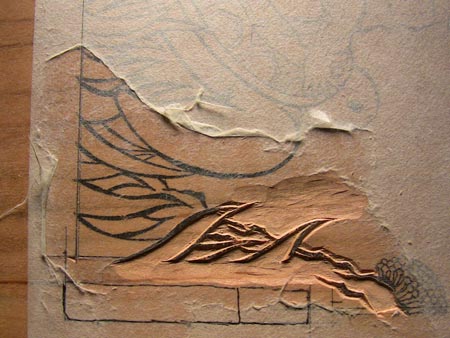
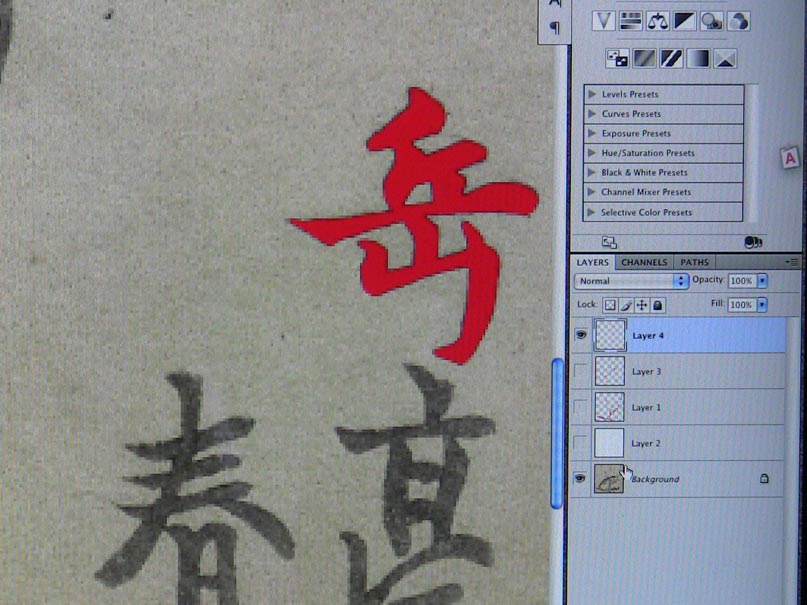
But before these can go onto the wood, there is another important job to be done. Because there is an area of very fine calligraphy on one of these images, I will have to inlay some boxwood at that appropriate place. This cherry wood is hard, but not hard enough for carving like this.
I described the actual inlaying process on an earlier page of the RoundTable here. An hour or so later, here we are, ready for the pasting step:
Once it's down, the backing sheet peels off, leaving only the gampi behind:
And here we go ... a few strokes just to get back into the swing of it. After dinner, I'll get back down here, switch on the webcam, and get to it in earnest!
Can't afford any more 'playtime' with the new video camera just now - it's time to get down to work on the next pair of prints!
There is going to be a bit of an interruption during the making of this pair. I'll be making a quick trip to Canada during the last week of February. It looks like our annual family 'reunion' won't be happening until the autumn this year, and there is no way I want to wait that long before seeing the parents/kids/grand-kids again. It'll be just for a week, but it will fall in the middle of work on these prints, so I'll be rigging the registration marks on the blocks in such a way that I can print just the 'outside' print first, then do the other one when I get back.
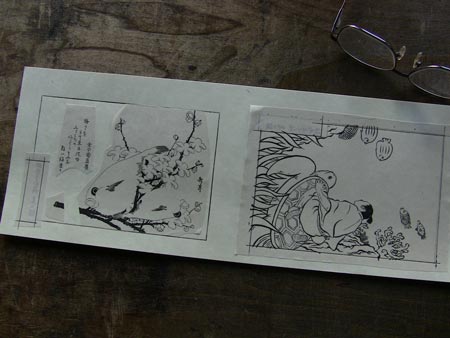
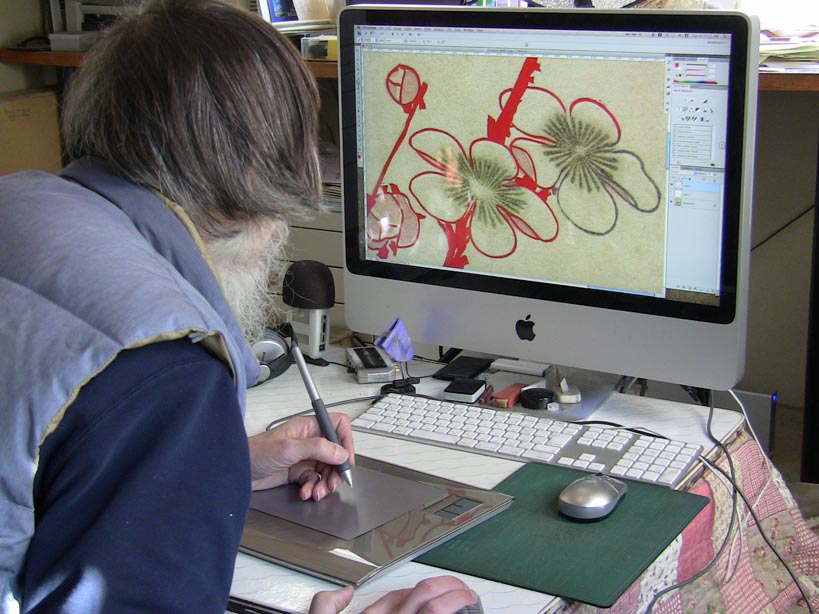
Anyway, we'll see more about that as we go along. For now, first job is to get the tracings ready. #12 is going to be a reproduction of a Meiji-era reproduction of an Edo-era surimono print. Actually, that's the same kind of process that I used for print #7, the Hokusai insect and moon; that too was taken from a Meiji reproduction. This one isn't Hokusai - it's one of his pupils, Gakutei.
This design uses the relatively rare technique of kime-dashi. This is related to the more common karazuri (embossing), but they are produced in quite a different fashion. More about this later, of course.
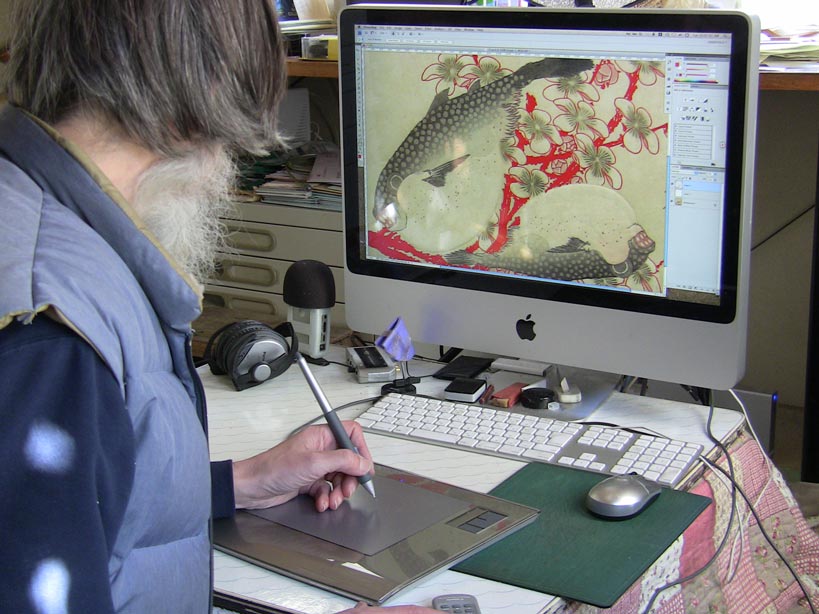
I have my own copy of this print, so scanned it in, and then brought it up in Photoshop for work. Creating a new layer in the file, I use my Wacom tablet to trace over the key lines (as you see in the photo above).
I trace in red, to make my work more visible, and make every attempt to catch as much as I can of the character of the original lines. I'm working here at 300% of the original print.
This tablet is pressure sensitive, so tracing the calligraphy is fun - it's almost possible to recreate the original brush strokes by using the pen alone.
I say 'almost' because I have nowhere near that kind of skill; I end up having to fill-in and touch up most of the lines as I go along.
So that'll be #12. #11 will be something a little bit different.
For this one, I won't be making a reproduction of anything. This is going to be an original. But don't panic ... not my original!
Last spring when I attended the large Design Festa event, there was a young girl with a booth just across from me and down a bit. I could see her display from where I sat, and - seen from a distance - I was sure she was displaying woodblock prints! There wasn't much chance to 'get away' during the show, but I did take the opportunity to go over there and see what was what.
It turned out that her images weren't prints, but were illustrations done in the style of prints, specifically ukiyo-e. We chatted a little bit about what she was doing, and it seems that she likes the old work very much, and wants to find a way to create images of her own, but following those traditions.
I picked up a few of the small note cards she was selling, and kept having a look at them during the next couple of days, while busy explaining and talking about my own work to the attendees. As we were all packing up at the end of the show, I made sure to get her contact information. I perhaps mumbled something about 'wouldn't it be interesting to make prints from some of these ...', although at that point I had no clear idea in mind about that.
Fast forward to now. My finances have eased a bit in the past couple of months, thanks to a very successful Gift Print season, and there is money in the pot to pay a designer royalty on a print (something obviously not necessary with the reproductions). So I called her up (her name is Kaori Seki, by the way), went over to her place for a visit, and the two of us went through a pile of her work, thinking about what might be suitable.
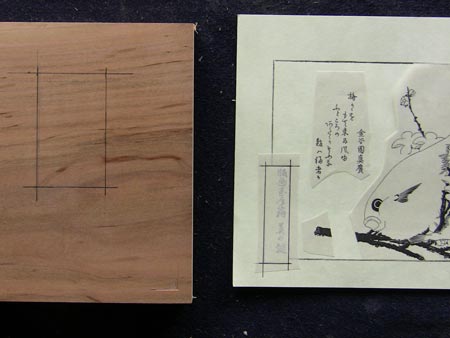
Most of what I saw that day was quite a bit too large-scale and finely detailed to be applicable to this Mystique project, but I did fasten onto an image from a series she had done on a mukashi banashi (traditional folk tales) theme. It's a picture illustrating the Urashima Tarō story.
Now this series is supposed to be about printmaking, not folk tales, but there are plenty of ways to skin a cat. She and I are going to make this print together in just the same way that the original ukiyo-e were created. A couple of days ago she delivered a sen-gaki to me. This is the sheet containing the outlines of the design - nothing about any colouring or patterns at this stage.
Rather than destroy her original by carving through it, I have scanned it in ...
... and will print it out on thin paper and paste that onto the wood. Once that 'key block' is carved, we will then do the iro-wake ... a set of colour separations. Just what it will all look like is still up in the air ...
Trust us!
Update to the post about YouTube the other day: After putting the new HD video up there, I dug back into my 'home movie' collection and uploaded a few more items. These were made before I got this new camera, so aren't in high definition, but they might be interesting nonetheless. Don't miss the 'Visit to the Seseragi Studio', recorded here one summer day a few years ago ...
After finishing up the 10th print in the series the other day, I wanted to have a bit of a break and do something different before beginning the next one. I thought it might be time to have another look at how I have been doing the little videos on the website ... (this thought was prompted by seeing the very nice quality of Ford Hallam's video I linked the other day).
Now I'm under no illusions that I can create anything like that here by myself; after all he had a professional video crew create that one for him. But seeing the HD quality made me wonder if it would be possible to at least try something along those lines, so I dropped in at an electronics shop downtown to see just how expensive that sort of gear is these days.
I was very pleasantly surprised. The 'latest' model cameras are of course very expensive, but when I looked in the second-hand section of the shop, I found that models from just a couple of year ago - but still with very high specifications - were available at reasonable prices. I looked at a Canon iVis HF10 (from 2009) for just under $200, and this had not only very impressive specs, but - according to some reviews I researched - seemed to be a very reputable model. It came with a three-year warranty, extra batteries and charger, and seemed to be in pretty much perfect condition.
So ... why not! At Christmas time I only got some socks and sweaters and stuff ...
I read through the manual on the train on the way home, and then gave it a try with a couple of simple tests. No problems ... so I wrote a little script, put it up on my teleprompter, prepared a print set and some lighting, put the camera on a tripod, and hit the red Record button on the remote control ...
After doing 'my' scenes, I used the camera to record some closeups of the prints, scooped all the footage into iMovie, and edited it together into what is hopefully a sensible little presentation.
Here you go!
Note: if you have a good 'net connection, you can watch this thing in 1080p HD video; just select the appropriate setting from the YouTube player (or jump over to the YouTube page itself). Here on my widescreen iMac, doing that and then hitting the 'Full Screen' control gives me an astonishingly impressive view. Wow those prints look good! (Too bad the narrator isn't quite as impressive!)
Last night I received a communication from a British craftsman (living in South Africa). He is not a woodblock printmaker, but his work does indeed share many aspects of my own. Rather than me talk about it, I think you might enjoy this documentary presentation.
It is in two parts, the first is the one shown here, and if part two doesn't come visible after you finish playing part one, it can be found on YouTube here.
(Also - the YouTube video is available at very high resolution, so if you have the pipes for it, select that version instead, from the video controls in the window here.)
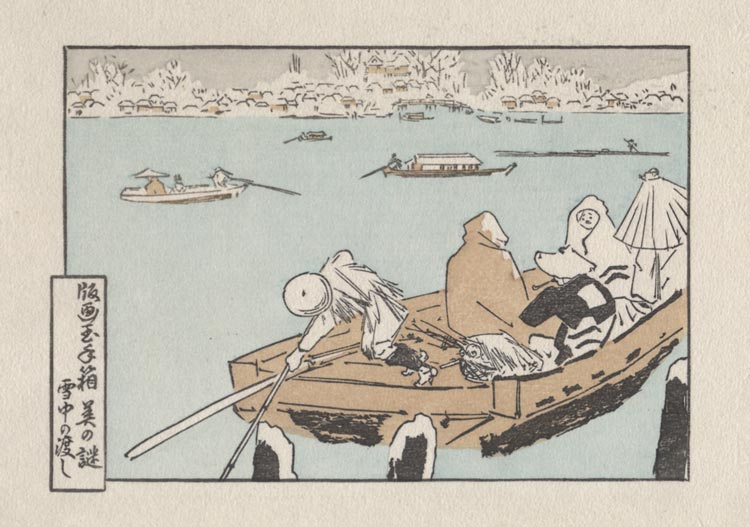
(These next two scans were made after the paper had been dried, so if you are trying to line these up it won't quite work, as the paper shrinks around 2% while drying ...)
Here's the outer embossed pattern - the same as on all the prints in this series of course. I do this while the paper is quite moist and receptive, and then immediately set each sheet out to 'dry' - or at least to give up the bulk of its moisture, before being placed into the drying boards for the final drying under pressure to keep the sheets flat.
The snow goes on after the paper is completely dry.
It's a mix of gofun (powdered shell) and nikawa glue. There are no particular secrets to the application - I tried using brushes of various stiffness, but ended up using that old standby ... my toothbrush. (I'll need to go and buy another one now ...)
The white powder on the prints has a different 'whiteness' as you move the print under the light. At some angles it almost disappears, and at other angles it seems to obscure the image underneath ... so I guess it's quite realistic in that aspect!
So the first batch (120 sheets) is done; I've got to switch to deskwork now for a couple of days, to get the story sheets and backboards ready, and it'll then be time to moisten another pile of paper and do it all again!
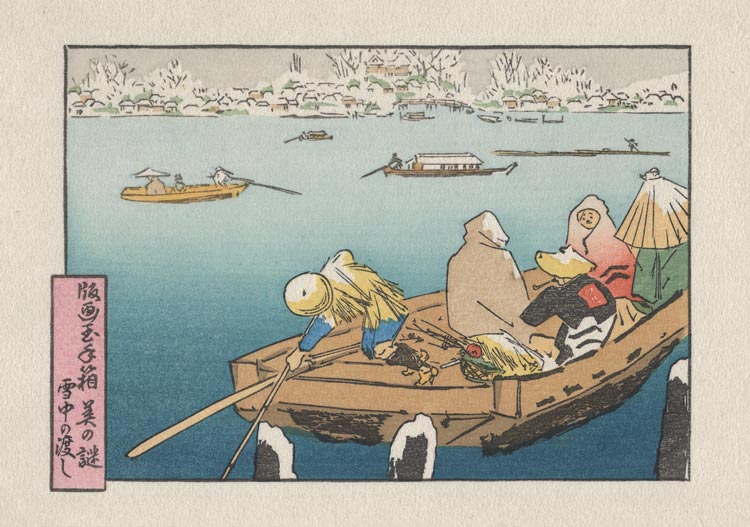
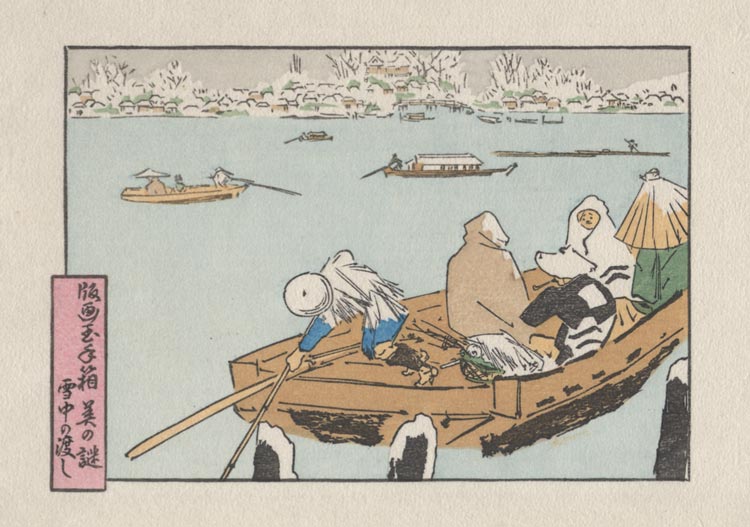
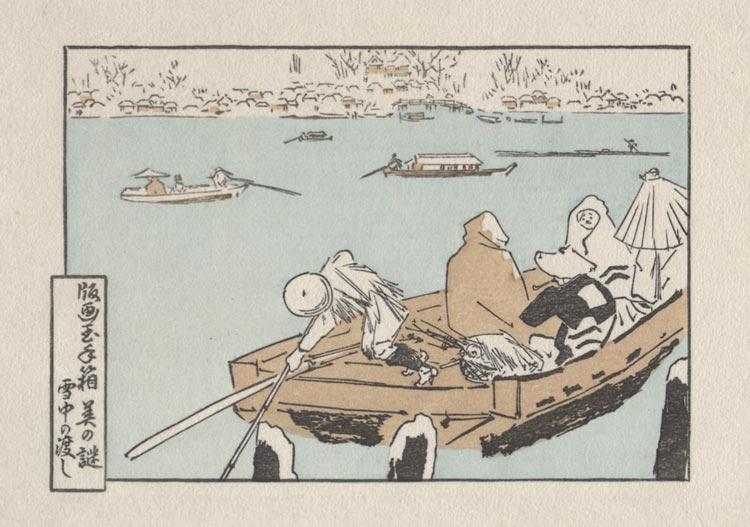
A block to darken up the underside of the ferryboat, and also add a few 'highlights' here and there:
And the final 'bare' passenger gets his drapery coloured, along with the motif on the coat of the flower seller:
And the most dramatic of all the impressions - the water gets its depth coat:
That concludes our 'regularly scheduled programming' ... but she is of course not finished. It's time for me to put it aside for a while, and start doing some experiments on the next stages.
We're of course going to turn it into a snowy day, and there are a few different ways to do that. Snow is sometimes created by cutting out little holes in all of the blocks to leave the white paper showing, but it's too late for that method this time! Another method - as shown in this print I made some years ago - is to carve a block for the flakes, and print them in an opaque white pigment.
But I think this time we'll explore another method, something I have seen in old prints but have never tried. Hopefully, tomorrow's report will be positive ...
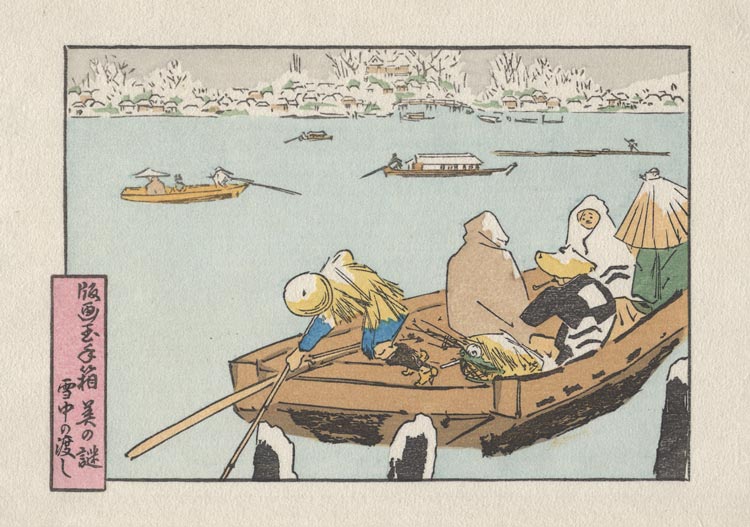
Another 'small' one - the green on a passenger's clothing, and some fill-in for the distant buildings (these are clickable for enlargements, by the way ...):
I would usually do the cartouche at the end of the process, but as the colour is already established (and it's carved on the same block I just used), might as well do it now ...
And another tone inside the boat - a kind of 'straw' tone ... for the straw raincoat, and the straw basket-cover and hat of the flower seller ...
I'm not quite sure how many we have left; at least five more, and perhaps six ... we'll see.
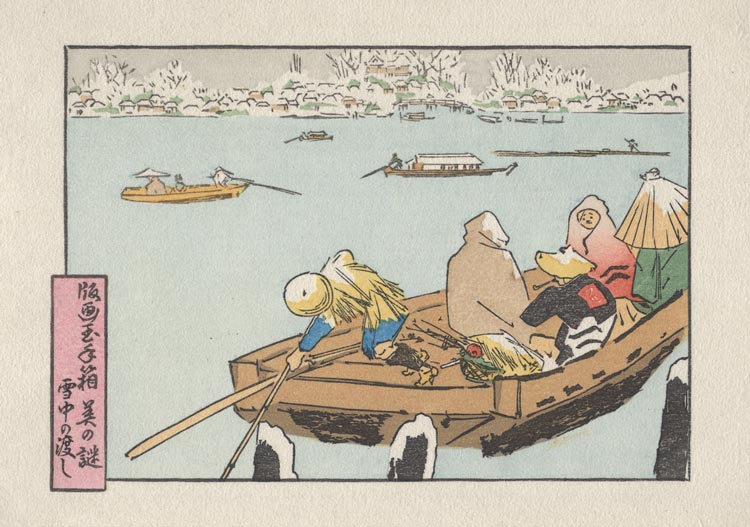
The first one is a light bluish grey one for the snowy sky ...
The paper is getting pretty damp now, so next up has to be something 'small', to give it a chance to dry out a bit. This deep blue on some clothing will fill the bill:
Then back to the wider areas; here's an overtone on the ferry, and also picking up the skin tones on some of the people:
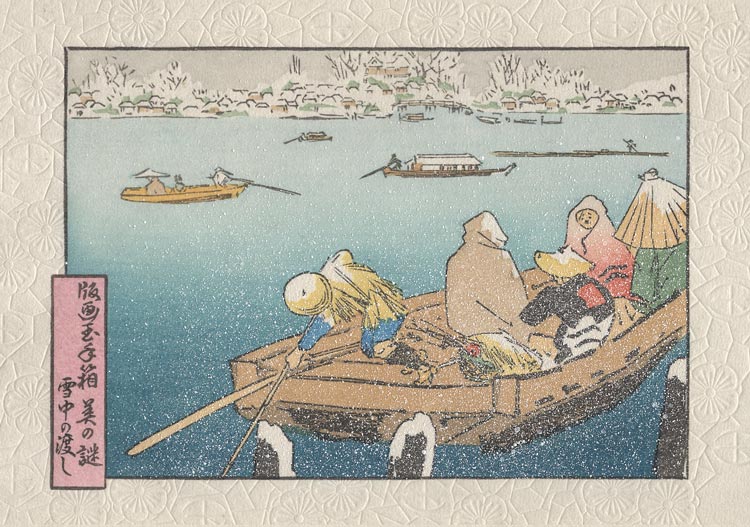
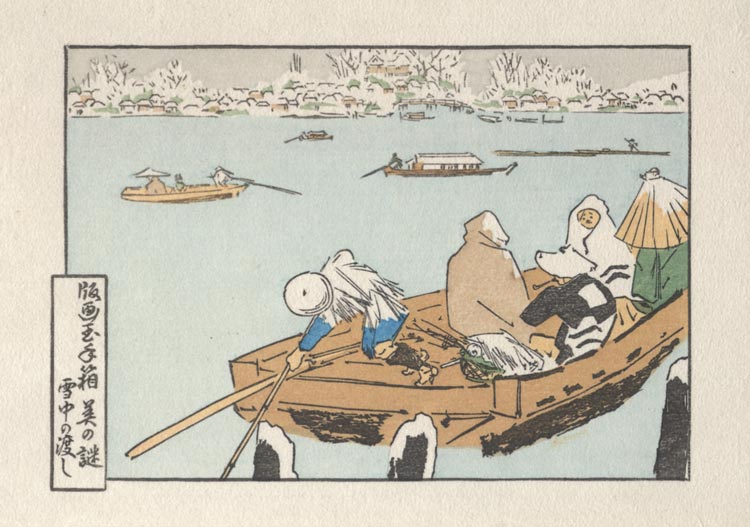
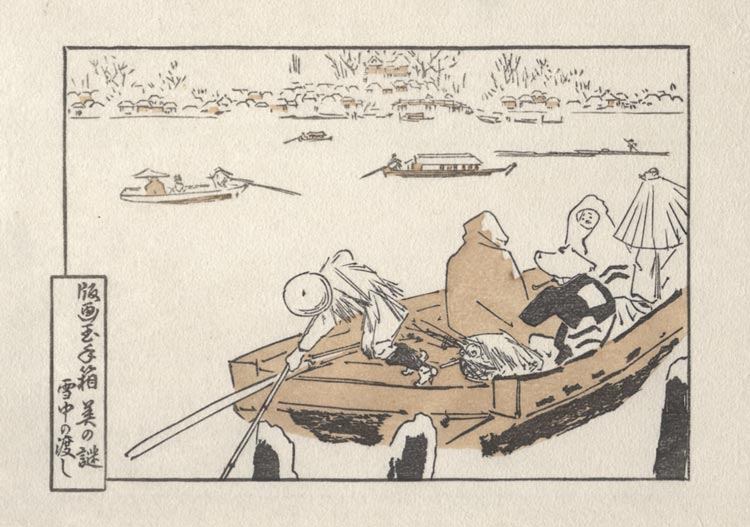
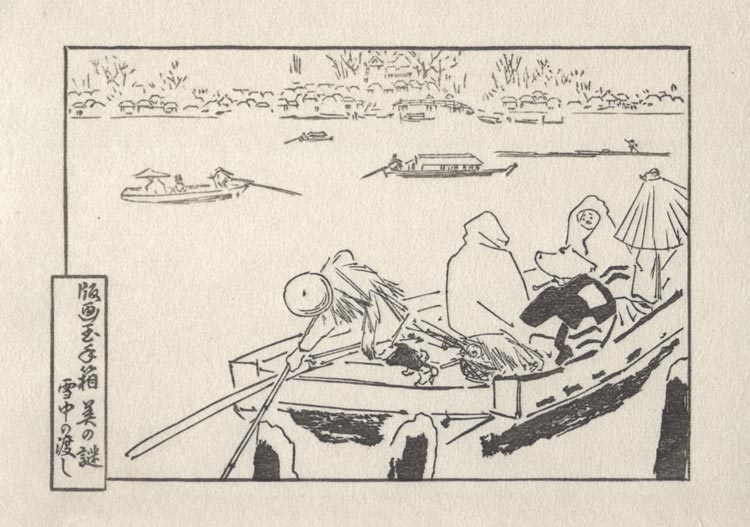
It's about time for another 'step-by-step' printing progress report!
The blocks for #10 in the Mystique series were carved at the same time as those for #9, but at that time I didn't take any time for proofing them, and just got busy with printing #9 (and the Gift Prints, of course). This one seems pretty straight-forward though, so let's just dig in and get going!
First impression is of course the border outlines common to all prints in this series:
And next up is the main key block:
I've listed this as a single impression, but it was done with two brushes: the distant areas of the image get a lighter shade of black than the main object at the front.
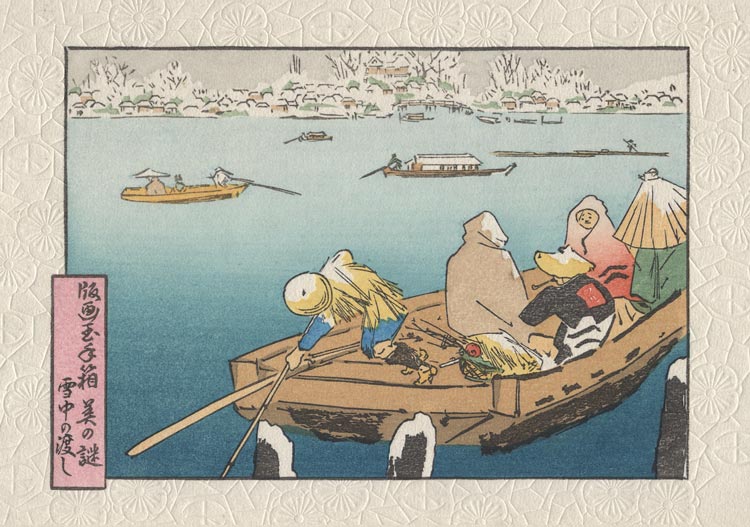
So you can now see what sort of image we have; it's actually a 'clip' from a much larger print. (I wonder if anybody will be able to identify it - or the designer?)
And there is a specific 'technique' theme for this one, but as that happens at the end of the process, we'll discuss it then. (There is a hint to what it might be though, in the Japanese title of this image ...)