
August 12, 2006
I mentioned in the previous page that registration tests would be necessary, and today's the day - after months of preparation, tracing and carving, the first actual 'image' will appear today! But before you get too excited, I should mention that I'm not going to use any paper for this ... so don't expect to see anything that looks like a print!
Japanese prints are capable of being made with an astonishing degree of accurate registration. Although the method of registering the paper to the block couldn't be simpler - nothing but two notches cut on the wood - it provides all the 'information' you need to enable the paper to be placed in perfect registration. Those two notches give not only perfect x-y information in two dimensions, they also allow the paper to be adjusted 'around' those two dimensions as well (think the 'Image Rotate' tool in Photoshop ...)
Then why aren't all the old Japanese prints registered perfectly? Well, ones printed from new blocks, on good-quality paper, nearly always are registered perfectly. The problem comes when either the wood or the paper - or both - expand or contract during the process. Wood changes with variations in humidity; there is no way around this, so the printer just has to learn to live with it and make adjustments along the way. Even plywood-core blocks like these do move to an extent, and today, I found out just how much.
The tracings had been pasted onto these blocks under perfectly identical circumstances, but that was months ago. In the time since then, I have hacked away at those blocks, exposing wide areas of fresh wood to the atmosphere, but even more importantly - the weather has changed dramatically, passing from spring through the rainy season, and now into a hot summer. So I know they will have changed; the question is how much, and in which directions.
Here's a snapshot of the system I will use to get this under control:
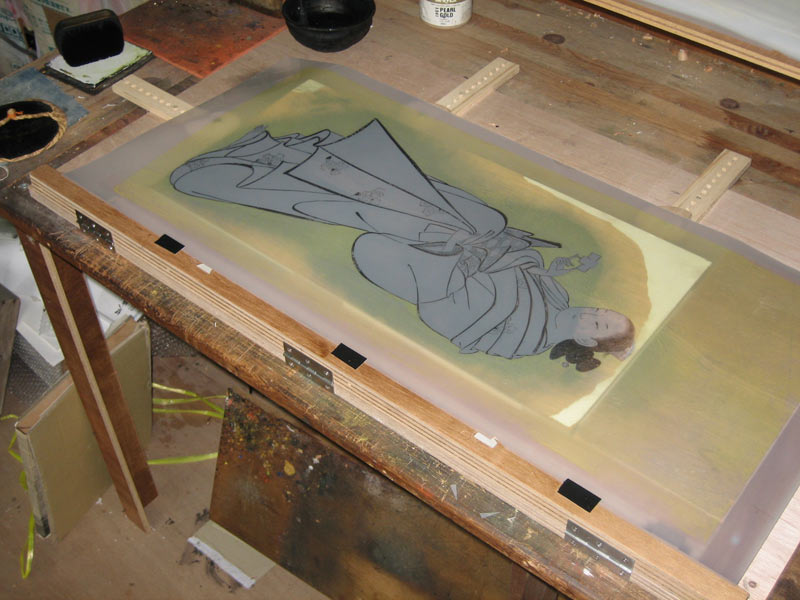
It's my normal block jig, of course, as descibed back on this page. At that time I described how I planned to use 'shims' inserted between the jig and the block to give me a method of allowing easy adjustment in any direction. I kept track of how many shims I put in place when pasting the tracings onto the blocks, today I will discover how these need to be adjusted.
I will do that with a large sheet of very stable mylar plastic. This is cut somewhat larger than the final print will be, placed into the registration marks on the jig, and then taped in place along the front edge, allowing me to flip it out of the way to change and adjust the blocks.

So the process is 'simple' - print an impression from one block onto the mylar, then put the others in place one by one and adjust the shims by looking down through the image on the transparent sheet. But which block to start with?
As you will be able to see later - when I will be including step-by-step images of the printing process - there is no single key block for this print. There are two black outline blocks, one with the dark thick kimono outlines, and one with a lighter grey for the face, hands and feet. Neither of these two blocks provides enough information to register all parts of the image - both must be included. But there is one block that does contain enough information to allow these two to be registered together, and that is the base block for the background (the one I carved here.
So in the first photograph above, you can see the result after the first three test impressions have been taken. I first placed the background block its original shimmed orientation, took an impression from it, and defined that as the 'base' for all subsequent adjustments. I then placed each of the two black blocks in turn in the jig ...

... flipped the mylar over to see them through the transparent plastic, adjusted their shims until they fit, and then printed them. It required a lot of fiddling, but I was able to get things lined up properly.
I then put a couple of the main colour blocks in place to see if they were going to fit properly, and it seems that they probably are. I didn't print them all onto the mylar, there is no point to doing that now, but I took each one in turn, placed it into the jig, and made careful notes about how it needed to be adjusted to line up.

Doing this work today will save me an incredible amount of time and trouble once the test printing starts. Of course, that will bring its own set of problems with paper expansion and shrinkage, but at least I will know that the blocks are basically in the correct position.
Here's a snap of the block list as it currently stands. The scribbled numbers are of course my notes on the shimming necessary to get each one placed correctly in the jig. Highlighted blocks are basically 'ready' - at least until proofing starts. Who knows what adjustments will be required then!

And yesterday, the package of blank blocks arrived, so it's time to put this jig away for a while, and get back to pattern carving!

![]()
![]()