Posted by Dave Bull at 4:19 AM, April 14, 2010
Yes, yet another entry in the 'Fun and Games' department!
The acrylic sheets for the Mystique cases were delivered yesterday afternoon. I ordered them from the same man who did the acrylic display stands for the previous Treasure Chest around five years ago. He did a good job that time ...
Here's a paraphrase of the start of our conversation yesterday:
He: Here you are; this is the first 100 or so, as you requested. All polished up, and ready to go.
Me: (opening the package and taking one out). Looks nice - that's a very good shine on the edges; I think the customers will be very happy with this!
He: The reason it takes such a good polish is that these are the more expensive 'cast' acrylic, not the standard sheet stuff like the sample we discussed earlier. I had a bunch of this in my stockroom, so decided to give you the extra 'service' and used this instead.
Me: Looks good, but how does it compare when it comes to scratching and maintenance ...?
He: Don't worry, no difference there at all. It also feels more 'solid', as it's a tad heavier.
Me: Yes, it does have a good solid feel to it ...
He: That's because this cast stuff isn't 2.0mm thick, like that cheaper sheet stuff; it's around 2.3 instead.
Me: (sudden silence)
He: What's wrong?
What's wrong is - of course - that the cases were made based on a 2.0mm thickness for the acrylic. And I demanded - and the makers complied - that the parts should fit together just ... so! With no wobble or looseness.
This extra thickness has screwed that up. These acrylic sheets can be forced into place, but only by pushing and jamming them into the slot. And once they are in there ... even more problems surface.
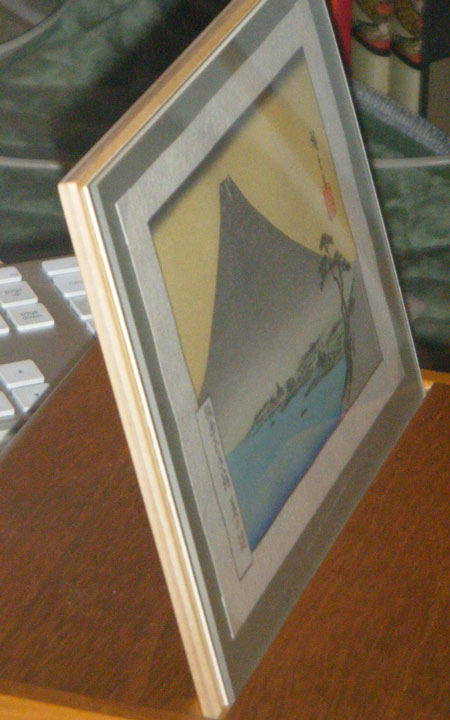
Here's our original sample, with the 2.0 standard sheet acrylic:
And here's what it looks like with a sheet of this (beautiful) new stuff jammed into place:
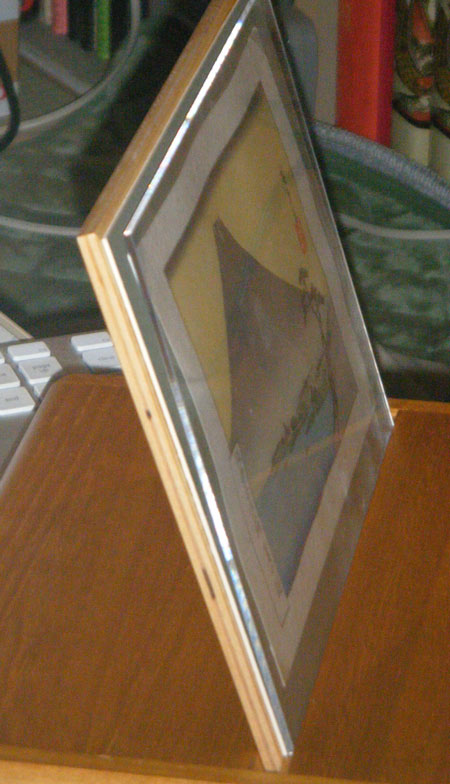
The squeeze at the bottom forces the top apart, giving an ugly spread to the parts. And what is even worse, the acrylic now casts a shadow down onto the mat and print:
He and I looked at each other, thinking about how to get out of this jam, but there really isn't much thinking to do. We can't possibly afford to toss these and start again, and there is no way that he can 'thin' them down, obviously. The only solution is for somebody to open up the groove a bit. And that somebody will have to be me.
0.x mm wider, on 210 boxes ... Smoothly and evenly, without scratching or damaging them ...
Fun and games!
Widening the groove is going to be very tricky without ruining something. Would it be possible instead to run shallow dadoes the depth of the groove around the edges of the back support wood? It would be on the reverse side so should not be visible, and then the acrylic sheet should fit without distorting the matte. Then four quick passes of that back board against a dado fence, to the depth of that additional acrylic thickness should be all that is necessary to correct this problem, and once set up should go pretty quickly.
In effect you would be thinning down all back edges of the display board to the proper thickness allowing the additional thickness of the new acrylic sheet room to sit comfortably in the groove.
Just a thought.

I can't change the back support - it is in a different slot. Thinning it would just make it loose in its own slot ...
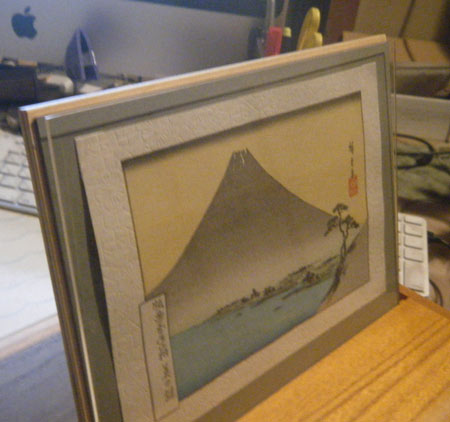
Here's an illustration that shows the slot construction (up at the top right of the image).
Seeing how much effort is going into this, I think my subscription is an even better bargain.
my subscription is an even better bargain
Sure ... if you ever get the prints! :-)
I'm sure you will, of course, but I'm starting to consider the idea of perhaps drawing a line in the sand here, and calling this first print 'May' instead of April. With one stroke of the pen, I can get back on schedule! :-)
Looks like you are boxed into a corner then. As this fellow did not follow the specifications, but altered them to suit his surplus depletion, can you insist on his replacing these with those originally ordered, and perhaps agree to purchase these later at reduced cost when you have more time to alter a future box groove? Despite the fact he says he was giving you a better quality product at no extra charge, it is an extra charge for you that has been created as well as set-back in delivery schedule. This would at least not require more of your time to make alterations, it might simply delay the shipping date some.
Hogwash.
You are totally blameless on this. You gave specs to your supplier and he violated them. It's his problem, not yours. He says that he was giving you an extra 'service', when in reality he was using some extra material that he had lying around in his shop rather than purchase what he needed to fill your order.
Further, he showed up with 100 out-of-spec pieces when you've got 210 boxes to deal with. Will the next shipment of acrylic be 2.0 or 2.3 mm? With such a flakey supplier, how can you tell?
If I were in your shoes, I'd insist that he take responsibility for his own mistake and quickly deliver pieces which fit your specifications.
All that aside, if you decide to alter your boxes, it's an interesting technical challenge. I'd do it with a router jig. But the tolerances that you'll need to work with in order to expand the groove .3 mm at a 72 degree angle will be daunting, to say the least.
Marc
blameless ...
Of course it's not 'my fault', but at this point it doesn't really matter; the only question is how to get this thing finished properly, and delivered to the collectors. And the guy is no more 'flakey' than I am, really; this is exactly the same kind of 'mistake' that I have made myself (as we have seen!). There's no point in trying to push him around here ... it would generate hostility, and accomplish nothing.
If I had a nicely equipped woodwork shop, it wouldn't be such a problem. I think I'd probably first have a try with a drill stand - tilt the table, fix up a support on it for the boxes, set the depth of a cutter, and then slide the boxes under it ...
But I have no tools like that at all. I do have a (very cheap) router, but it is somewhat loose in its base attachment, and I smell disaster lurking there.
I think what I might do is pick up a Dremel, then rig up a guide jig that I can place over each box to help me keep it steady along the cutting line. The paulownia is very soft, and - once it's all set up properly - the work should go very quickly.
It might be a good idea to combine this job with the drawer insert gluing. Switching back and forth between the two jobs would perhaps give the glue on each one a chance to make a quick set, so that I could then easily move to the next piece.
So I'll think about this while I'm working on the printing during the rest of this week, and then get to it!
I do think your supplier should have stuck to the original spec, and I don't mind the wait. How can it be a better quality of service when it has this knock on effect? It's not right that you should have to mess around with the boxes when they look so good. If it's of any help, you can skip adding the wooden inserts into the box for my subscription. I like the look of it as it is, and don't mind if the contents move around a bit.
Dave,
The way to fix this is to sand the acrylic on all 4 sides so it looks like you meant to do that, a feature. If you sent up your drill press to do this, you can take a small slice off all around or have your supplier do it. Acrylic will cut very nicely with a flat drill, no point. Like a milling machine drill.
I am sure this will work and it will give a slightly opaque edge on all 4 sides of the sheet whatever width you decide. Try one and see if this works. I am not the plastic queen for nothing. You can fix this. You need to build a little fixture to keep them all at the same width and set a stop on the drill press, then run them through. It should take about a minute or two each.
Barbara
I'm in agreement with Mark as far as leaving out the glue-in pieces to keep things from sloshing around. A little extra space may not be a bad thing, as you are sending these off to all different climates and a little expansion or contraction can be expected. Besides, once it has arrived, I won't be shaking the box, it will be stationary upon some prominent pedestal under klieg lights and behind spectator ropes! :)
Random other suggestion: Could you use the drill to cut a small slice off the very bottom of the acrylic, so the bottom of the shield fits into the slot, and then hangs out over the edge by a tiny bit? (I don't know power tools from anything, mind you. It just seems like that would be a solution with relatively small chance of damaging any other part of the system...)
(Printing break here ...)
Thanks for all the suggestions!
As for leaving out the inserts - no way! We haven't come this far just to give up on such an easy adjustment. And there is no concern about being too tight; the new clearance will be exactly the same as the originally planned clearance.
As for slicing the bottom of the acrylic, that's not practical because it will be used in both orientations - vertical and horizontal.
And Barbara, that is a doable idea - putting a kind of thin 'border' all around the acrylic on four sides. But I think I'll go ahead with trying to widen the slot, as that will leave a clean and clear acrylic panel, which I think is the best way to let the print display properly ...
There are six impressions left now, so I'll be done sometime this weekend (this first batch of 120 sheets, that is), and can then have a go at these 'fixes'.
Dear Dave,
It's the prints I'm interested in. The case is a marketing tool that is nice but much less important. Get the first print out and deal with the case issue in the most logical fashion or the most reasonable: get the original 2mm material For the first 100 cases and find a way with your supplier how to make do with the wrong material for the next 100. It's not worth your time to spend hours retrofitting/fixing an error; at least this "collector" would rather you spend your energies on your art and less on the packaging.
(You could possibly sell it at cost if you had to--a custom framer? Someone doing acetate drypoints?)
this "collector" would rather you spend your energies on your art and less on the packaging
Well of course that is what is actually happening - I've easily spent more than 10 hours per day at the printing bench over the past week ...
Once they are done and dry (sometime this weekend I think), then I'll spend a day or two getting everything ready for shipping, including these case adjustments.
The case is a marketing tool that is nice but much less important
This isn't quite how I see it. For me, the 'thing' that I am producing is not the individual print(s), it is the 'set' as a concept. This has been the case all the way along for me. Sure, the prints look 'nice' one by one, but I think (I may be fooling myself) that there is quite a bit of added 'value' in the way that the whole thing is put together.
I kind of see your point - for a typical book for example, it's the words on the page that are more important than the binding, but for a hand-made book, it had better have high-quality binding, or there is no point. So - as far as possible anyway - I want to maintain a 'no compromises' approach to this ... :-)
I too am looking forward to receiving my prints, and agree with Dave that it's the whole concept that's attractive and important. It can be so frustrating to have that vision thwarted through others' mistakes. The idea of the construction of the case was so neat and elegant it seems a shame to have it spoiled for "a ha'porth of tar" so to speak.
Having said that, maybe get your acrylic man to bevel the edges all round........