Posted by Dave Bull at 6:16 PM, July 21, 2007
Here we go again! Just as I did a couple of months ago with the River in Summer print, I am going to show many details of the production process for the next one in the series: the Forest in Autumn.
My campspot on the river is around 20 minutes by bicycle from my home, but the woodland spot is much closer - the 'trailhead' is less than 60 seconds walk from my front door, and once in the forest, it's less than five minutes walk (stroll, actually) to the place where I usually park my tent for these little trips.
When blogging about the progress of the previous print, I held back showing a photograph of the actual location until after finishing the print, as I didn't want viewers to get a preconception of what the print might look like. In the case of this print, I'm going to show it up front, because the situation is quite different ...
Here's a snapshot of my tent in place:
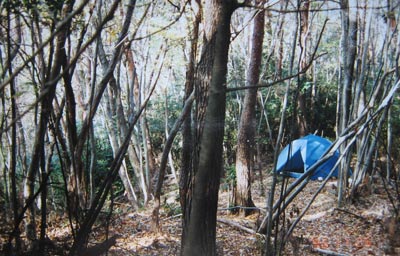
What a mess! As subscribers to this series will learn when they read this chapter of the book, this woodland is really in poor condition. After being clear-cut just over 50 years ago, it was fenced in and abandoned, and has had no maintenance at all in the intervening years. Now it's still a pleasant place to camp for a while, as long as you don't want to 'do' anything - just sit and enjoy the peace and quiet. But it is difficult to walk around in many areas, as the undergrowth has run rampant, and on windy days it is quite dangerous, as many trees are rotten, or have weak, dead branches ready to fall.
It's also not 'picturesque' at all, as you can see from that photo. I certainly can't simply 'point and shoot' ... expecting to come up with an attractive image.
But if you have read the short description of this print here, then you know that this is going to be a night scene. Well ... a night scene means a dark image, so most of the detail can be hidden in the gloom, no?
Well ... 'unfortunately', in this case, it's not just a night scene, but a moonlit night scene, so there is going to be plenty of illumination! I can't just 'hide' things in dark corners!
The main problem for coming up with a design based on this woodland area, is how to 'open it up'. There are no long vistas possible, so the only way to get some space in a design is to get my (virtual) axe out, and start removing trees. I 'clear cut' an area around the tent, and prepared an image with some components arranged in four planes:
- a few trees in the foreground, which will be carved in enough detail to show surface texture.
- the tent and a couple more trees in the next plane
- a group of (imaginary) trees to define the rear boundary of the visible area, and finally ...
- a 'backdrop' plane, also completely imaginary, to try and indicate the presence of a more distant area of the woodland.
Before I show you the design, there is one more thing perhaps worth mentioning. The design for the previous print did actually 'look like' the finished print. All the major components of the print were visible in the line drawing. This one is different. The first and second planes are basically visible, but the third and fourth will be primarily defined by colour blocks, at a later stage in the process.
Anyway, here is the basic drawing around which the print will be built:

As far as I can tell at this point, there should be around 12 faces of colour blocks, and maybe 20~24 printing impressions. I wasn't hugely successful with getting the lighting right in the previous print, but this time, that is going to be critical. Moonlight on a woodland glade - it has to be dark, yet at the same time the dappled areas of light on the forest floor will have to glow brightly!
I wonder what I've got myself into this time ....

The thread continues in [Forest in Autumn - 2] ...