Posted by Dave Bull at 4:04 AM, February 4, 2011 [Permalink]
With most of the carving now finished (except for the sea block, for which Seki-san is sending me a bit more detail later ... bubbles, etc) it's time to start getting ready for the printing.
And that means ... sizing time!

This is the fourth pair of prints that I have done since beginning to do the sizing myself, back in the summer. As I reported at that time, it went pretty well (considering I had never done it before), and I was feeling fairly confident about it.
The second 'go-round' a couple of months later also went smoothly, but when I did the paper the third time - for the previous pair of prints exactly two months ago - I ran into many problems. That was in early December, and the ambient conditions here could not be more different; instead of hot and humid, it had become cold and very dry. But I was ready for that, or so I thought.
I went back to the 'books' for advice on how sizing in winter should be approached differently from summer, but all I found were repeated comments to the effect that the mix should be 'weaker' (less gelatin to any given amount of water). So I cut it back about 10%, and proceeded as usual.
If I said 'it was a disaster' that would be an exaggeration, because I was able to print on the paper (cursing at the 'paper sizer' every step of the way), but it was basically a mess, start to finish.
What I hadn't realized - because my 'introduction' to sizing came in the warm season - was that doing it in summer is easy compared to a colder season. Paper at room temperature (in summer) is soft and absorbent, and the warm size floods into it smoothly. But paper in December is (of course) cold and brittle, and even though the size itself is warm (coming straight from the heated bath), the instant it hits the paper it 'gels' and tightens up. I could see this happening as it came out of the brush, and later when I was printing, the 'spottiness' was very evident. Rather than being distributed evenly throughout the body of the paper, the gelatin was 'dotted' everywhere.
And then when I was drying it, no matter how tightly I kept the windows closed, the paper dried almost instantly, curling up and 'crisping' as it did so. It was very difficult to get it smooth and ready for printing when moistening it later.
So ... this time around, I was ready. I made up the mix with an even lighter amount of gelatin and alum than before. For the record - if anybody is 'doing this at home', I used 2 litres of water, 80 grams of gelatin, and 23 grams of alum.
Then, getting an old panel heater out of the closet, I set it up so that the waiting paper stack got basically warmed up (photo above). (I also prepared the paper an hour or so before this, by 'hiding' it under my kotatsu (the sunken table with the infra-red heater underneath) in the living room.
This all helped a great deal, and the size came out of the brush into the paper very smoothly indeed. One problem solved!
But there was another problem with my previous attempts, both in summer and winter. I have been having a lot of trouble getting the sizing evenly spread across the sheet. The problem is the 'touch-down'. The moment the full brush touches the paper, it 'lets go' of a lot of the liquid, and even though I tried to move quickly at first, then slowing down as the brush became more empty, the initial spot was always too wet.
So this time I decided to try something else.
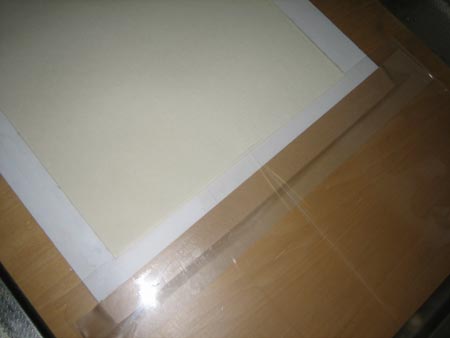
Not sure how visible it is in this photo (and the one above), but I have put a very thin (but stiff) plastic sheet in the 'touch-down' area at the right side of the brushing area. Here's a closeup of how the paper stack (these are finished sheets) extends just a tiny bit under the sheet:
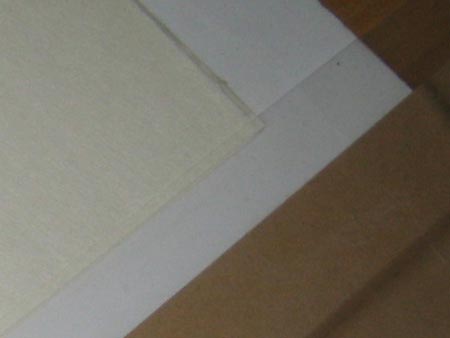
Each fresh sheet goes onto this stack, and is slipped under the edge of the plastic. I then touch down with the brush out in the plastic area, and sweep it smoothly onto - and across - the paper. The plastic catches the initial flood. The very tip of each sheet thus gets missed in the brushing, but that won't be printed on, and actually will be trimmed off later anyway.
How did it work? Very well indeed. I still had some sheets with too much at that end, but it was greatly improved over last time.
But there is something else to mention about this kind of 'trick'. Every now and then, I get an email from somebody who has seen one of my sharpening videos, letting me know about a wonderful tool that they want to recommend - a little roller device that will keep the bevel of the knife 'flat' when rubbing it across a sharpening stone. "It's great! You never have to worry about the tool rocking on the stone!"
Yes, I'm sure. But also, if you use such an aide to sharpening, you yourself will never become able to hold the tool properly. For the rest of your life you will be dependent on it. No thanks. I'd rather struggle (at first), then later, enjoy my ability to do it properly without the crutch.
So I was thinking about that as I set up this plastic sheet today. "Am I 'crippling' myself?"
I think not. I'm still trying to get the proper smooth 'touchdown' motion, and whether or not the plastic is there I think won't make too much difference in my progress.
Maybe.
Anyway, it's all done now, and ready for printing. I think the results should be better than the previous batch (it couldn't be any worse!), but we'll discover that next week.
In other news ... Did you read the comment I posted in the previous entry? I'll be out of here on Sunday for an appointment with Seki-san, and then I'll be downtown again on Wednesday for a visit to Takahashi-san, who is the lady currently sponsoring young Sato-san's training. It's not possible to make arrangements with him directly, and I will have to go through her. I think she should be cooperative though ... we'll see.
What's cooking? Well, I had better not talk too much about it until I get the "OK, I can do that!" from these people, but the idea for a nice little 'fun' project has bubbled to the surface over the past couple of days ...
And on top of that stuff, I'll be out of here all day Tuesday too, for a day of demonstrations and fooling around at school!
So ... I made it through the first half of the Mystique series with everything getting out the door on time, but it's looking a bit iffy for these next two ... Dave's falling into his bad habits again!
