![]()

|
|
|
|
|
|
|
|
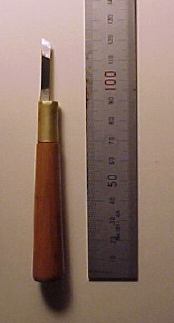
One knife blade doesn't last very long; usually just a couple of months. I keep the same handle of course, just slipping in new blades as needed.
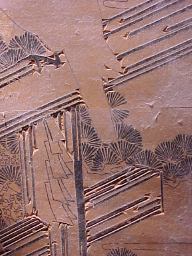
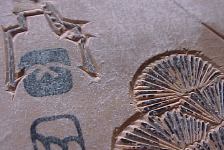
The cutting knife is of course quite fine, and the lines it incises are somewhat difficult to see. The small triangles cut out here and there show those places where two cut lines meet. These triangles are cut away because the clearing tools to be used later will not fit into those corners. In some places - between closely spaced lines - long thin slivers of wood have already 'popped out' ... The body of the crow will be left on this block, but the black you will see there in the final print will come from an additional 'tsuya' (shiny black) block that will be overprinted on top of it.
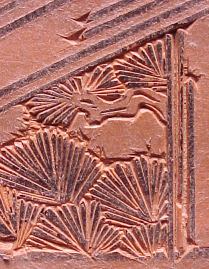
Here's a close-up of the 'pine needle' clusters - all still done using just the same tool ... That 'blank' space you see in this photo just under the horizontal tree branch will be cut away later with the 'aisuki' chisels. You can see in a couple of spots where the paper has peeled away as I cut into it. This is common with very delicate work, no matter how well one pastes down the hanshita. It's actually not a problem, because once one side of any line is cut, you then know where the other side should be, and having the paper lifted out of the way sometimes makes it easier to see where you are going ...
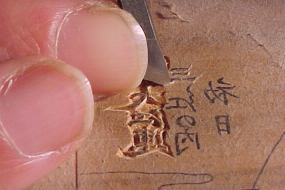
I've 'knocked off' the very tip of the knife by rubbing the back side of the knife with a few strokes on one of the sharpening stones. I did this 'temporarily', for the job of carving the 'wiggly' and rough outlines of the tree branches. The knife must turn this way and that as it moves along the wood, and if I left the tip in its delicately pointed shape, it would soon break off. Knocking off the tip like this avoids a lot of resharpening. For carving the calligraphy of the poem (visible in the background) I will need the full natural point, and will sharpen it that way at that time.
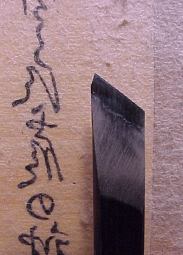
I guess with a photo like this you can get an idea of the scale of this work. Actually, this is a photo of carving the 'title' of the print - the poem is written with even smaller characters ... I don't try to do this with the naked eye. I have a lens on an arm that extends over my desk and I look down through it at the block. I don't know what the carvers in 'the old days' did - when did lenses and spectacles first start to be used? It seems difficult to conceive of them doing it without such aids. When carving characters like this, there is absolutely no 'strength' needed; the blade is only inserted a fraction of a millimetre into the wood, and then slices - and that is the appropriate verb, not 'cuts' - its way along the lines. Only the tiniest wiggle of the wrist is needed to take it around the curves of the line.
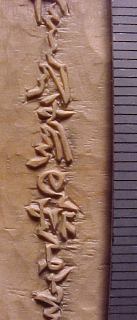
Here's a bit of one of the poems, with a millimetre ruler for scale ... Although I think I'm pretty close to the shape of the original characters, I really won't be able to tell until I've done some test printing. Once I can then see the result, I will return to the block and trim off some lines that may be a bit thick, or round off some corners that are too 'sharp'. This particular piece of boxwood isn't as fine as I had hoped it would be. It was sold to me as a piece of Mikurajima tsuge - boxwood from Mikura Island; this wood is reputed to be the finest boxwood, and has been used for centuries for making ultra-fine wooden combs. I'm not about to pretend to you that I can tell from looking at this wood just what island the tree was growing on, but there are those who apparently can ... It's not that this piece isn't hard enough, that it certainly is; I broke the knife many times while carving this poem. The problem is that once the carving was done, and the paper was being washed off, the wood absorbed the water too readily and some of the thin lines have expanded in width - not a great deal, but enough to spoil their character. I will have to trim them down after seeing the test printing. This wood isn't quite as hard and dense as I would like it to be. Back to the woodyard for next time ...
Once the outlines are finished, the hangito will not be used again on this block. Note that only those lines which will print in black on the finished print have been cut. The two uncut patterned areas you see in this photograph will be cut later on one of the colour blocks. (If I were working from an original artist's drawing, I would have to make sure that I had traced a copy of such patterns onto a separate hanshita, in order that they not be 'lost'. But as I do have an original here for reference, I can simply ignore them at this stage.)
For clearing the 'waste' on this block, I use two chisels - a 15mm asa marunomi (shallow 'U-shaped' chisel), and a 24mm hiranomi (wide flat clearing chisel). These tools are both used with a hammer or mallet. It is difficult to see in the photo, but there is a 'bench dog' on the carving bench, against which the block rests while the 'banging' is going on. The block is not clamped in place, but must be free to turn this way and that, as the wood grain of this cherry is quite convoluted in places, and one must frequently rotate the block and work from the reverse direction to avoid splintering out the wood.
Just how close to the carved lines to go is a matter of skill - and bravado! The more wood one can remove at this stage, the less work will be needed at the next step - but a tiny bit too far, and you are looking at a time-consuming repair job. Because people are 'watching' this time, I think I'll stay on the safe side, and not tempt fate by going too close ...
The third stage in cutting the keyblock is removing those last little areas of waste left bordering the lines. This is done with the family of flat chisels known as aisuki. I used five of them on this block: 6mm, 3mm, 1mm, .5mm, .Xmm (that smallest one is just a 'point', used for prying out waste in very small spaces). In addition to this clearing, I also use the largest of these aisuki chisels for running over the places scooped out by the marunomi to trim down any lines and striations left behind. This isn't absolutely necessary, but I like to have a clean and smooth-looking block (and it does actually help the printing process go smoothly, as the pigment builds up on such striations and sometimes causes blots on the paper.)
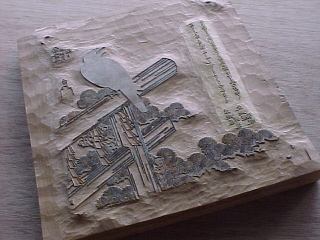
So here's the finished key block, freshly cut, and with the left-over remnants of the hanshita paper washed off. The next step will involve smearing black ink all over it, and I always feel a bit of a sad twinge whenever I do that - these blocks are like sculptures, and I'd like to be able to leave it in this beautiful 'natural' condition ...
|
|
How the Prints are Made | Completed Albums | Subscriptions |
|
|
|
|
|
|
|
|