« [River in Summer - 16] - Impressions 7~10 | Main | [River in Summer - 18] - Impressions 13~16 »

[River in Summer - 17] - Impressions 11~12

Posted by Dave Bull at 7:40 PM, June 4, 2007

Continued from [River in Summer - 16] | Starting point of the thread is [River in Summer]

Only two impressions in this update ... lots of other work going on at the same time! (... over on the book production side of things ...)

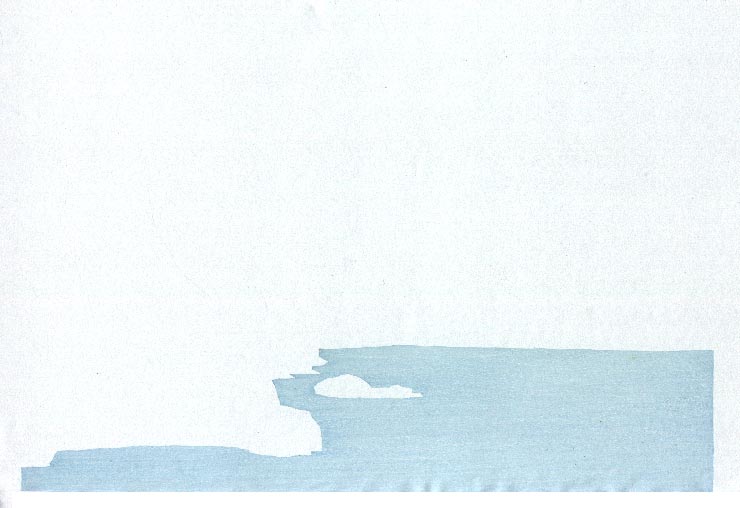
Impression #11 - Finally, we get something on this print other than grey or black! The pigment being used here is raw Prussian Blue, printed in a thin layer over the previously applied grey base. This certainly isn't the final river colour, although the tone you see here will 'show through' in a few places through cutouts in the block that will later be printed over top of this one.

That impression by itself (on scrap paper ...) (block):

Before moving on to the next impression, a few words about what you will see ... The pigments used in this kind of Japanese printmaking are all transparent. This has a couple of very important ramifications when planning the arrangement of colour blocks:
1) Everything shows through. Nothing gets covered up, and whatever you put on the paper will still be visible in the finished print. Every colour is blended with whatever is on the paper already. (The previous blue impression is a perfect example - the 'clean' prussian blue doesn't hide the grey, it becomes toned by blending with it, just like a colour on a Photoshop layer set at X% opacity, blending with the colour below.)
2) You can't print light highlights onto dark areas. Unlike oil painting, or acrylics, or whatever, you can't take a brush, dab it in white pigment, and then touch highlights onto the image. You just can't do it. Any areas that are to be lighter than their surroundings, must be printed from separate blocks, and then avoided during subsequent printing of those darker areas. We've already seen this in this print - the modelling of the boulders started with the lightest tone, and then built it up step by step with blocks cut to create darker areas. The highlights are created by omission, not application.
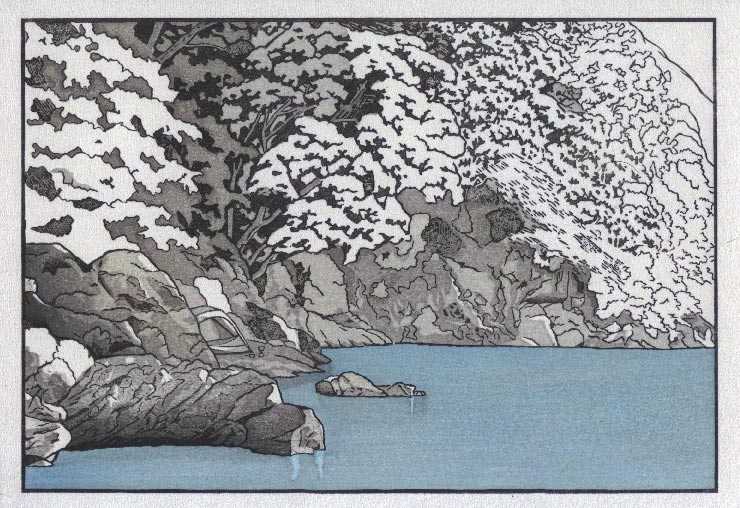
So ... the same thing is now going to happen for the forested mountainside - work from light to dark - but with a major difference ... it's not just grey stone, but a complex area of mixed greenery, with various shades, various shapes, and various shadows. It's going to be quite a party! Let's begin ...

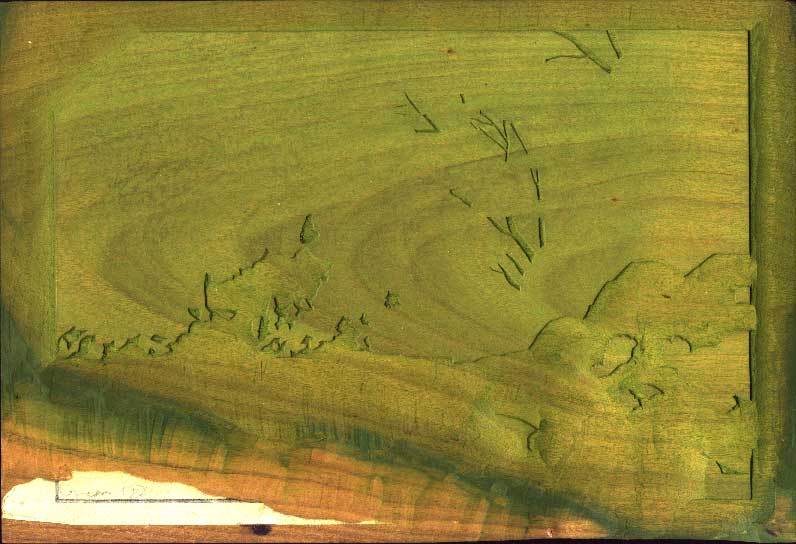
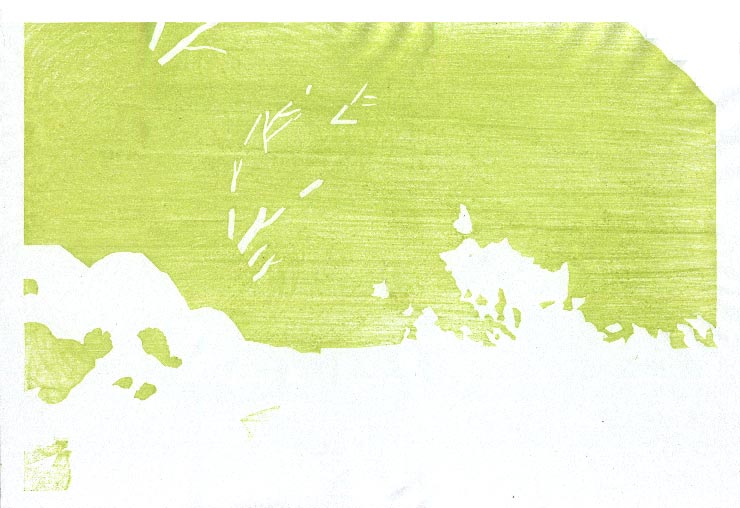
Impression #12 - Base tone under all greenery:

That impression by itself (on scrap paper ...) (block):

The only places on the sheet that remain untouched by pigment now, are the sky up in the top right, the scattered 'sunshine' highlights on the rocks here and there, and ... one little screw-up, where there is a bare white patch showing on the mountainside, over near the right side, which you can easily see if you click to bring up the enlargement. I guess when I cut the green block, I was thinking that spot was stone, but when I cut the base grey block, I was thinking it was greenery ... oops! (I'll make a 'plug' in one of the subsequent colour blocks to cover it up ...)

So with 12 impressions now done, we're roughly about 1/3 of the way through. I still don't know exactly how many there will be, but as far as I can tell at this point, it will probably be in the low 30's.

The thread continues in [River in Summer - 18] ...

Discussion

Following comment posted by: Marc Kahn on June 5, 2007 10:09 PM

I think it's exceptionally cool that with only 1 application of green, because it's being overlaid on top of various greys, there can be so many different shades of green. I can easily count 5 distinct shades of green, although there's probably more.

The idea that the final color of any given area of the print is the cumulative result of all the layers of color applied to that area is a source of wonder to me. If you think about it mathematically, each time the printer adds a new layer, he doubles the number of potential cumulative colors. Therefore, if there are N layers, the number of potential colors is 2 raised to the Nth power.

This print, with 12 layers so far, could have as many as 4,096 different cumulative layers. Once Dave reaches his minimum projected 30 layers, the potential number of unique overlay combinations will be over 1 billion.

I'm interested to hear Dave's estimate of how many different overlay combinations will actually be in this print.

Marc


Following comment posted by: Dave on June 5, 2007 11:17 PM

Dave's estimate ...

Something a bit less than 1 billion .. :-)

I don't have any idea ... and I guess the concept of 'how many colours are in this print' really doesn't have much meaning for this kind of work. With ukiyo-e prints it's usually fairly easy to count colours, as they are mostly 'in between' the lines, but when dealing with shin-hanga work, with blurred lines and multiple overprintings, counting becomes pretty much impossible.

But what is important - and vitally so for the publisher - is how many impressions it takes to produce an image. This is of course mostly a matter of economics; more impressions = more cost ... in blocks, carver fees, printer fees, and increased spoilage.

So when Dave the publisher was planning these colour blocks, he was trying to reduce them as much as possible by demanding a large number of over-printed areas, but was wrestling with Dave the printer, who wants as many separate blocks as possible on hand, to give him the maximum freedom and flexibility for devising an attractive and interesting image. (Having too many overprinted areas greatly reduces flexibility - change one pigment on one of those blocks, and you may change the result in distant parts of the image.)

But the two of them came to a compromise a few weeks ago, and worked out a colour breakdown using 12 faces plus key block. (Many of of the faces include more than one printing area, and some will be used more than once, thus resulting in 30+ impressions.)

As work has progressed though, a couple of those blocks have turned out to be not so useful, and are now being altered, and a couple more new ones will have to be added to the pile. So the thing is still in flux, and just how it will all turn out is yet to be seen. (There is no set 'proof' copy that I am working towards, and anything is yet possible!)

I realize also, that I perhaps didn't mention about the quantities involved; there are 112 sheets of paper in the stack that I am currently printing. I'm intending to get around 200 copies of each of the prints in this series, so as soon as this first batch is done - I guess early next week - I'll be cutting another batch of paper and starting all over again, for the second run.


Add Your Input


Remember Me? (with a cookie ...)

(you may use HTML tags for style)

Back to the Main Page