One-point Lesson : Handmade Sharpening Stones (more ...)
Lesson #18: Making sharpening stones for curved chisels ... continued
A previous entry (#16) discussed making one's own sharpening stones for curved gouges and chisels. This time we'll see how to make the stones for that final dressing step in sharpening - removing the 'burr' on the inside of such gouges.
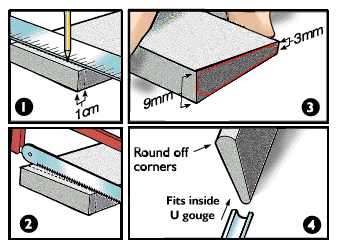
Although it is technically possible to remove the burr by using just the edges and corners of a normal rectangular sharpening stone, the job is much easier if one has a collection of small 'slips' of the proper shape. To make these, start with a fine grit man-made stone of standard rectangular shape (a 'shiage-to'), and use a fine-bladed hacksaw to cut a one centimetre slice from one end (Figs. 1-2).

For the next step use a concrete block (or alternatively some sandpaper placed on a hard and flat surface). Rub the freshly cut face of this small piece of sharpening stone against the abrasive surface until it is evenly beveled - one end of the slice should end up about 9mm thick, and the other end about 3mm (Fig. 3). Then hold the slice vertically and roll the ends against the concrete in such a manner that each end of the slice is rounded off to an even 'U'-shape (Fig. 4). (Do all these rubbing steps with plenty of water splashed onto the concrete block)
When the desired shape has been reached, clean up any scratches by dressing the stone against a regular flat finishing stone (always with plenty of water). Your new stone is then ready for use; the 3mm end will remove the burr on the inside of gouges from 3mm~9mm in size, and the 9mm end will do so for gouges from 9mm up.
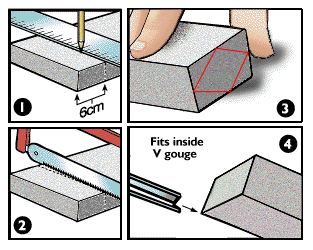
Slipstones to be used for the inside of 'V'-gouges are made in the same fashion. After slicing another similar piece from the original sharpening stone, rub the four long edges against the concrete block in such a way that the slice is turned into a long and thin diamond shape (when viewed end on). As you rub, watch carefully and stop when the developing bevels meet each other, forming a sort of 'knife edge' on each side of the slip. It is this thin edge that is used to remove the burr from inside a V-gouge.

Unless you drop and break them, these tools will last your lifetime ...
Graphic provided by John Amoss
Thanks John!
