A 'Scattered' Gold Background
Using 'Sunago' ...
Many of the old woodblock prints in the genre known as 'surimono' made use of metal 'pigments' in their manufacture. Metals were used as leaf, powder, flake, or filings, and, when used with discretion, could add quite a feeling of luxury to the print.
On this page, I will demonstrate a basic technique for creating a background of 'torn' flakes of gold scattered across the paper ...
This effect is most commonly used in papers for calligraphy here in Japan, but now and again, one sees it used on a woodblock print.
(Many thanks to Mr. Hisashi Komuro for demonstrating for me the techniques illustrated here.)
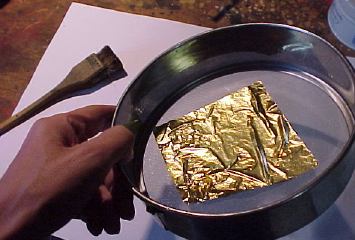
The flakes are usually not purchased in that form, but are made up by the printer himself from standard gold leaf. The tools one needs for this are simple - a strainer (sieve) with a good stiff mesh, and a brush with short and stiff bristles.
To make enough flakes to cover the background of 200 prints of about B5 size, about ten standard sheets of gold leaf are needed. Before each sheet is 'processed', it must be lightly - very lightly - dusted with talc.

Without this dusting, the flakes would stick together in the applicator tool; with too much talc dusted onto the leaf, the flakes will not adhere well to the paper.
After each leaf is dusted, place it into the strainer.
Use the stiff brush and rub in very tight circles over one spot on the leaf. Have a clean sheet of paper underneath to catch the flakes. After a moments rubbing, the leaf at that point will have been torn to shreds and forced through the mesh. Move to another spot and rub again ...
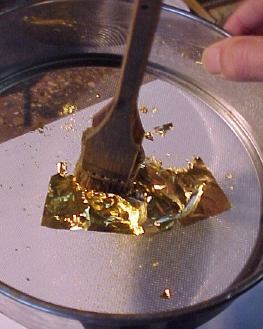
Move around the leaf, 'chewing it up' section by section, until all the gold has been turned into flakes. Try to avoid having the leaf fold over itself in the strainer, as this will cause it to adhere to itself, producing 'lumpier' larger flakes.
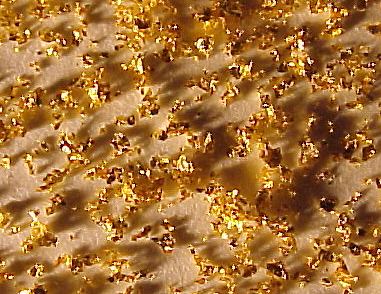
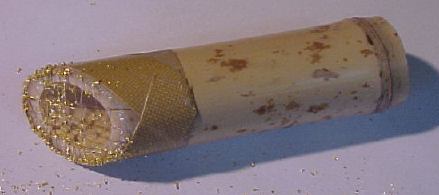
When all the sheets have been processed, you will have a pile of flakes, known in Japanese as sunago. (As the flake size is determined by the size of the mesh on the strainer, decorators in gold who do a lot of this work keep an assortment of strainers (furui) on hand, as well as a collection of takezutsu in different sizes ... It is also common to use a 'two-pass' process - passing the leaf through a strainer with a larger mesh first, and then passing the resulting sunago through one with a finer mesh.)

A close-up look shows them to be torn and twisted little fragments of gold leaf. They are extremely light; a sneeze would be disastrous, but even strong breathing will send them spinning up into the air ...
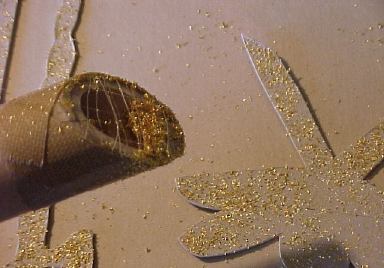
The sunago will be applied to the paper with the use of a tool known as a takezutsu, made from a segment cut from a piece of bamboo (open at both ends - one end cut with a bevel shape):
The bevelled end of the tool is criss-crossed with a mesh of hairs:

These hairs (which I collected from myself) are glued in place over the mouth of the tool and protected by strips of tape. The openings in the mesh should be just a bit larger than an average flake.
Once the tool is ready, the sunago is 'loaded' into it by pouring the flakes into the open back end of the tool.

For this print, I wanted a 'tone' on the paper, so I printed a background tint in the usual manner before any of the other steps. (I also put a light gradation on the background, working up from the bottom of the sheet.) The paper was then ready for the flakes to be applied.
The flakes will be bonded to the paper with nikawa, liquid gelatine - the same substance used to size the paper. It should be mixed with enough warm water to allow it to be brushed over the block, but not so much as to dilute its 'stickiness'. A few trials are in order, to ensure that the flakes on the finished print will adhere properly.
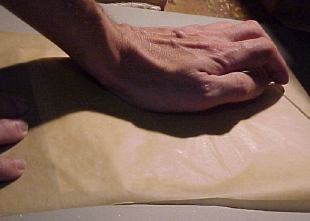
Once the block has been coated smoothly, lay the paper in place and lightly use the baren to ensure that contact has been made everywhere. Do not use as much pressure as you do in normal printing - you want the gelatine to remain on the surface of the sheet, not to be pressed down into the fibres.

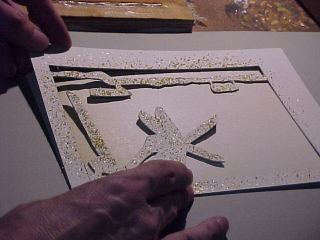
Because I want the flakes only to appear in the 'background' portions of the image, I prepared a cardboard mask for the next step:
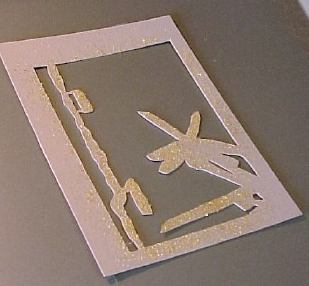
The wet paper is placed face up on a hard and smooth surface (a sheet of heavy glass is perfect), and the mask aligned properly on top of it:
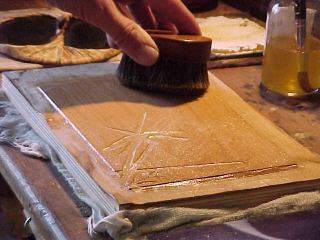
Now the fun begins. Take the takezutsu and lightly wave it in the air above the print. Too lightly and no flakes will come out - too vigorously and too many will drop down. How high up? Too high and the flakes will fly all over the room instead of where you want them - too low near the paper and you will get 'clumps' instead of a smooth distribution. About 10~15 cm up above the paper seemed to be about right for this print ...
You will have to occasionally tap the takezutsu with a fingernail of the opposite hand, to dislodge more flakes. Keep the waving motion going though, or you will get an uneven distribution of flakes on the surface of the sheet.
When you've got the coverage you want, lay the takezutsu back down gently, lift off the mask, and cover the paper with a sheet of something smooth for the next step. Rub with the heel of your palm firmly over the entire surface, to flatten the flakes in place and ensure that they are bedded into the wet surface.
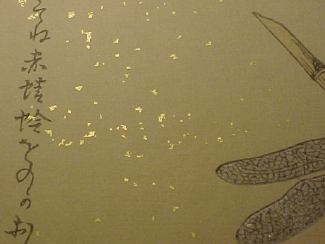
The result should be something like this:
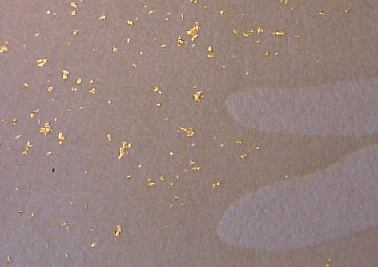
The flakes could actually be scraped off at this point, but if they are not disturbed they will remain in place, and when the paper is dried at the end of the printing process, they will become permanently fixed.
The still-moist paper now goes into the stack, ready to be printed with the next colour in sequence ...

