Gradation Printing : Additional Material
More Basics of Gradation Printing ('Bokashi')
This first entry is reproduced from the book 'Woodblock Printing' by F. Morley Fletcher, published by John Hogg, London 1916. (pp.76-77) (eBook version of the volume is available here)
The simplest way of making a gradation from strong to pale colour is to dip one corner of a broad brush into the colour and the other corner into water so that the water just runs into the colour; then, by squeezing the whole width of the brush broadly between the thumb and forefinger so that most of the water is squeezed out, the brush is left charged with a tint gradated from side to side.
The brush is then dipped lightly into paste along its whole edge, and brushed a few times to and fro across the block where the gradation is needed. It is easy in this way to print a very delicately gradated tint from full colour to white. If the pale edge of the tint is to disappear, the block should be moistened along the surface with a sponge where the colour is to cease.
A soft edge may be given to a tint with a brush ordinarily charged if the block is moistened with a clean sponge at the part where the tint is to cease. This effect is often seen at the top of the sky in a Japanese landscape print where a dark blue band of colour is printed with a soft edge suddenly gradated to white, or sometimes the plumage of birds is printed with sudden gradations. In fact, the method may be developed in all kinds of ways. Often it is an advantage to print a gradation and then a flat tone over the gradation in a second printing.
This next entry is reproduced from the book The Technique of the Color Wood-cut, by Walter J. Phillips, published by Brown-Robertson Co. Inc., New York 1926. [Editor's note: Phillips' entire text is available on line, courtesy of Mr. Roger Boulet]
To print gradations load only one corner of the brush with pigment, the rest of it with a little water and paste. If the gradation covers a large space this is unnecessary: start with a full brush where intense tone is intended and work towards the light; you will find if you manage properly that you will finish with a comparatively clean brush. It is sometimes expedient to print the gradation first, and a flat tone over it. For small areas, such as the boy's red cheeks in The Bather, use a dry brush with a small quantity of strong pigment, already mixed with paste, on damp wood.
The next entry is reproduced from the book Japanese Woodblock Printing, by Hiroshi Yoshida, published by Sanseido, Tokyo 1939. (pp. 83-83) (eBook version of the volume is available here)
Bokashi (gradations or blending)
There is a wide variety in gradations, but at least the following seven must be mentioned:
- Gradual gradation. In order to get the gradation required, the block is rubbed first with a wet cloth on the end where the colour is to disappear in the gradation; then a moistened brush is dipped in pigment at one end and is rubbed against the block back and forth and sideways a few times so that the pigment in the brush may be diluted with the water left by the cloth. This is repeated for each print. When the shaded area is to be broad, often thick pigment is applied to one end and thin pigment to the middle part. This will save the movement of the brush toward the end where there is no pigment.
- Short abrupt shading at the end of a narrow tint. Water is first applied to the block with a cloth and then the pigment with either maru-bake (brush covered with pigment) or kata-bake (brush with pigment at one end).
- Short abrupt shading at the end of a long flat tone. Maru-bake is used. First wet the block with a rag; then rub the desired area back and forth with the pigment contained in the maru-bake. The slight natural irregularity caused by this motion, aided by water on the block, will produce the gradation.
- Obokashi, a gradation in a wide area. Gradual shading over an area of one foot or so involves difficult work. First wet one end of the block with a rag, and apply pigment with a broad brush, as broad as the area to be covered with gradations. It is necessary to print several times, each time narrowing the space to be shaded. Thus the gradation of a long area may be obtained.
- Curved gradation. The brush containing the pigment should be applied to the block, twisting it or curving the motion as required. The principle applied is similar to other forms of bokashi.
- Curved and straight gradation combined. A similar principle prevails here also; the straight and curved motions are combined when applying the pigment to the block.
- Gradual blending of two colours. In producing this blending, a broad brush is used saturated with different pigments, one at each end, which will blend into each other when the brush is moved on the block. Sometimes two brushes are used, each with a different colour. If there is to be a vacant space between the two colours, water should be applied there.
To be sure, there are other kinds of bokashi: a variation may be created by the use of the baren; the blending spots may be obtained by wiping the pigment of the block in certain spots; or a piece of cloth may be used with water to create shading in any form desired.
A piece of cloth folded with a piece of wooden board inside is generally kept on a tile on the work-stand. And while engaged in this kind of work the placing of the rag is very important. If it should be turned around, the colour might be applied to the wrong place.
It is the same with the brush; carelessness will bring similar disastrous results.
In creating gradations, it is easier to work with plenty of pigment. Therefore, if the block has many small holes such as represent shimmering lights on the water, the pigment is likely to fill the holes. The block should be tapped with the brush and then the finishing strokes given before printing so as clear the holes.
The rag is used for applying colour to the middle of the block in order to get a blended effect. For this the rag is flapped on the surface and then a small amount of pigment is applied to the middle with a brush as in the case of obtaining red cheeks. But these devices often fail to produce satisfactory results.
The blending, as well as the baren-suji, show the effects obtained by printing from the blocks that are not cut for that purpose. They produce splendid results if well utilized, but bring complete failure when badly used.
The next entry is reproduced from the book Japanese Print-making, by Toshi Yoshida & Rei Yuki, published by Tuttle, Tokyo 1966. (pp 68, 77-78)
For bokashi or gradation printing, the block is first rubbed with a wet cloth in the area where the color is to fade in gradation. Then one side of a moistened brush is dipped in pigment and rubbed back and forth sideways a few times so that the pigment on the brush may be diluted with the water left by the cloth.
In this case the final stroke of the brush has to follow the grain of the wood, although in general this is not desirable.
* * *
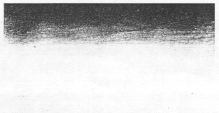
Ichimoji-bokashi (straight line gradation) is the sort of bokashi often encountered in the landscape prints of Hiroshige and Hokusai, where it is used to represent the horizon, the sea, or the sky.

To obtain this effect, the part of the block where the color is to fade should be dampened with a wet cloth. Then a brush of the same width as the strip to be printed is moved horizontally from side to side several times. This produces a short, rather abrupt shading at the end of a narrow tinted strip.
Ichimoji-mura-bokashi (straight line gradation with uneven edge) is a variation of the technique described above.
In this case the brush is moved from side to side, first with a slightly irregular motion, then in the same manner as for ichimoji-bokashi.
O-bokashi (wide gradation) is a gradual shading over a wide area. To achieve this, the technique of the standard bokashi is repeated a number of times, each time narrowing the space to be shaded.
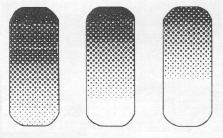
This is done by the use of different brushes, each of which has been saturated with pigment as required.

The O-bokashi technique requires much skill.
Ate-nashi-bokashi (gradation without definition) is employed to get the effect of rosy cheeks or similar soft modulations of color. The principle is the same as in the other forms of bokashi. The printer dampens the block with a wet cloth, circumscribing the border of the part that is to fade out in gradation, and then applies the pigment with a small brush. It is difficult to obtain the same result in each print when this technique is employed.
Futa-iro-bokashi (two-tone gradation) is the gradual blending of two colors. To produce this effect, the printer used a broad brush saturated with two different pigments, one at each side, which will blend into each other when the brush is moved over the block. Sometimes two brushes are used, each carrying a different color. If there is to be a vacant space between the two color areas, water should be applied to that part of the block.
