Yoshida - Japanese Woodblock Printing : Chapter II : Part II
Japanese Wood-block Printing
Hiroshi Yoshida
CHAPTER II
(continued)
Woodblocks
Japan has a rich variety of trees growing in her domain, and while many kinds of wood have been tried for a great number of years, the cherry-wood, especially that of Izu Province, has been found to be the best for blocks. Besides sakura (cherry), katsura (Cercidiphyllum Japonicum S. et Z.) and honoki (Magnolia hypoleuca S. et Z.) may be used.
Cherry-wood is desirable for it is more easily handled and less brittle than some other kinds of wood, and thus convenient for cutting and printing. At the same time it also has the special quality which gives nokori-enogu. That is, it has power to retain a part of the pigment after printing. By the time about ten sheets have been printed, the block absorbs and retains some of the pigment which cannot be wiped off or printed away and which gives a desirable tone to the print. The cherry-wood block gives the best impression.
Honoki is rather soft. Its surface with the rough fibre produces an impression not altogether pleasing. But beginners use it mainly on account of its being easy to cut. Sakura and katsura have a harder grain, but they are more satisfactory than honoki. In olden times other kinds of wood, such as keyaki (Zelkowa serrata, Mak.), were inlaid in the block in order to give the benefit of the grain in special selected parts of the print.
For a fine engraving, a cross-section, or end of the grain, of tsuge (Buxus sempervirens, L., or box-wood), tsubaki (Thea Japonica, or camellia) and others have been used. Sometimes pieces of tsuge or tsubaki were inlaid and cut in order to get fine durable lines for the eyes and other features. Of course, almost anything can be cut for a print, the potato, carrot and linoleum being among the common materials used. Linoleum is too brittle to give a sharp definition, and it does not print well with water colours. However, for serious work, in the production of art prints, cherry-wood should be chosen. Especially for the key block, dry cherry-wood of uniform texture, which does not warp, is best. Wood for the key block must be hard in order to give a clear, lasting impression.
In order to prepare the wood for the blocks, it must be planed very smooth, so smooth that when two planed surfaces are put together, it will be difficult to separate them without slipping them along. When two such blocks with planed surfaces together are dipped into water it is well-nigh impossible even for a strong wrestler to force them apart. There are specialists for this work. Even when they are so well planed, the cherry boards will warp after about five or ten days of exposure to the air. So they must be planed again, and will then be ready for cutting. The wood-blocks will warp still more, but by wetting the surface the board will resume its flat shape. Hashibame (an extra piece of wood attached to either end of the board, or cross ends) may to a great extent stop the wood from warping and keep it straight, but this prevents the artist from taking advantage of the warping. The block should be about one or one and a quarter inches thick.
Preparation for Block Cutting
Now the board will be ready to be worked on. The paper with the outline drawing (sen-gaki) is pasted on it face down, the lines showing through on the back of the paper. The board must be larger than the drawing; it should have enough margin to include right-angle (kagi) and straight-line (hikitsuke) register marks.
The right-angle mark should be near the right hand bottom corner on the block and the horizontal line in front at a short distance from the left corner.
The pasting of the sen-gaki on the board to be cut is extremely difficult. In the Edo period a boy even after seven years apprenticeship to a cutter was not allowed to do this job. It was customary for the chief cutter to attend to the pasting of the drawing himself. To do this difficult work the necessary amount of rice paste is first placed upon the board. This is smeared all over the wood with the palm of the hand, thus covering the board uniformly with the paste. Then the whole surface is tapped with the palm of the hand flat so as to roughen it. This is done so that when the paper falls on it the paste does not immediately stick to the whole surface of the paper.
Having adjusted the bottom of the paper with the drawing on it to the lock, the paper is allowed to fall softly upon the block, the left half of the paper being held up between two fingers of the left hand. The middle of he paper is rubbed softly in a vertical direction with the right hand, thus securing the paper in position. The left half is rubbed up and down, working from the middle gradually toward the left edge. When the left half of the paper is on the block, the right half is first raised off the block and, in order not to create any wrinkles, rubbed with the left hand up and down gradually from the middle toward the right edge, slowly lowering the paper to the block with the right hand. Care must be used so that the drawing may remain the same size on the block as on the dry paper. Of course, all this should be done quickly but without undue haste, bearing in mind that the more quickly the work is done the less will be the amount of moisture absorbed by the paper.
When the paper is pasted firmly on the wood, and while it is still moist, the top layer of the paper should be peeled off by rubbing the surface with the tips of the fingers, rolling the fibre of the paper into small rolls. This is done in order to get a clear definition of the lines drawn on the other side of the paper now in direct contact with the block. Blank spaces may be left alone. The peeling should continue until the surface layer upon which the drawing was done is left on the wood. When properly done, the drawing looks as clear as if drawn on the block itself. The minogami paper must be of the best. When the paper dries up before the whole surface is peeled off, the artist may apply oil with a tooth-brush which makes the drawing stand out clearly, though it still leaves the unnecessary thickness of the paper on the wood to be peeled off.
When an error in the drawing is corrected by pasting another piece of paper on top of the drawing, the unnecessary part where the paper is double must be attended to before the peeling begins. It must be cut with a sharp knife and taken off, leaving on the block only the piece of paper with the correct drawing which must also be peeled off to the proper degree. When dry, the block is ready to be cut, and this is to be the key block.
Cutting of the Key Block
In cutting the key block several tools are necessary: a toh (knife), several aisuki (digging chisels), a couple of maru-nomi (rounded chisels) a hira-nomi (flat chisel), a few tsukibori (pushing chisels) a mallet, a small saw, and a grindstone. In olden times a kozuka (small knife worn on the sword) was used by converting it into a knife for cutting lines, but now a special tool has been made for the purpose. When using the knife, the right hand which manipulates it should be lightly supported by the left hand for emergencies. The necessary tools and their uses are as follows:
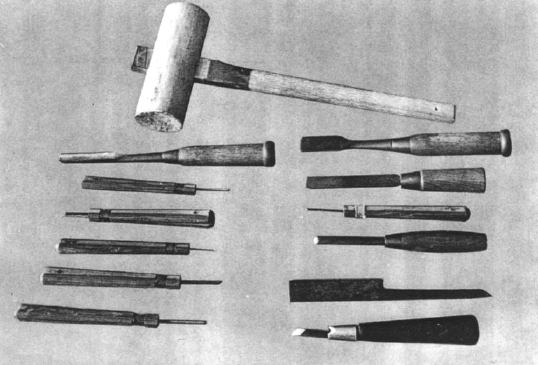
Figure 3
|
Maru-nomi Ai-suki Ai-suki Tsuki-bori Maru-nomi |
Kento-nomi Ai-suki Maru-nomi Saw Toh |
Toh, knife. Only one kind is necessary; used for cutting the lines by pulling it toward oneself with the flat side of the blade toward the line.
Ai-suki, flat chisels varying in width from one- to five-sixteenths of an inch. These are used for cutting away unnecessary parts of the board.
Maru-nomi, semi-circular chisels of two or three different sizes. These may have come originally from abroad, but have been in use in Japan for some time, long before the "modern" print-artists began using them. They come in different sizes and in irregular curves.
Hira-nomi, broad chisels to use on large spaces.
Tsuki-bori, for cutting by pushing forward. Several kinds of this type may be suitable for Westerners. I have been using some for cutting colour blocks. Some are V-shaped (sankaku-nomi); others U-shaped.
Kento-nomi, for cutting when changing the kento, or register marks.
Grindstones, both coarse and fine grained. All according to one's needs, used for sharpening the tools and grinding off the face of the block.
A small saw, for sawing off pieces of wood to be inlaid in the block by wedging them in when the wood chips off by an error in cutting. Unless one is very cautious the wood is liable to chip off while clearing.
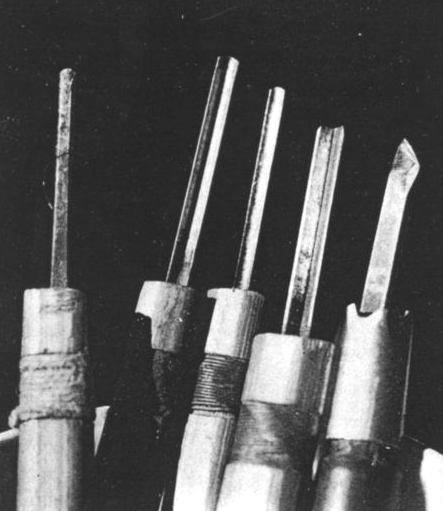
Figure 4
Tools
Left to right: Ai-suki
Maru-nomi
Maru-nomi
V-shaped tsuki-bori
Toh
It may be well for us to bear in mind that there are two kinds of prints: in one, great importance is placed on the cutting, in the other, on the printing. To my mind the importance should be evenly divided between the cutting and the printing, but often we find the print tends toward one emphasis or the other. European prints generally emphasize the cutting, and their methods are best adapted for such, while in Japanese prints it is generally best to place importance on the printing. The choice, however, may be left to the taste of the individual artist.
One way is to cut the lines with a knife exactly as drawn. This was the case in the Edo Period. The other is to cut with a tsuki-bori, creating the lines as the fancy of the cutter may move him; one line more or less would not matter in this style. The former places greater importance on the drawing, the latter on the cutting.
In my print called "Ohara Beach" (No. 81), the lines suggesting the reflection of light on water were cut by the latter method directly on the block in order to create the desired effect, though the lines were not shown on the original drawing. Such a practice does not seem to have existed in the Edo Period.
In cutting with a knife, the strength must be modulated according to whether the soft or hard parts of the wood are being cut. This is necessary in order to cut to an even depth, and to prevent the necessary parts from chipping. When the artist comes to a sakame, where the grain of the wood is reversed, the direction of the chisel in clearing must likewise be reversed.
In handling the knife in Japanese fashion, note that it is drawn toward oneself and not pushed away, and that it should be pressed down by the thumb, and assisted by the left hand as we have already observed, in order to prevent it from slipping. The artist cuts the block with the knife as if he were using his brush in painting. It is difficult to keep the knife from slipping when cutting slantingly across the grain, or when one strikes the soft spot after the hard grain in working at curves.
When the lines cross each other, the knife should be drawn continuously, raising it slightly at the point where the lines cross. The slight cut does not show in printing, if it is done only on one side. The cutting should not be stopped in order to avoid the line, for if it is, the strength of the line will be lost. In the Edo Period it was customary for the cutters to cut the lines of the face in continuous strokes, as in drawing. The triangular corners formed by the intersection of lines should be cut and cleared so that the corner may be easily finished when it comes to sarai, the clearing of a vacant space.
The knife should be held aslant when cutting, so as to form a sloping ridge for the lines. The lines thus formed will be strong and will prevent surplus pigment from collecting along them.
It is also well to put in the sute-bori first. The term means "thrown away cuts." That is, a line is cut slanting the opposite way at some distance from the line to be cut. This decreases the resistance and prevents the knife from breaking, thus greatly facilitating the cutting.

Figure 5
Key block for "Peaceful Riishiri"
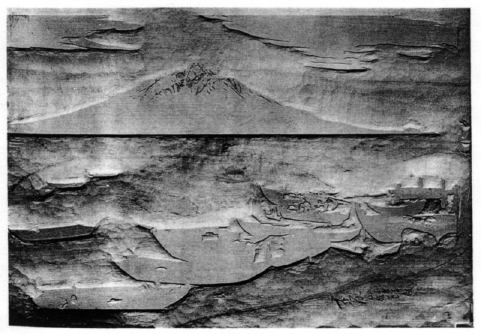
Figure 6
One of the colour blocks for "Peaceful Riishiri"
When curved lines are cut by an inexperienced hand, the knife often breaks. It may be sharpened, however, each time it breaks, and while it may not take more than ten days to use up the whole knife when cutting curved lines continuously, yet the knife, even three or four inches long, can be used almost to the end by resharpening it each time it breaks.
To cut curved lines requires a great deal of practice. Beginners in Japan are often required to cut words from the joruri-bon which is invariably written in a cursive hand. The curved lines give the cutters the best practice.
The knot in the wood is a very hard problem. It must be observed well before the drawing is pasted on for cutting, lest an important part of the drawing fall on a pitchy knot difficult to cut.
The cutting is generally started about the middle of the block, and will be easier if the block is revolved. In olden times cutters were ashamed of revolving the block in cutting, as the painter was in revolving the silk in painting. But for no particular reason, other than the fact that the act was considered disgraceful. As we have already observed, the line should be cut first of uniform depth. In sarai, or clearing, the chisel should be moved as a lever about one-sixteenth of an inch away from the knife-cut. If there are places where the cut is forgotten, or if it is not deep enough, then the line may chip off.
When the vacant space is very large, this space is left untouched, forming an island (if it should be beyond the reach of the baren when printing) in order to support the paper in printing, and in order to prevent it from touching the pigment on the block. This rarely occurs in the key block, but in colour blocks it is often required.
When a broad chisel is used in clearing there is a tendency for the block to slip away from the artist. Cloth cushioned under it will help, or a peg on the table will prevent the board from slipping.
In olden times cutters were specialized: kashira-bori and do-bori. The heads and hands of the figures were cut by the former; the bodies, the background, and the rest by the latter. The hair was cut by the cutter, though not faithfully drawn, for it was impossible to draw it. The lines of the features were cut much finer than the brush could render them. In this respect the cutting was similar to the engraving of the West.
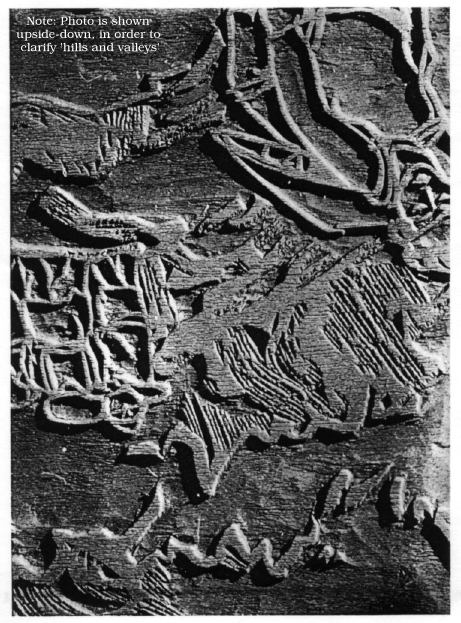
Figure 7
Detail (upper left portion) of the block from which Figure 8 was printed. Only bits of parallel lines print and produce sabi or dry brush effect. The slightly darker parts show low places where the block has been cleared. Of course, in the block the drawing is reversed.
Furthermore, what was impossible in the printing was achieved in the cutting. For instance, there is a technique known as ita-bokashi; that is, instead of ending with an abrupt cut, the design is cut away on the block little by little so that it may vanish gradually or the colour may end with a soft edge when printed. At the same time what appears almost impossible to cut by reason of its intricacy, may be cut with comparative ease if one knows how to do it. For instance, in the production of the effect of a dry brush which is known as sabi or kasure. This is achieved by cutting many parallel lines first in the direction of the brush-stroke and then cutting these lines with a knife here and there, changing the direction of the blade. This will leave numerous points, which, under a magnifying glass, may be found to be in triangles, rectangles, squares, hexagons, etc., as may be seen by the illustration inserted here.
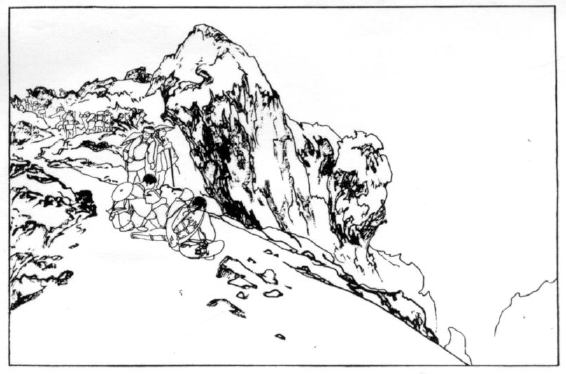
Figure 8
Kyogo from the key block of "Summit of Fuji"
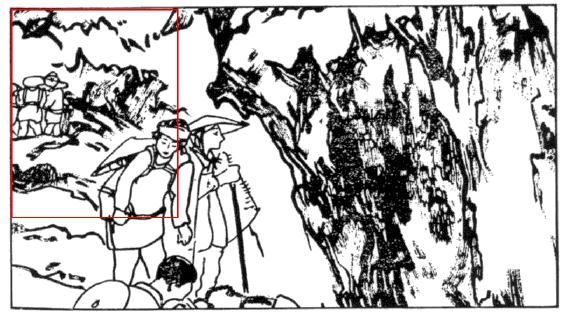
Figure 9
Detail of the same, showing sabi.
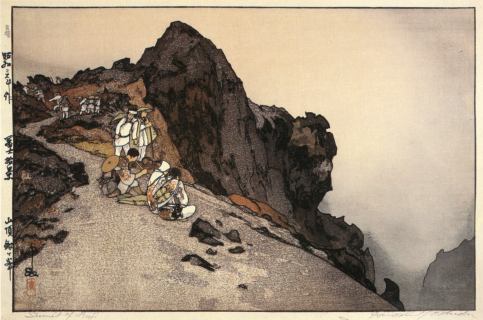
Figure 10
"Summit of Fuji"
