Fletcher - Woodblock Printing : Chapter VI
Wood-Block Printing
F. Morley Fletcher
CHAPTER VI
Detailed Method of Printing
Success in printing depends very much on care and orderliness. It is necessary to keep to a fixed arrangement of the position of everything on the worktable and to have all kept as clean as possible. To see the deft and unhurried work of a Japanese craftsman at printing is a great lesson, and a reproach to Western clumsiness.
The positions indicated by the diagram on an earlier page will be found to be practical and convenient.
The special tools used in printing are the "baren" or printing pad, which is the only instrument of pressure used, and the printing brushes.
THE BAREN OR PRINTING PAD
As made by the Japanese, the baren is about five inches in diameter, and consists of a circular board upon which a flat coil of cord or twisted fibre is laid. This is held in place by a covering made of a strip of bamboo-sheath, the two ends of which are twisted and brought together at the back of the board so as to form a handle. The flat surface of the bamboo-sheath is on the under side of the pad when the handle is uppermost. The ribbed bamboo-sheath is impervious to the dampness of the paper in printing, and the pad may be used to rub and press directly on the back of the damp paper as it lies on the block without any protective backing sheet. The collotype reproduction shows the shape and character of the baren.
Japanese printing pads may be obtained from some of the artists' colourmen, or from Japan through various agencies. They are by far the best instrument for the purpose. A pad lasts a considerable time, and when the bamboo sheath wears through may be re-covered as described below. If the new bamboo sheath is unobtainable, the baren may be re-covered by a sheet of vegetable parchment (of the kind used for covering pots of jam), laid on when wet, and twisted and bound at the end like the original bamboo covering. A baren used and re-covered when worn will last for an indefinite time in this way.
TO RE-COVER A WORN BAREN WITH BAMBOO SHEATH
Damp the new leaf in water with a brush on both sides thoroughly.
Wipe dry both sides. Lay it on a flat surface and stretch wider with the fingers on the inside, keeping the leaf flat with the palm of the hand.
Rub the inside of the leaf with something hard and smooth across the width on both sides.
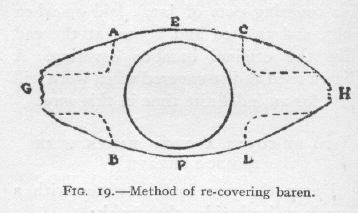
- Cut AG, BG with leaf folded.
- Place the round pad in position on the flat leaf.
- Stretch the leaf to lap at sides EF.
- Turn in EA and BF fold by fold, first one side and then the other.
- Pull hard before beginning the other end.
- Cut away CH, DH, holding down firmly the end done.
- Twist up the ends tightly, pull over to the centre, and tie tightly together; cut off ends.
- Polish on board and oil slightly.
Twist the inside part of the baren occasionally to save wear by changing its position within the sheath.
Several substitutes have been tried in place of the Japanese baren, with coverings of leather, shark's skin, celluloid, and various other materials, but these necessitate the use of a backing sheet to protect the paper from their harsh surfaces.
An ingenious rubber of ribbed glass which works directly on the paper has been devised by Mr. William Giles, who has produced beautiful results by its means.
If one is using the Japanese baren, its surface needs to be kept very slightly oiled to enable it to run freely over the damp paper. A pad of paper with a drop of sweet oil suffices for this, and may lie on the right of the printing block where the baren is put after each impression is taken.
An even simpler method is that of the Japanese craftsman who rubs the baren from time to time on the back of his head.
BRUSHES
 Japanese printing brushes are sold by some artists’ colour dealers, but these are not essential, nor have they any superiority over well-made Western brushes.
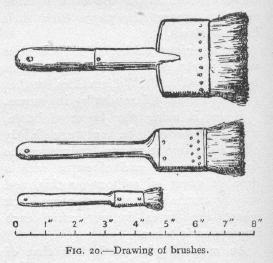
An excellent type of brush is that made of black Siberian bear hair for fine varnishing. These can be had from good brush-makers with the hair fixed so that it will stand soaking in water. Drawings of the type of brush are given above.
Three or four are sufficient; one broad brush, about three inches, for large spaces, one two-inch, and two one-inch, will do nearly all that is needed. Occasionally a smaller brush may be of use [Ed. note].
PRINTING
To begin printing, one takes first the key-block, laying it upon a wet sheet of unsized paper, or upon wads of wet paper under each corner of the block, which will keep it quite steady on the worktable. A batch of sheets of printing paper, prepared and damped as described in Chapter V, lies between boards just beyond the block. The pad lies close to the block at the right on oily paper pinned to the table. To the right also are a dish or plate on which a little ink is spread, the printing brush (broad for the key-block), a saucer containing fresh paste, a bowl of water, a small sponge, and a cloth. Nothing else is needed, and it is best to keep the table clear of unnecessary pots or colour bottles.
When these things are ready one should see that the paper is in a good state. It should be rather drier for a key-block than for other blocks, as a fine line will print thickly if the paper is too damp and soft. In fact, it can scarcely be too dry for the key-block, provided that it has become perfectly smooth, and is still flexible enough for complete contact with the block. But it must not be either dry or damp in patches.
If the paper is all right, one lifts off the upper board and top damping sheet, placing them on the left, ready to receive the sheets when printed.
The key-block, if quite dry, must be moistened with a damp sponge and then brushed over with the broad printing brush and ink. If a grey line is wanted the brush should be dipped in a little of the paste and scarcely touched with ink. For a pale grey line the key-block also must be well washed before printing. Even if the line is to be black a little paste should be used. This is best added after one has brushed the black ink on to the block, not mixed with it beforehand. The ink and paste are then broken together smoothly and completely over the whole surface of the block. The last few brush strokes should be of the full length or breadth of the block and be given lightly with the brush held upright. The inking of the block must be thoroughly done, but with no more brushing than is necessary to spread the colour equally. When properly charged with ink the block should not be at all wet, but just covered with a very thin and nearly dry film of ink and paste.
No time should be wasted in lifting the top sheet of printing paper on to the block, placing first its right corner in the register notch, and holding it there with the thumb, then the edge of the paper to the other notch, to be held with the left thumb while the right hand is released to take up the baren (fig. 21).

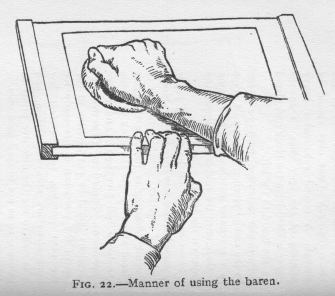
Beginning at the left, the baren is rubbed backwards and forwards, a full stroke each time, to the outside limits of the block, with a moderate, even pressure, moving the stroke in a zigzag towards the right end of the block (fig. 22). Once over should be enough. A second rub makes heavy printing of the finer lines. Then the paper is lifted from the block and placed on the board to the left.
Particular attention must be given to the careful placing of the paper home in the register notches, and to holding it there until the rubber has gripped the paper on the block.
Sheet by sheet all the printing paper is passed in this way over the key-block, and piled together. There is no fear of the ink offsetting or marking the print placed above it. As the work proceeds the block will give better and better impressions. Spoiled or defective impressions should be put together at the top of the pile when it lies ready for the next printing, for the first few impressions are always uncertain, and it is well to use the defective prints as pioneers, so as not to spoil good ones.
When the block has been printed on the whole batch, the sheets should be replaced at once between the boards before one prepares for the colour impressions. Usually the paper will be too dry for colour by this time if this is so, the damping sheets should be moistened and put in again as before; one to each three printing sheets. In a minute or two they will have damped the paper sufficiently and must be taken out, leaving the printing sheets to stand, between the boards, ready for the first colour-block.
PRINTING FROM COLOUR-BLOCKS
In printing colour the paper may be slightly damper than it should be for key-block impressions, and a heavier pressure is necessary on the baren if the colour masses are large. If the baren is pressed lightly the colour will not completely cover the paper, but will leave a dry, granular texture. Occasionally this quality may be useful, but as a rule a smooth, evenly printed surface is best. it will be found that smooth, even printing is not obtained by loading the block with colour or paste, but by using the least possible quantity of both, and nearly dry paper.
In beginning to print from a colour block, care should be taken to moisten the block fully before printing, or it will not yield the colour from its surface; but the block must be wiped, and not used while actually wet.
The printing proceeds exactly as in the case of the key-block, except for the heavier use of the baren. The paste should be added after the colour has been roughly brushed on to the block, and then the two are smoothly brushed together. The Japanese printers put the paste on to the block by means of a little stick kept in the dish of paste. Experience will soon show the amount of paste needed. It is important neither to add too much nor to stint the paste, as the colour when dry depends on the paste for its quality. Too little paste gives a dead effect.
Some of the colours print more easily than others. With a sticky colour it is well to wipe the block with a nearly dry sponge between each impression, so that the wood gives up its colour more readily. In the case of a very heavy colour such as vermilion a drop of glue and water may help; but with practically all the colours that are generally used the rice paste and careful printing are enough.
The amount of size in the paper is another important factor in the printing of colour. If the paper is too lightly sized the fibres will detach themselves and stick to the damp block. Or if too heavily sized the paper will not take up the colour cleanly from the block, and will look hard when dry. One very soon feels instinctively the right quality and condition of the block, colour, and paper which are essential to good printing; and to print well one must become sensitive to them.
PRINTING OF GRADATIONS
Beside the printing of flat masses of colour, one of the great resources of block printing is in the power of delicate gradation in printing. The simplest way of making a gradation from strong to pale colour is to dip one corner of a broad brush into the colour and the other corner into water so that the water just runs into the colour then, by squeezing the whole width of the brush broadly between the thumb and forefinger so that most of the water is squeezed out, the brush is left charged with a tint gradated from side to side. The brush is then dipped lightly into paste along its whole edge, and brushed a few times to and fro across the block where the gradation is needed. It is easy in this way to print a very delicately gradated tint from full colour to white. If the pale edge of the tint is to disappear, the block should be moistened along the surface with a sponge where the colour is to cease.
A soft edge may be given to a tint with a brush ordinarily charged if the block is moistened with a clean sponge at the part where the tint is to cease.
This effect is often seen at the top of the sky in a Japanese landscape print where a dark blue band of colour is printed with a soft edge suddenly gradated to white, or sometimes the plumage of birds is printed with sudden gradations. In fact, the method may be developed in all kinds of ways. Often it is an advantage to print a gradation and then a flat tone over the gradation in a second printing.
No care need be taken to prevent "offsetting" of the colour while printing. The prints may be piled on the top of each other immediately as they are lifted from the block, without fear of offsetting or marking each other. Only an excessive use of colour, or the leaving of heavy ridges of colour at the edges of the block by careless brushing, will sometimes mark the next print on the pile. As in printing the key-block, it is well to hold the brush quite upright for the last strokes across the block, and always to give a full stroke across the whole length or width of the form to be coloured.
As soon as one colour-block has been printed, the next may be taken and printed at once, without fear of the colour running, even though the fresh colour touches the parts already printed.
One by one each colour-block is printed in this way until the batch of paper has been passed over the whole set of blocks composing the design of the print. There may sometimes be an advantage in not printing the keyblock first, though as a rule it should come first for the sake of keeping the later blocks in proper register. If the key-block is not printed one cannot see how the colour-blocks are fitting. But in the case of a sky with perhaps two or even three printings - a gradation and a flat tone or two gradations - there is danger of blurring the lines of the key-block, so that in such a case the sky should be printed first, and then the key-block followed by the remaining colour-blocks.
At the end of a day's printing the prints may quite safely be left standing together between the boards until the next day. For three days the damp paper comes to no harm, except in hot weather, but on the fourth day little red spots of mould begin to show and spread. It should be remembered that freshly boiled paste is to be used each day.
DRYING OF PRINTS
When the prints are finished they should be put to dry as soon as possible. If they are spread out and left exposed to the air they will soon dry, but in drying will cockle, and cannot then be easily pressed fiat. It is better to have a number of mill-boards or absorbent "pulp" boards rather larger than the prints, and to pile the prints and boards alternately one by one, placing a weight on the top of the pile. The absorbent boards will rapidly dry the prints and keep them quite fiat.
Finished prints should be numbered for reference, and should, if printed by the artist himself, also bear his signature or some printed sign to that effect. The number of prints obtainable from a set of blocks is difficult to estimate. The Japanese printers are said to have made editions of several thousands from single sets of blocks. The actual wear in printing even of a fine line block is imperceptible, for the pressure is very slight. Certainly hundreds of prints can be made without any deterioration. But an artist who is both designing and producing his own work will not be inclined to print large editions.
