Colour Woodcuts
CUTTING THE BLOCK
Transferring Design to Key-Block - Register Marks - Cutting and clearing the block - Colour blocks - Repairs to blocks
TRANSFERRING DESIGN TO BLOCK
LET us assume for the moment that the cartoon for the print is completed, and that the forms composing it are defined, to a greater or lesser extent, by line. A tracing of this line is made on the thinnest Japanese tissue-paper with a brush and ivory black water-colour. This is better than ordinary liquid indian ink, as the glue in the ink shrinks and causes the thin paper to pucker, distorting the drawing. The brush is a suitable instrument to use, because the character of the brush-stroke has an affinity with the character of a knife-cut line.
In order that the prints may be the same way round as the design, it is of course necessary for the cutting to be in reverse. The tracing must therefore be placed face downwards on the block, and fastened along one of its long edges with either a row of drawing-pins or a strip of gummed paper. It should then be folded back out of the way and the surface of the block well pasted with a good stiff paste. Rub the paste well into the block, but use it sparingly. Lift up the paper by its two free corners, keeping it taut all the time; then bring it over on to the pasted surface. Place over it a piece of paper as a protection, and rub this fairly vigorously with the baren. Lift off the protecting paper, and take care to see that the tissue is adhering properly over the whole of its surface by pressing with the fingers, or a handkerchief, any doubtful parts of the now damp tissue. Nothing is more annoying later than trying to cut through a piece of tissue which comes unstuck during the process of cutting. The tracing should be left until it is thoroughly dry, but must not be dried at the fire, as this causes pasted paper to come loose. It will be realized that this tissue-paper tracing is cut right through in the process of cutting; it offers no resistance to the sharp knife.
The above method is based on the traditional Japanese procedure and is the best where a brush-like line constitutes an important feature of the design. For reasons which will appear when the preparation of the colour blocks is dealt with, this method may be the best for the beginner's first print.
Should there be little or no outline in the cartoon, however, a different method of transferring the design must be followed. Make a pencil tracing of the cartoon on ordinary tracing-paper. Put a thin wash of poster white all over the block and, when this is dry, transfer the tracing to the block by means of carbon paper. This wash of white will show up the carbon tracing clearly, and moreover will form a good basis for working directly on the block in body colour (usually in black and white) to improve the drawing. Do not allow the surface to become in any way encrusted with paint. If it should get rather thick anywhere, wash down that part and re-paint thinly; enough of the carbon tracing will remain to preserve the drawing.
REGISTER MARKS
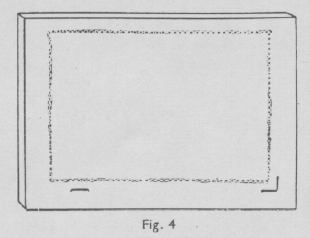 The preparation of the first block also includes
the placing of the register marks, which ensure the correct
registering of the design. These are two shallow depressions placed
as in Fig. 4 (the dotted line indicates the picture area). One is a
right angle to take the right-hand corner of the paper; the straight
one to the left is to keep the long edge of the paper in correct
alignment. These marks are in the same relative position to the print
on each block. As accuracy is essential, the register marks should be
drawn with a set-square and a very sharp pencil. The straight
register mark must, of course, be exactly in line with the lower arm
of the right-angled one.
The preparation of the first block also includes
the placing of the register marks, which ensure the correct
registering of the design. These are two shallow depressions placed
as in Fig. 4 (the dotted line indicates the picture area). One is a
right angle to take the right-hand corner of the paper; the straight
one to the left is to keep the long edge of the paper in correct
alignment. These marks are in the same relative position to the print
on each block. As accuracy is essential, the register marks should be
drawn with a set-square and a very sharp pencil. The straight
register mark must, of course, be exactly in line with the lower arm
of the right-angled one.
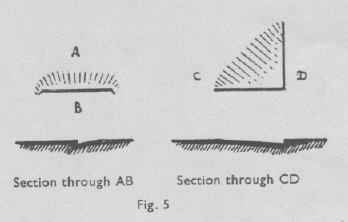
A margin of paper is always left round the printed surface, usually at least half an inch at the top and sides, and three-quarters of an inch at the base. Allowance for these margins must be made when placing the register marks. These, shown actual size in Fig. 5, should be cut before the cutting of the design begins. They are best cut with a chisel (see Z, Fig. 2). Hold the chisel dead vertical with its flat side outwards, making the incisions by pressing firmly downwards; the depth of these should not be more than one-sixteenth of an inch, and their length is decided by the width of the chisel. With the small, flat gouge (D, Fig. 2) make a smooth slope down to the chisel cuts. The register marks should only be deep enough to receive the paper; they should be cut as cleanly and accurately as possible.
CUTTING AND CLEARING
The block, during cutting, is protected on the under side with a square of green baize and is placed on a smooth surface at about the same slope as an ordinary writing desk, say twenty degrees. This slope brings the surface of the block at right angles to the line of sight; the baize enables the block to be freely turned about on the smooth surface for convenience in cutting.
 A really good light makes for easier and better
work. The best is one coming from in front, and slightly from the
left. A top light is not helpful; it is better to have a level light
which throws the work into relief. For exceptionally fine cutting a
magnifying glass may be used, but a really good light produces better
results. To work out of doors is perhaps the best of all.
A really good light makes for easier and better
work. The best is one coming from in front, and slightly from the
left. A top light is not helpful; it is better to have a level light
which throws the work into relief. For exceptionally fine cutting a
magnifying glass may be used, but a really good light produces better
results. To work out of doors is perhaps the best of all.
Before beginning to cut the first block it is as well to get familiar with the tools and wood by doing a small piece of precise cutting; haphazard trial cuts are useless. Draw, let us say, a capital letter about one inch high on a spare corner of a block. The first step is to make a V-shaped trench round the form which is to be left standing. Place the knife with its flat side against the form to be defined, and make an incision slanting away from the edge of the form. Then make a second incision parallel to the first, but slanting in the opposite direction. These two incisions meet at the base of the trench, when a small strip of wood comes away and the 'V' trench results.
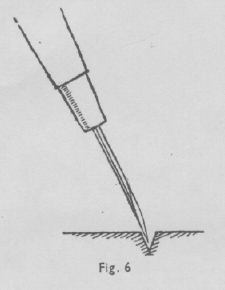
The knife is held in the right hand with the flat
side against the form to be cut, at about the angle shown in Fig. 6.
It must, however, be kept upright as regards the direction in which
it is to move (A, Fig. 7). If the cutting edge is sloped forward as
at B (Fig. 7), the knife will not be under such ready control, too
much of the cutting edge being sunk into the wood. 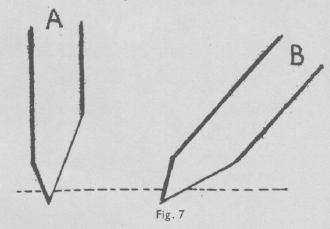 The Japanese ensure the upright position by
holding the knife in the fist. This method is very accurate, and
easier to acquire than might be expected. However, many people prefer
to hold it like a pencil; this method is also quite satisfactory so
long as the cutting edge is not sloped forwards.
The Japanese ensure the upright position by
holding the knife in the fist. This method is very accurate, and
easier to acquire than might be expected. However, many people prefer
to hold it like a pencil; this method is also quite satisfactory so
long as the cutting edge is not sloped forwards.
The left hand plays an important part in the cutting. The end of the middle finger is kept continuously pressed on the back of the knife as low as possible, the whole hand lying quite flat on the block, moving with the knife and constantly steadying and guiding it.
Now take the small gouge (B, Fig. 2), and make a fairly deep groove, parallel to the 'V' trench and about one-sixteenth of an inch from it, thus leaving a ridge following round the V-shaped trench already made. This ridge acts as a rampart to protect the edge of the form against accidental slips of the clearing tools whilst clearing the background.
For clearing, the block is placed on the bench hook (Fig. 3) which lies flat on the table, hooked against its edge. The sides of the bench hook provide the necessary resistance to the pressure exerted during clearing. Large or small gouges are used, according to the size of the space to be dealt with. To clear very large spaces quickly, the largest gouge may be used with a mallet.
The background is cleared to a depth which varies according to the width of the space, being about one thirty-second of an inch at the edge but deeper towards the middle. There is seldom any need to clear deeper than three-sixteenths of an inch, and anyway the first impression from your block will show if any part of the ground is not deep enough.
Finally, the protecting ridge is cleared away and the ground immediately around the printing surfaces made smooth and neat, so that their edges will print clearly. The outside edges of the cleared space must also be smoothed neatly with the chisel and afterwards rubbed over with fine glass-paper. When large areas of background occur between parts of the design they are better not entirely cleared; a portion of the original surface should be left to support the paper when printing. The edges of these 'islands' should also be smoothed as just described.
In clearing, the left hand is used to help in the control of the gouge. When using a small gouge the first and second fingers are pressed firmly on to the tool near the point. With a larger gouge the whole of the left hand is placed over, and pressed against, the right; without this counter-resistance the gouge may slip and do much damage. By means of this the opposed forces of the left and right hands strike a balance, and the gouge is kept under close control. Wherever the grain of the wood allows it, work away from the printing surfaces. When clearing against the grain take particular care not to go too deep. If there seems to be any danger of an accidental split extending near, or into, your design, cut round the form again with the knife, which should be kept handy whilst clearing.
The security of a fine line depends on its wide base. When a line is at right angles to the grain of the wood, the risk of a portion breaking away will be lessened if the first knife-cut is deepened with another which penetrates through the fibres a little lower than the general level of the background.
After this brief exercise in cutting, the first block may be begun with confidence.
The first block to be cut is usually the key-block which, by its line, defines the colour masses and supplies accents of drawing. 'The Jetty, Sennen Cove' (Plate XX), shows this use of the key-block line.
If difficulty is experienced in keeping the knife to the exact direction desired, make a very slight incision first and then go over it again at exactly the same angle. Spontaneity does not depend on speed of cutting. The knife should actually move through the wood very slowly; continuity of curve depends on close attention and accuracy. Complete the cutting of each object as you go along, proceeding systematically and regularly from one part of your design to the next. To cut a bit here and a bit there leads to confusion and error. In the same way, when clearing, clear inch by inch from end to end of your block, dealing with and finishing neatly each part as you come to it.
The colour-wood-cutter should accustom himself to cutting in various directions, not exclusively relying upon turning the block about. In his hands the knife becomes as much an instrument of draughtsmanship, and the determining factor in the character of the line and mass, as the graver in wood-engraving or the needle in etching. This fact should control both his mental and practical approach to the use of the knife.
COLOUR BLOCKS
When the key-block has been cut and cleared, the first colour block is begun. Register marks, identical with those on the key-block, are first cut on the block to be used. An impression of the key-block is taken on Torinoko paper, which need not be damp. The block is then covered over with stiff paste and the impression of the key-block is slipped into the register marks, allowed to fall naturally into place on the block, and then pressed down with the baren or the palm of the hand. Do this firmly but gently, as paper stretches easily when damp by contact with the pasted block, and the forms may become distorted. It is essential for accuracy of register that the impression should be pasted down at the same degree of dryness or dampness as when printed. When the paste is dry, the upper layers of the paper can be peeled off by rubbing gently with a damp finger or an india-rubber, making use of the fact that Torinoko paper is made in layers. With care the paper can be peeled away until only a very thin film is left over the Chinese ink or colour of the printed impression. The design can be made to show still more clearly by rubbing the part to be cut with a touch of olive oil on the finger. Before starting to cut, fill in with any convenient paint or crayon those portions of the design which are to be printed from that particular block; this reduces the risk of cutting away portions which should be left. The colour block is then cut as already described elsewhere.
The same method is followed for each subsequent colour block. Where only small areas of certain colours are required two or even more may be cut on one block, either with the same register marks or separate ones. Sufficient space, however, should be left round each colour mass for the free manipulation of the wide brushes used in printing.
A somewhat different method of preparing the colour blocks must be employed when a key-block line does not form part of the design (see 'The Vltava at Prague ', Plate XIII). First cut the block which gives the most comprehensive idea of the design (probably the 'key-mass', see page 38) and paste an impression of this on a second block. Trace on it, from your cartoon, the forms to be printed from this block. When the second block has been cut, take an impression from both this and the first, and paste down for the third, referring again to the cartoon for any additional forms, and so on until all the blocks are cut.
It should be mentioned that, whether a key-block is used or not, additional details can be drawn direct on any block as required. In fact, the artist should keep an open mind for any developments of his design which may suggest themselves as he cuts his blocks-this, of course, within the limits fixed by the blocks already cut.
REPAIRS TO BLOCKS
In spite of all precautions, a slip of the tool may occur. Very small chips can be remedied with 'plastic wood', which is obtainable at any ironmonger's. Larger errors can only be remedied by inlaying a new piece of wood. To do this, cut out, with the register mark chisel, a rectangular well covering the damaged portion (A, Fig. 8). This rectangle should be about one-sixteenth of an inch
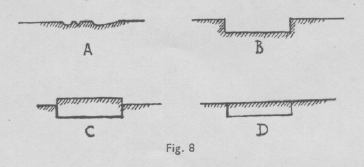
deep with its sides dead vertical (B, Fig. 8). Next, saw off a piece a good quarter of an inch deep, from the same block or one of similar grain, and trim the sides with the chisel to fit the aperture tightly. Tap the piece in gently with the mallet or handle of the chisel. The upper portion will now project (C, Fig. 8). Reduce the inlaid piece to the original level of the block by fine, slicing cuts of the chisel (D, Fig. 8). If inlaying is done accurately there is no need to use seccotine or glue.
Mistakes in any medium involve waste of time, but to inlay takes no longer than to scrape, knock up, and polish an error in a copperplate.