Colour Woodcuts
WOODCUT BLOCKS AND TOOLS
The blocks - Cutting tools - Sharpening the tools
A PRINT can be made from almost any kind of wood, but the best is cherry. In my experience it is delightful to use and entirely satisfactory. It cuts crisply and evenly, is hard enough to take delicate work, yet is not so hard as to give unnecessary labour. In printing it gives up the colour excellently. Moreover, its grain has enough interest to give vitality to the printed surface while yet remaining unobtrusive. Other woods are sometimes used, but each is in some respect inferior to cherry; for instance, pear resists the moisture necessary in printing, and white wood is too soft for the cutting of crisp edges to fine lines.
Blocks should be about three-quarters of an inch in thickness, more or less, according to the size of the print. To allow for register marks and margins, the blocks should be one and a half inches longer and wider than the print. This will allow some adjustment in the placing of the design on the block so that the grain may run in the direction most suitable to the design, and knots be avoided (see stages of 'The Jetty', Plate XX). Anyway, the blocks must be at least three-quarters of an inch longer and wider than the design. If wood cannot be obtained wide enough for this, a strip of any close-grained wood must be screwed on to one of the long sides of the block to take the register marks. Both sides of the block are used. The surface is prepared first with the truing plane to get it quite level, then worked with a fine-set smoothing plane. To get a perfect finish requires very expert workmanship. A cabinet-maker's scraper may be used, but do not rely on one scraping only. Some fibres may have been merely pressed down by the scraper, and will rise up and give trouble when the block is damped for printing. After scraping once, sponge over the surface well, allow to dry, then scrape it again. Although the artist should know how the blocks are made and the printing surface finished, he will naturally leave this to an expert cabinet-maker.
The blocks are sometimes clamped at the ends to prevent warping and to protect the surfaces during cutting and printing. However, the clamps add to the cost of the blocks and, what is more, restrict the proper use of the baren (printing pad) in printing. They can therefore be very well dispensed with. If the wood is well seasoned, warping should not occur sufficiently to matter. If it does, the hollow side must be thoroughly damped with a soaked sponge and left to dry under pressure. When one side of an unclamped block is being cut the under surface must be protected by a piece of good, thick paper pinned on at the ends, or, alternatively, with a square of green baize fastened to the ends of the block with four drawing-pins. It is useful to have a few pieces of this material available in various sizes.
 When blocks are put away during intervals of printing,
their printing surfaces must be protected with several thicknesses of
newspaper. They should be made into a parcel with the title of the
print on the outside, and stored in a dry place.
When blocks are put away during intervals of printing,
their printing surfaces must be protected with several thicknesses of
newspaper. They should be made into a parcel with the title of the
print on the outside, and stored in a dry place.
TOOLS
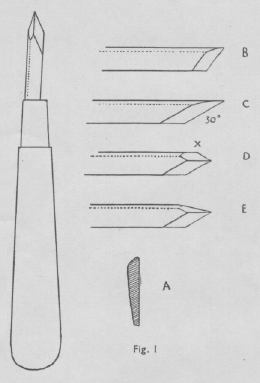
The knife (Fig. 1), used by the Japanese, has been evolved in accordance with the requirements and natural scale of the colour-woodcut. The blade fits into a slotted handle and is held in place by a tapered ferrule. This allows for adjusting the blade, as it gradually gets shorter by sharpening. The blade is flat on one side and 'humped' on the side which is sharpened (see enlarged section-A).
The knife, as sold, is usually ground to a rather blunt angle (Fig. 1, B). The first step in shaping it is to make this angle more acute, and at the same time provide your cutting edge (Fig. 1, C). The acuteness of this angle will be determined by the fineness of the cutting to be done, but it should not be so acute that the point will break; thirty degrees usually provides a serviceable point. The knife should then be further shaped by making a similar, but smaller bevel or facet, as shown at D. Now remove the projection at X. The finished knife is shown at E, and will only require the cutting edge to be sharpened on the finer stone, and then stropped.
Japanese knives of first quality are difficult to obtain, but a facsimile, equally efficient, is made to my specification by T. N. Lawrence, 1-4 Red Lion Passage, Fleet Street, London, E.C.4. Two sizes are available for use according to the scale of the design.
The knife is a determining factor in the making of a print, and I would emphasize its importance. It must be made from best quality steel, properly tempered, shaped in the right fashion, and kept sharp. All the forms of the design should be cut with this knife, otherwise unity of character will be lost. No cutting should be done with a gouge.
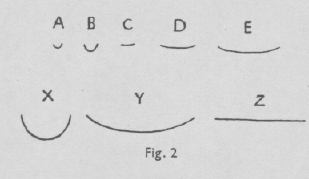 The gouges and chisel for clearing the blocks
are few in number. Sections of the cutting edges of those necessary
are shown full size in Fig. 2. A, B, C, D, and E should be in graver
handles, with the bevel of the cutting edge underneath. X and Y
should be in ordinary woodcarver's handles, as they are sometimes
used with the mallet. The chisel shown at Z is used almost
exclusively for making the vertical cut for the register marks, and
is also in a woodcarver's handle. If nearly two-thirds of each handle
is sawn off and the sawn edges rounded, the tools are brought more
into scale with the work required of them on the blocks.
The gouges and chisel for clearing the blocks
are few in number. Sections of the cutting edges of those necessary
are shown full size in Fig. 2. A, B, C, D, and E should be in graver
handles, with the bevel of the cutting edge underneath. X and Y
should be in ordinary woodcarver's handles, as they are sometimes
used with the mallet. The chisel shown at Z is used almost
exclusively for making the vertical cut for the register marks, and
is also in a woodcarver's handle. If nearly two-thirds of each handle
is sawn off and the sawn edges rounded, the tools are brought more
into scale with the work required of them on the blocks.
Sharpening stones of three grades are required:-
- A carborundum stone for rapidly shaping a new or chipped tool (minimum about 4 1/2 in. x l 1/2 in.). A small geared carborundum grindstone is a luxury.
- An India stone of medium grade for general sharpening (minimum about 4 in. x l 1/4 in.).
- An Arkansas stone of medium hardness for keeping a fine edge on the knife (minimum about 3 1/2 in. x 1 in.).
A 'slip' of India stone for sharpening the inside of gouges is desirable, though the edge of a thick leather strop will serve the purpose. This strop is necessary for use with all the tools. It should be a piece of stout leather, such as a piece of an old razor strop. A paste composed of emery and crocus powder mixed with grease should be spread on the strop. This paste can be bought ready for use, as 'Razorkeen', from barbers or ironmongers.
Sharpening stones should be lubricated with a mixture of equal parts of olive oil and paraffin. A thin oil, such as Singer's Sewing Machine oil, is particularly suitable for the small and delicate tools used.
A small wooden mallet is useful when clearing large spaces.
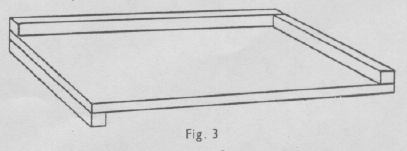
A bench hook, 11 in. x 15 in., as shown in Fig. 3, is very useful when clearing.
SHARPENING THE TOOLS
The tools as sold are ground only; they can be sharpened at the shop at a small extra charge. However, as tools must be kept really sharp for any cutting or engraving process, knowledge of how to sharpen them must sooner or later be acquired.
The chisel is the easiest to sharpen, so those inexperienced with tools might start with this. Place the stone with the end towards yourself. Hold the chisel at an angle of about fifteen degrees, two fingers of the left hand being pressed firmly on the blade as near the stone as possible, in order to ensure a very close contact. Keep the right hand steadily level throughout the backward and forward movements, avoiding any tendency to rock the hand, since this produces a rounded edge which is fatal to real sharpness. As the sharpening proceeds a 'burr' will be formed. The sharpness of the edge can be ascertained by testing gently with the finger. When it has become really keen, remove the burr by stropping each side alternately, keeping it flat on the strop while doing so.
The gouges are sharpened in a similar way, but in order to bring every part of the cutting edge into equal contact with the stone the gouge must be rolled regularly from side to side. Unless evenness of rubbing is maintained all along the cutting edge, it will become wavy and be troublesome in use. Before finishing the sharpening, rub the inside with the slip, and conclude with stropping outside and in. For stropping the inside, bend the leather round some suitable object, or, for very fine gouges, use its edge.
When re-sharpening tools which have become blunt through use, resist the temptation to raise the right hand a little in order to sharpen quickly. This reduces the width of the bevel and produces a rounded edge, spoiling the tool until it is re-ground. It is necessary to take time to rub away an equal thickness of steel all over the bevel and so retain the original angle.
I have written at some length about the sharpening of tools because the acquisition of a measure of skill in this is of first importance, and affects not only the work of cutting and clearing, but the appearance of the finished print. With sharp tools, cutting becomes a straightforward, satisfying job, and the resulting forms will be clean-cut and incisive. Moreover, far more effort is needed to use a dull tool. During the cutting, most of the small catastrophes which are so trying to the temper are due to a dull tool being used with heavy effort, instead of a sharp tool moving sweetly through the wood. Keep your strop handy and you will rarely need the stone.
The blocks and cutting tools now being assembled, the next step will be to transfer the design to the first block and begin the cutting.