 HE
blocks and tools have come. If you have ordered the unhandled tools
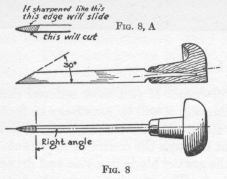
from Paulson it will be necessary to first drill 3/64 inch holes in
the shanks of the handles parallel with the base line - not through
the center of the shank. See Fig. 8. Then hold the graver blade in a
vise and drive the handle squarely into it. The idea is to have the
bottom edge of the blade in line with the bottom of the handle - a
little lower if possible. The gravers as bought are too blunt and too
long. A graver measuring five inches over all is almost too long. The
excess tip of the blade could be broken or ground off. The gravers
are brittle, so care must be exercised not to attempt any misdirected
violence on them. The cutting point should be ground down at an angle
of about 30 degrees or so. If you cannot do this work yourself
perhaps a garage man may be induced to do it for you. It is so much
easier to tell how a thing should be done than to do it oneself, as
may be gathered from reading almost any art criticism.
 Make
sure that the grinding and sharpening of the nose of the graver be at
right angles to the blade, otherwise one has a form of skidding to
contend with, for one cutting edge will be obtuse and the other
acute, and of course the side having the acute edge will do the
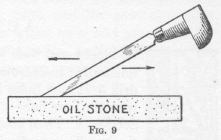
cutting. See Fig. 8, A. Sharpen only the bevelled end or nose, as
shown in Fig. 9. The wire edge remaining after sharpening on an oil
stone may be removed by stropping on a piece of sole or belt leather,
or on wood.

Now for the art and mystery: To be dogmatic, the artist to realize the charm of the woodblock must conceive his picture as accents of light, that is, the unit of expression should be the white line. The artist starts from black chaos and works toward ordered light, he has to bear in mind that this is a relief process, like type - that part which remains on the surface of the block is printed; that cut away shows as white in the print.
Make the drawing on the block with a not too hard pencil, keeping in mind that the subject reverses in the printing. The drawing may be inked in with a pen or a brush. Corrections or changes could be made with Chinese white or dry oxide of zinc mixed with a little white of egg, and applied with a fine brush. It is presumed that the prospective woodcutter knows something of drawing. The block is too cumbersome a medium on which to practice the elements of art. In the drawing one need not indicate the technique - something may be left to God and the graver.
Now for the engraving: Perhaps to get the hang of the tools one may turn a block bottom-side up against the cleat of the bench hook, and experiment a bit with the gravers before actually proceeding with the engraving of the drawing. Keep the tool as flat to the block as possible. In graving small blocks the thumb of the hand holding the graver is rested against the edge of the block to guide and control the action of the tool; in the larger ones, the thumb is rested on the surface. Not much time need be spent in this experimental engraving. The first attempts are not likely to be very good anyway - unless one happens to be a Blake. A few wild digs will he no serious loss - unless, again, the left hand gets in the way. Do not dig too deeply into the wood, although the wider areas will have to be excavated deep enough so that the inking roller will not hit the bottom.
After the block has been pretty well dug into a little of the dry oxide of zinc brushed into the cuts will give a fairly good idea as to how the finished job will look. Unlike etching one can tell quite well how a wood-engraving proof will look long before actually pulling one.
When the block is ready for proofing clean it thoroughly with a dry stiff brush. Be sure all dust and powder is off the surface and out of the incisions of the block before applying the ink to it. Put a dab of printing ink on a slab of marble or pane of glass, and run the inking roller (brayer is the trade name of the instrument) over it until the ink is well distributed. There is no telling how much or how little ink to use; that is a matter of experience. Run the roller over the face of the block, being very careful not to bear down on it, nor to let it slip off the edge. In the former instance the fine white lines are likely to suffer - either choking in part or getting lost entirely, and in the latter case, the ink instead of being deposited on the surface of the edge will be wiped off there, and the result on the print will be a weakened border line and a ridge of ink outside of it.
Next place a sheet of thin, soft but tough paper
tenderly on the inked block, or the inked block on the paper - making
sure in the latter case that nothing is under the paper but a flat
surface. Simple as it looks, it is a trick to not touch block and
paper before they are properly placed. A clean block could be used to
guide or 'pilot' the inked block to position on the paper.  With a flat stick, Fig. 10,
burnish the back of the sheet over the block until the ink is
transferred to the paper. Use the burnisher so that the end points
outwardly. There is less danger of ruining the print in case of a
slip over the edge of the block, which is quite likely when the
burnishing is done with the tool pointing in toward the center and
the hand is not above the block. An occasional rub over one's hair
with the burnisher will lubricate it to slide more easily over the
paper.
The job is done - except for the cleaning of the block and the brayer. For this use gasoline. I saturate the block from the back before touching a brush to the face of it. In this way the dirty gasoline does not enter the pores of the wood, and the block is kept cleaner for subsequent engraving, if that should become necessary. Once the block becomes blackened it is difficult, in the event that one wants to do additional work on it, to see clearly. While dry zinc white may be brushed over the surface - after the cleaning medium has dried - it is not so likely to adhere to the wood if the pores have been filled with an ink residue. A stiff bristle brush about 3/4 of an inch in diameter will do nicely for cleaning. Do not use kerosene oil on a block. While the oil will clean off wet ink it is difficult to get it out of the block, for it will never really dry or evaporate. It will not be possible to print from a block saturated in cleaning fluid for at least twenty-four hours. Within that period the ink will not 'take' well, or else dirty gasoline will be forced out on the print. If you wish to continue printing immediately following cleaning - supposing the cleaning to have been done in order to work on the block again - use a rag dampened with turpentine to rub off the ink. Do not let the slab, and more especially the brayer, go uncleaned for more than a day for it is very difficult to clean off dried ink from the latter. The brayer should be suspended, when not in use, so that no part of the inking surface comes in contact with any object. It is made of a composition of glue and molasses, and constant pressure against it will cause deformation.
|
|
|
|
gravers |
woodblocks |
|
pen and pencil |
drawing ink |
|
oil stone |
printing ink |
|
burnisher |
oxide of zinc |
|
bench hook |
paper |
|
brayer |
gasoline |
|
ink slab |
kerosene oil |
|
bristle brush |
|
|
leather for stropping |
|