« June 2010 |
Main
| August 2010 »
Size matters - the first test batch!
This thread about paper sizing is continued from here, and started here.

After all the preparation, it was finally time today to give my new sizing 'system' its first test!
I spent most of the afternoon at it, and I can tell you - this is not an easy job! Not that I thought it would be, but it has nonetheless made me realize that this is going to need a lot of practice to pull off properly. After all, I'm trying to make the jump from 'zero' to 'professionally acceptable' all in one go ...
Anyway, I did indeed take a lot of photos as I went along (with my camera's self-timer), but instead of putting them here on the RoundTable, where they will soon disappear into the untraceable maze, never to surface again, I thought it would make more sense to put them in a 'Sizing Process' page over in my Encyclopedia.
So please jump over there and have a look:

This thread about sizing continues here.
Posted by Dave Bull at 8:54 AM
| Comments (8)
Size matters - first heating test
This thread about paper sizing is continued from here, and started here.
The delivery man knocked at the door this morning - as the 'just in time' system keeps ticking along. He brought the solution for the question of how to heat the sizing mixture in its tray. This should do it:

That doesn't tell you much I suppose, so let's get it unwrapped ...
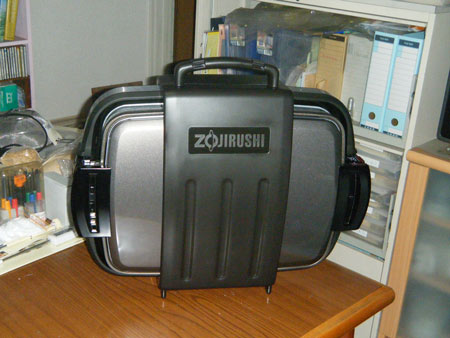
Yes, a new Zojirushi table hot plate. It all fits together into a nice package for storage: ribbed steak grilling tray, grease catching tray, some other parts I can't really identify well, and ... a flat griddle, with 2cm raised edges!

No use for the steak stuff (not today, anyway!) so I put those parts aside, and set up the plain tray. After filling it with water, I put two small wooden 'feet' in, stood my own new tray on top with three litres of water inside, and then fired it up, using the 'warming' setting (as low as it would go).
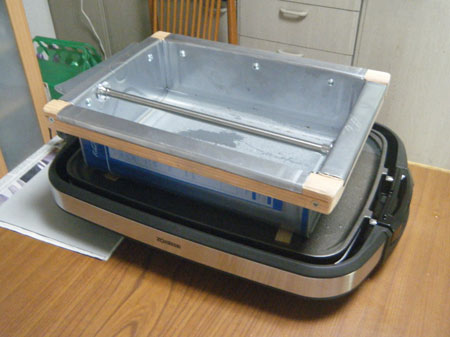
It didn't take more than a few minutes for the whole system to stabilize ... at just around the perfect temperature for what I want!
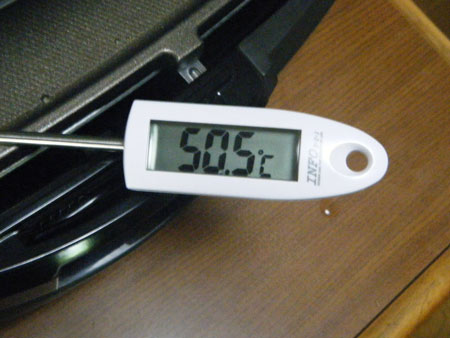
I had been a bit afraid that it wouldn't go low enough, but this will do very well. After watching it for a while, I think this is going to be relatively easy to control - I will have to 'top up' the water in the bottom tray frequently as it evaporates, but the system soon brings that up to temperature, without affecting the upper mixture too much.
So this will do for now. On the 'to do' list for next time I'm in Akihabara will be picking up a small microcontroller unit with a thermocouple. That will let me 'set and forget', so I don't have to watch the thermometer all the time. (Although after letting this test run for a couple of hours today, it really does seem quite stable just as it is.)
Sometime later this afternoon, there is supposed to be a delivery of some unsized paper that I'll be using for the first tests. I don't want to waste any of my normal printing stock (from Iwano-san) until I get the rough hang of how to use that brush. Until then, I'll use the time making up a pile more of the hangers (I'll need about 60 of them, as that's how many sheets of paper I plan to be running in each sizing batch), and continuing with the left-over book printing work from yesterday. (Ichikawa-san will be picking all that stuff up tomorrow evening, so I have to get busy to play my part in the 'just in time' game ...
This thread about sizing continues here.
Posted by Dave Bull at 8:31 AM
| Comments (1)
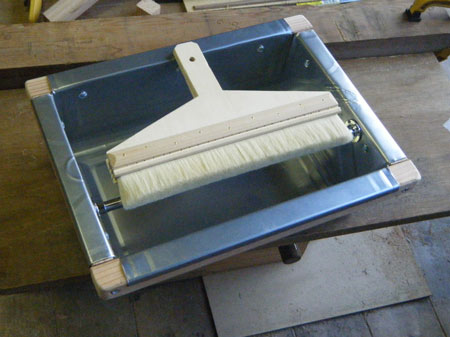
Size matters - building the tray
This thread about paper sizing is continued from here, and started here.
I went back up to the 'home center' this morning, to make a final decision on what to use for the heating tray. One day last week I had hopped on the bike and headed for a couple of local sheet metal shops - going by the listings in the Yellow Pages - but no luck ... they were all gone. And it's just as well really, because even if I had found one that could do the job, I know what they would charge - an arm and a leg. I remember when I had a similar tray made up for me around 40 years ago, for steaming and bending guitar parts, and that was around $20 I think, but there is no way I would ever get something for that kind of price these days!
I stopped by the local indigo dyeing workshop, to ask the owner Murata-san if he had any recommendations on somebody who could do the job, but he didn't, and he thought it would probably be 'around $400 ...'.
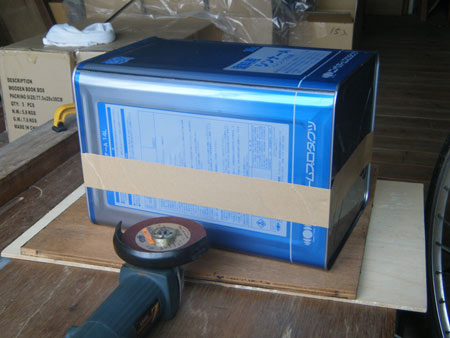
So it was off to the home center, to either get some supplies for making one, or to find something I could convert. And I found it straight away!
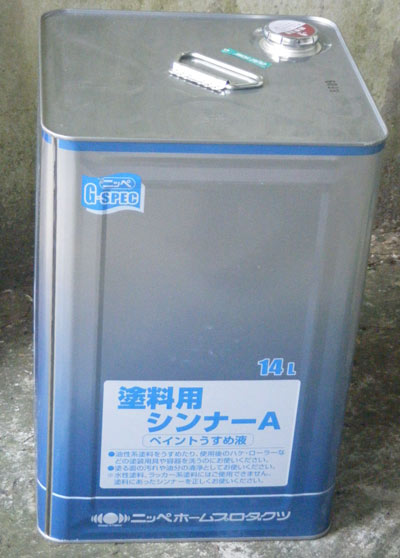
Of course, a large-size paint can! This one is not paint, it's thinner, which will clean out of the can much more easily than paint would, and it is very cheap - only 2,400 yen for the 14 liter can. I roped it onto the back of my bike, brought it home, and transferred all the thinner to an old 'poly tank' that has been gathering dust here. So I now have a lifetime supply of paint thinner ... not that I ever paint anything, but it should be useful for cleaning rollers and stuff.
Anyway, to work ... First step (after washing it out thoroughly) was to split it in two:
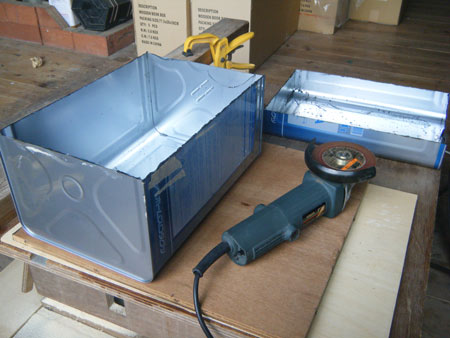
The metal of the can is way too thin to support itself now that the can is cut apart, so it's necessary to make a kind of frame for it. After notching out the corners down about 5cm, I cut some thin slots in four pieces of wood. Each wooden piece slots over one of the sides, covering up the raw edge, and the metal is hammered and rolled over a couple of times.
I repeated this for each side, and then securely screwed them all into place from the inside.
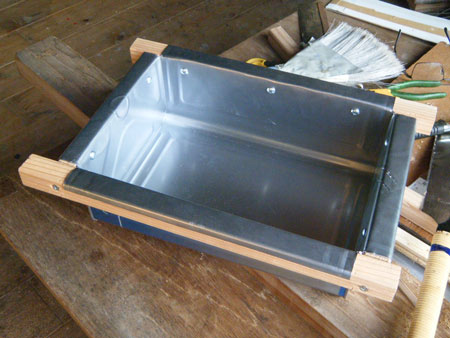
After cleaning up the corners a bit, it starts to look like a sizing tray! It's very 'tight', completely waterproof of course, and sits perfectly flat on the table.
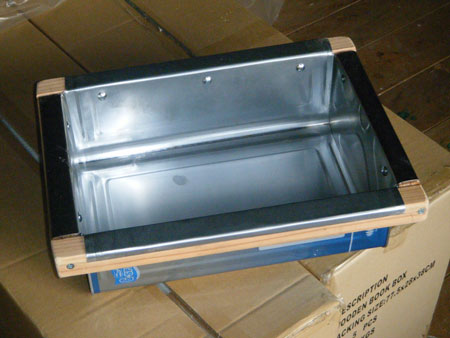
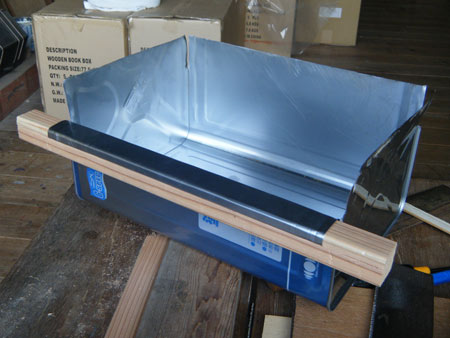
I fitted a stainless steel rod across the top, to act as a 'wipe-off' bar:
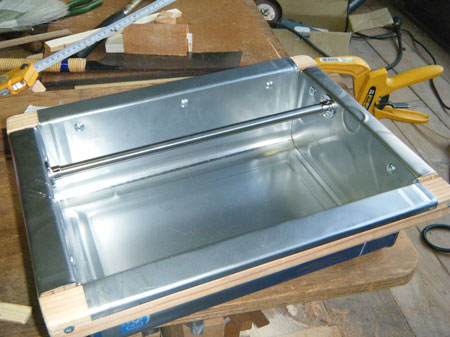
And here she is, posed with my new dosabake (sizing brush), ready for action!
This thread about sizing continues here.
Posted by Dave Bull at 8:28 AM
| Comments (7)
Size matters - moving forward ...
This thread about paper sizing is continued from here, and started here.
With the colour blocks for the Hasui design now done, it's time to put on another hat and get the sizing project moved forward a bit.
I took a trip to the local 'home center' to pick up some of the small supplies I will need, and to see if I could find anything that might be useable for the heating pan.
First, the easy part. How to hang and dry the sized paper?
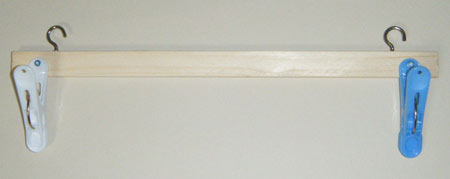
Keeping in mind that one of the problems I have recently had with the paper I received from Misawa-san was the clip marks, I hunted around for something that wouldn't leave any ridges. Found it!

They look like normal (plastic) clothespins, but are designated 'for lingerie'. They have no ridges, just a smooth plastic surface inside the clip!
I bought a bunch, and when I got home, cut some small wood strips, screwed a clip to each end, and made a pile of little 'hangers':


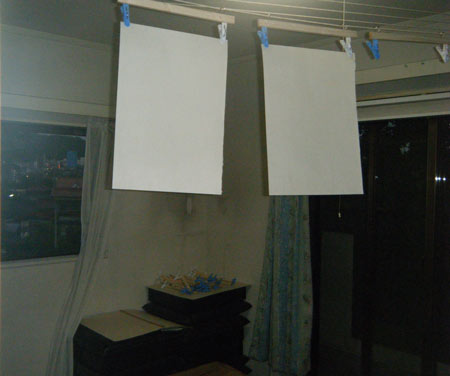
The reason for making these is that unlike Misawa-san, who does the hanging job together with his wife ...

... I'm here alone. But it seems to me that I can simply clip one of these hangers to the top sheet of wet paper on the stack, and then hang it up by myself ...
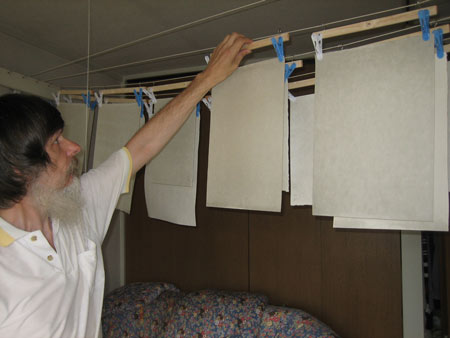
As for where to hang it, I went upstairs to my 'bedroom', rigged up a bunch of hooks on rails on each side of the room, stretched a few sample strings between them, and tried it out. (This is just two sheets of dry paper, as a test ...)

That room is up on the 4th floor - very airy - and has two windows, which should allow me to control the drying rate pretty well I think. (Although I can already see that the strings will need to be tighter ... It's very damp here these days, and they lost tension straight away ...)
Tomorrow's job is to build the heating tray, and I'm still not sure how to go about that. I was thinking about using an IH hot plate, but after asking some questions on my favourite online 'help site', it seems that this might not be the best approach ... Any advice here would be welcome!
This thread about sizing continues here.
Posted by Dave Bull at 7:21 AM
| Comments (1)
Mystique Series - colour blocks nearly ready
Let's have an update on the progress of the colour block carving. Here are shots of the sides completed so far (these are clickable), along with a bit of explanation about what is happening.
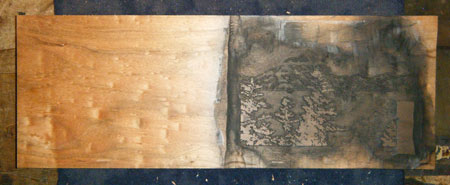
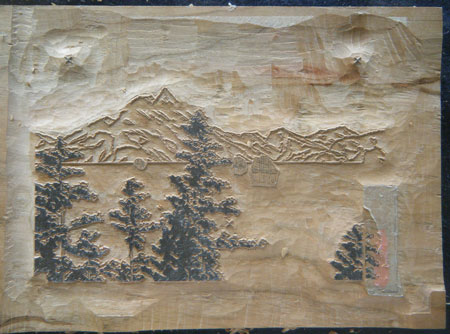
First is the key block, with the Hasui image visible on the right half. The design for image #6 will later be cut onto the blank left side:
The next photos are five sides of three pieces of wood (I'm still not quite finished the sixth side). These are the colour zones for the Hasui image. They are cut onto the blocks in 'heads and tails' fashion, with registration marks at both ends of each face.

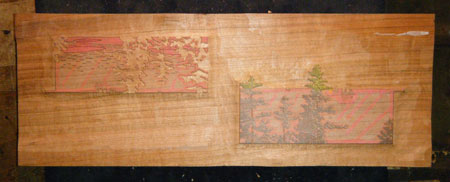
So what's going on? The answer is easy - the left-hand print of this pair is going to be a sumi-zuri - a 'black printed' image. It won't have any colour blocks. So rather than waste half of each piece, I put that image on the 'outside' of each pair, and then just cut a set of colour blocks for the Hasui image as though there were no pairing going on at all.
The two designs will stay together through the whole printing process though, because they have to get the final embossed pattern together, and will then be cut apart as usual after drying.
The reason for doing it this way is the large number of impressions that the Hasui print is probably going to need - maybe 15 or so. If it were paired with an image that also needed many impressions, the overall total would be too many for safety in this hot season. (The paper would have to stay moist just too long ...)
So I paired these up - the print with many impressions together with one with few impressions. The Hasui will be the August print (and I'm studying the daily 'storm cloud' sunsets that we've been having all week long, for ideas on the colouring ...)
Posted by Dave Bull at 7:47 AM
| Comments (1)
This thread about paper sizing is continued from here
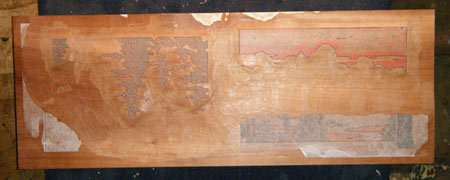
While the carving is going on, I'm trying to move forward on getting the paper sizing organized. I dug back into my photo albums from years ago, and found some snapshots taken on a visit to Misawa-san, the man who has done most of our sizing for the past couple of decades.
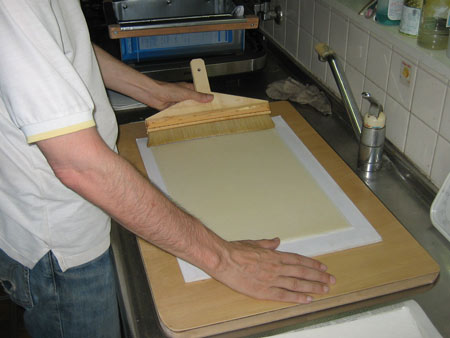
Here is a series giving an overview of the process. The size is prepared and poured into a metal 'bucket', which has an electric heating element to keep it at the suitable temperature. After dipping his brush, he wipes on the bar to remove excess:
Then makes the stroke across the paper surface:

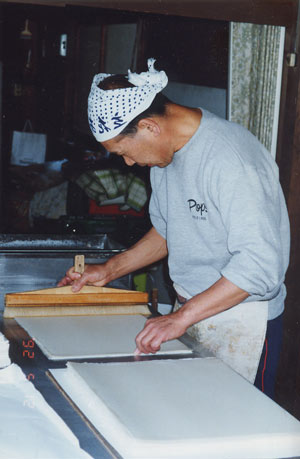

He moves quickly at first, but then as the brush unloads, makes the end of the stroke more slowly, trying to ensure that the size is evenly distributed.
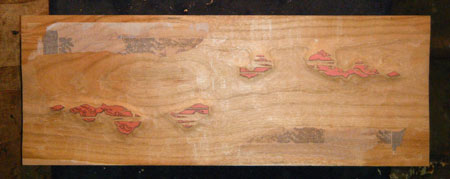
I watched him work through the stack that morning, then he took a break for lunch. The moisture evened out over the next couple of hours, and the next step was hanging it up to dry. He worked with his wife, and they used a couple of small paper protectors on each sheet:

Then held it together, lifted it up, and clipped it to the strings running across the ceiling:
The windows of the room were opened 'just enough' to allow the paper to dry at the proper rate ... not too slowly, not too quickly.

Looking closely at that photo, I see that the sheets seem to be hanging in pairs, although what stops them from sticking together, I can't imagine.
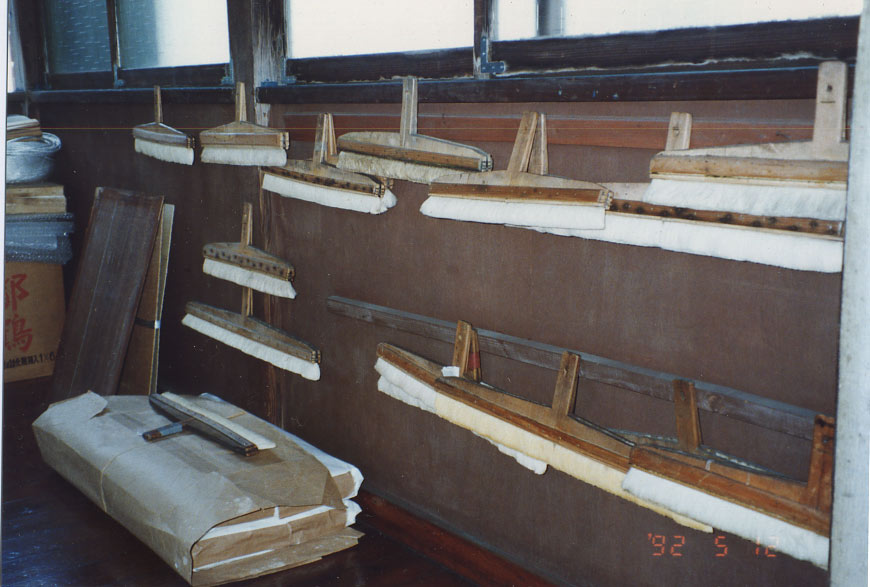
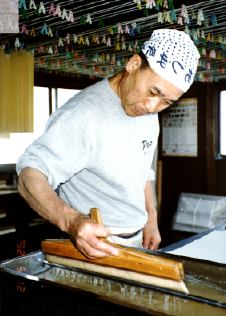
And here are his brushes ...

At this point - looking at that photo of the brushes - I have to mention that I made a quick trip to Tokyo the other day, stopping off at the brush shop. I need to order a replacement mizubake (water brush) for my daily use, and of course, I need something for doing this sizing.
When I asked him about getting a nice wide brush like the ones you see in this photo he just laughed. He hasn't made anything like that for decades, and when I mentioned that 'Well, this is your chance!' he just shrugged. No. 'Can't get the wood,' he mumbled.
I offered to find some wood for it, but he wouldn't be pushed. He is something over 80 - I wrote about him here nearly 20 years ago - and I suppose I can understand his point of view. Who needs this kind of 'trouble' at that age ...
So I bought the widest one he had, which is just a bit short of one 'shaku' (they don't talk centimetres, etc. over there). This is too narrow to do a sheet of paper in a single pass, so I'm going to have to cut the sheets in smaller pieces for my experiments. (There is absolutely no way that you can make multiple passes on wide paper with a narrow brush and expect it to work. You'll either get gaps, or strips with heavy size, either way a disaster).
Next step, getting the 'bucket' made ...
This thread about sizing continues here.
Posted by Dave Bull at 5:24 AM
| Comments (0)
Mystique Series - key block done ... colour separation
Although it is now extremely hot here - even down by the river - the work has moved forward, and the key block for the Hasui design is now done:
Just before completion - with the small boats waiting:
And after washing (under the strong light bulb at night, sorry):

The empty zone over at the right is where the cartouche lettering will be carved later, after I get the master copy of the calligraphy back from collector Tauchi-san, who has taken on the chore of doing them for the whole series.
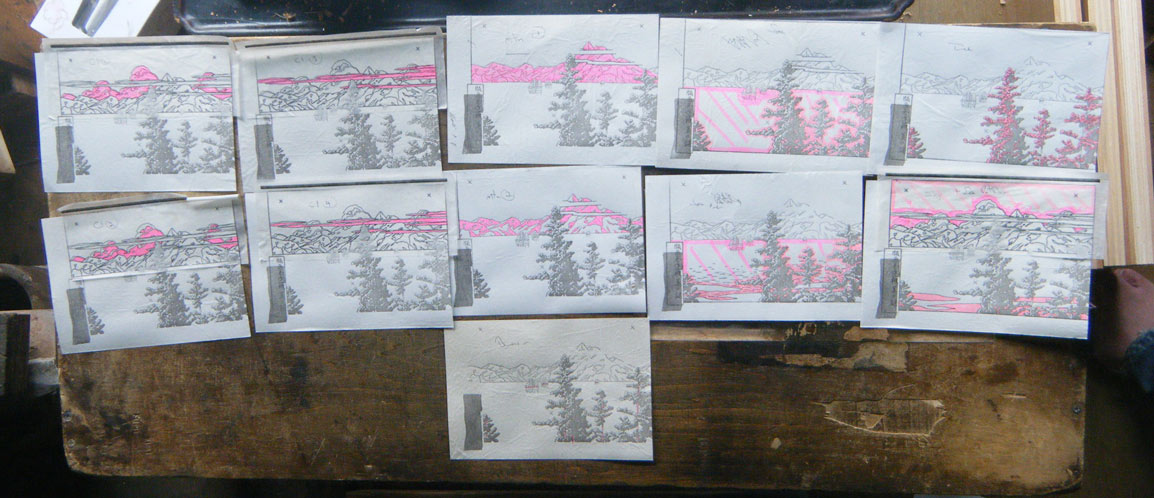
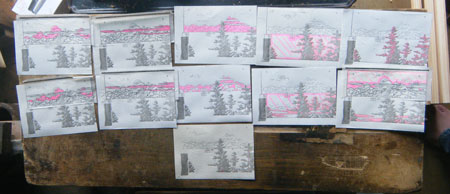
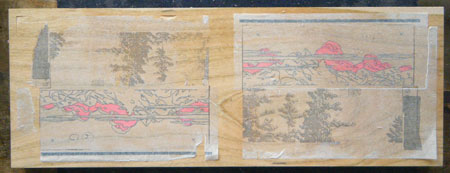
But I can get busy on the colour blocks while waiting for that to arrive. I think we are looking at 12 faces in all (including the key), but I'm not sure how many impressions it will be; there are going to be a number of gradations and overprintings, obviously. Here are the separations, ready to be pasted down (click to enlarge):
And here is one of the colour blocks, waiting for carving to start:
If you have been 'following along', you should have questions here!
Posted by Dave Bull at 3:47 AM
| Comments (6)
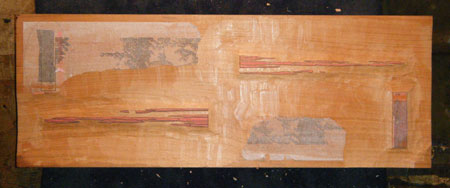
Paper arrives ... a new world of problems ...
It's difficult to remember what I've written about here on the RoundTable - did I mention the sizing problem before? Well, for readers who aren't up-do-date on that situation, some info is in a recent Story A Week episode.
That story mentions 'mid-summer' as the crunch time, and here we are ... The packet of paper arrived the other day, 400 sheets of hosho from Iwano-san, enough to last to the end of the Mystique series:

It is, of course, unsized, which I had requested, but it is also trimmed, which I had not. Back at the beginning of the year, when talking (face to face) with Iwano-san about this order, I very carefully gave him my requirements for the dimensions, going to far as to draw a diagram of what I needed - a rectangle with the dimensions (a size adequate for four of my print pairs), surrounded by the 'mimi', the selvage. But somebody in his workshop misinterpreted this, and trimmed the whole stack, removing all the selvage.
Does this matter? Yes, of course! When applying the sizing, the paper has to be hung up to dry and this is normally done with clips hanging from cords strung along the ceiling. These clips leave marks in the paper, but as the paper is (normally) oversize and gets trimmed at the end of the process, no problem.
But this paper is trimmed to the exact dimensions I need on the blocks, and is unsized. And what is worse, most of the prints in this Mystique series will not be printed right to the edge of the final dimension - which could help flatten out any marks - but have an embossed pattern around the edges. Any tiny marks left in the paper by that drying stage will be absolutely and clearly visible in the finished print. So clips are 'out', and I'm going to have to find another way to dry them ...
Um ... after I learn how to do the sizing, that is!
More on that, as it takes place over the next couple of weeks ...
This thread about sizing continues here.
Posted by Dave Bull at 4:17 AM
| Comments (2)
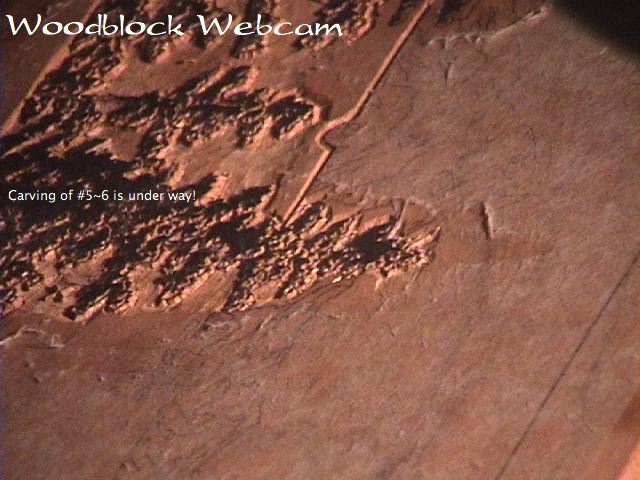
More carving ... and we have a winner!
Well, I didn't think it would take too long for somebody to identify this print, but I didn't think anybody would get it on the first day!
All I posted was this small image:

But that was enough for Gary Luedtke, who took that hint, then watched over my shoulder for a few minutes on the Webcam, and came up with the correct answer - a Hasui image of Mt. Unzen, created in 1927 (I'll show you below).
Here is some carving progress since then:

And here is where I left the Webcam last night:
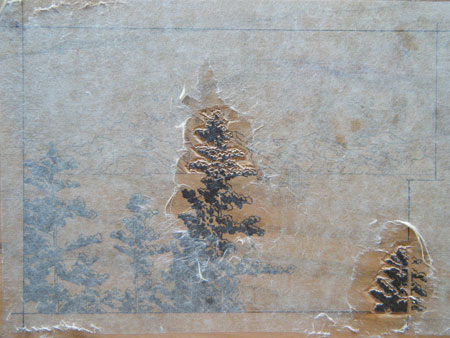
I don't own my own copy of the Hasui original ...
... and am working from a number of images from here and there on the 'net. About the clearest one I found is this:
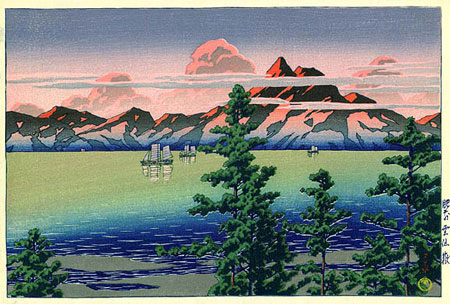
That's not much to go on for making a reproduction, but in this case, it's OK. Because my print will be only about 1/2 the size of the original (in linear dimensions) a lot of the detail will be missed anyway. I have re-drawn the whole thing, working at 200% in Photoshop, drawing lines that 'make sense' at the target scale.
It's the printing that will make or break this one, and that sample really doesn't show the design at its best - the colours are awful, and the registration is off.
Here's a better one I found somewhere:
So when my own printing begins, I'll have quite a lot of latitude ...
(Congratulations to Gary! The rest of you will have another chance, when carving on the other image of the pair begins soon. And nobody is going to get that one on the first day!
Posted by Dave Bull at 3:10 AM
| Comments (1)
Mystique Series - carving begins again - win a free print!
For the previous pair of prints in the Mystique series, I didn't show many progress photos, as I kind of wanted to keep the images a bit of a surprise for the collectors. But if I do that every time, it doesn't leave much for this RoundTable, so this time we'll keep it completely open, so you can follow along as I build this pair ...
But having said that, I don't see why I should make it too easy for you ... and now that I think about it, it might be fun to make this into a bit of a contest. Who can be the first to identify each of the two prints in this pair?
The first person to post a comment at the bottom of this page with the correct identification of either of the images will receive a complimentary copy of that print (when it is finished, of course). If you are a current collector, and would thus be receiving it anyway, you can have the option of having an extra copy (to perhaps give as a gift), or we'll simply make your regular copy 'no charge', as you wish.
You have two ways to inspect the block that I am working on - either via the Woodblock Webcam, or the progress images that I will post here as I go along.
Here's the first one (this is from the horizontal image of the pair):
You may think that this doesn't give you a lot to go on, but actually, I think it does. You should certainly be able to tell the genre, perhaps even the artist. And the position in the image of the object depicted is a very large hint about the type of design ... Anyway, enough for now. Good luck!
Posted by Dave Bull at 3:56 AM
| Comments (1)
A month since the previous RoundTable update ... It's been a very busy month, but 'busy' in a peaceful and relaxed way!
I actually returned to Japan over a week ago, but had to jump right back into the work, as the deadline for shipping print #4 in the Mystique series is coming closer. But - as a lot of the preparation had been done before I left - that didn't take too long, and the first batch of 100+ prints is now drying, ready for inspection and signing. We'll have a look at it later ...
I got the printing finished late on Friday night, and then had to 'clear the decks', as on Saturday I played host to a group of 13 visitors.
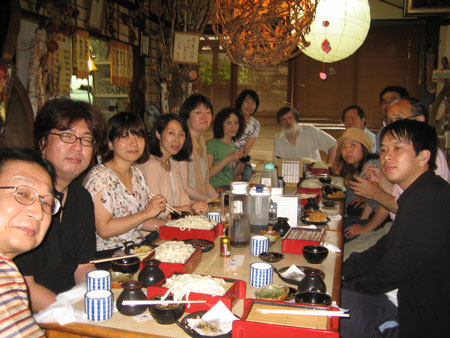
(No, that's not my house in the photo - it's the noodle shop across the street!)
Carver Asaka-san (sitting just to my left) brought over a gang of his students - people who are studying carving with him. They are mostly amateurs, but a couple of them have aspirations towards making a career out of this, and I was happy to agree when he asked about coming.
We spent an interesting day squeezed into my small place, looking at prints and blocks and just generally chatting about our work. A nice break for me, too.
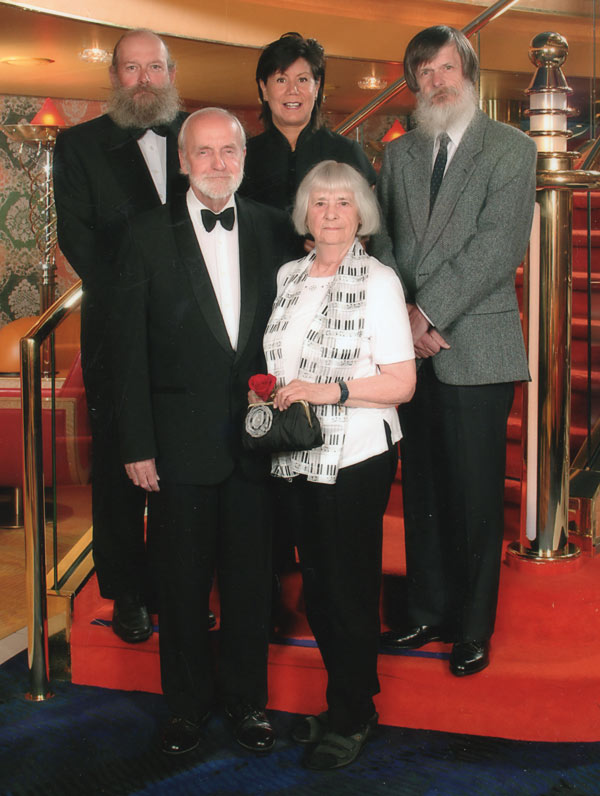
And - although it isn't related at all to printmaking - I should report at least a bit on the Canada trip ...
Easiest way to do that is perhaps give you a photo, and a link to a little story that accompanies it.

The story is here.
That cruise was the 'main event' of the Canada trip for my folks and their three kids, but once it was over, I had to move my attention to the generation below me! This wasn't all that easy, because my two girls are so busy it is beyond belief. Himi-chan is a full-time mother/wife, as well as being a full-time worker for her sister Fumi's fashion company, which of course would keep her busy 24 hours a day, if she would let it. It is going gangbusters!

It was difficult for me to get a word in edgewise with them because they were so busy fulfilling a rush of orders that had just come in due to a write-up they got in a recent Martha Stewart magazine.
Their website is here, but they also make many of their sales through Etsy, where they are frequently featured on the front page, their clutches are so popular. Please visit them!
And let's end with a small 'teaser' ...
Posted by Dave Bull at 3:01 AM
| Comments (2)