Wood Engraving
TEN engraving tools are as many as will be required for ordinary purposes. The beginner can start with five, but labour is often saved by having a sufficient number. They should be about 3 1/2 inches in length, according to the size of the worker's hand, and when held in correct position the point of the tool should not extend beyond the end of the thumb more than half an inch. In practice the greatest freedom is obtained when the point extends but little beyond the thumb, but as some allowance must be made for repeated sharpening away on the oilstone, the half-inch extension is recommended. When purchased they are generally much longer, 6 inches, but this length is much too great to allow the tool to be used with ease. The makers will generally grind them down to the required length for the purchaser, an ink mark or piece of stamp paper stuck to the tool indicating exactly the amount to be taken off. One side of the handle is flat, and the tool, as it enters the handle, is slightly curved upwards. This is to allow for free passage of the hand and tool over the surface of the wood, and though tools may be without this upward curve they lose freedom of action by being so.

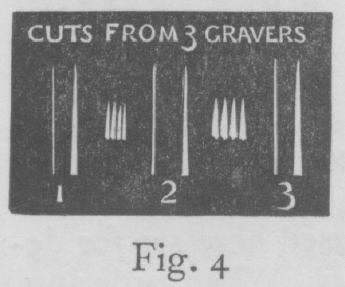
Of the ten tools, six will be known as tint tools,
three as spit-sticks, one as scauper. The tint-tools cut lines of
uniform width from extreme fineness (No. 1) to much greater width
(No. 6).  They are
used for tinting, that is, cutting a series of lines to produce a
tint or shade; for outlining, especially lettering; and for scauping.
The numbers used here are for descriptive convenience only. When
ordering, the actual width of cut required should be given, otherwise
the purchaser may receive something very different from what was
expected.
They are
used for tinting, that is, cutting a series of lines to produce a
tint or shade; for outlining, especially lettering; and for scauping.
The numbers used here are for descriptive convenience only. When
ordering, the actual width of cut required should be given, otherwise
the purchaser may receive something very different from what was
expected.
 The
spit-sticks (Nos. 1 to 3) are tools by which the cut can be easily
broadened by gradually pressing the point deeper into the wood. By
keeping to one depth they can also be used in the same manner as tint
tools. They have rounded sides and cut through the wood with smooth
ease. Instead of spit-sticks, tools known as gravers are often used.
They are flat-sided, as tint-tools are, but the spread is much
greater. The cut made is the same as that made with spit-sticks but a
much greater spread is possible. The finest is known as the lozenge
graver, the broadest as the square graver. They are used in the same
manner as spit-sticks and often preferred to them, but they lack the
smooth ease of cutting which is the special feature of
spit-sticks.
The
spit-sticks (Nos. 1 to 3) are tools by which the cut can be easily
broadened by gradually pressing the point deeper into the wood. By
keeping to one depth they can also be used in the same manner as tint
tools. They have rounded sides and cut through the wood with smooth
ease. Instead of spit-sticks, tools known as gravers are often used.
They are flat-sided, as tint-tools are, but the spread is much
greater. The cut made is the same as that made with spit-sticks but a
much greater spread is possible. The finest is known as the lozenge
graver, the broadest as the square graver. They are used in the same
manner as spit-sticks and often preferred to them, but they lack the
smooth ease of cutting which is the special feature of
spit-sticks.
The scauper, the tool of greatest width, is used for clearing away the wood round the engraving. It is desirable that the belly part of this tool should be sufficiently rounded: a point too square will not cut through the wood easily. An extra tool with a square point, about the size of the largest tint-tool, may be found useful for taking out corners.
A good selection for the beginner starting with five tools only would be two spit-sticks (1 & 3), two tint tools (4 & 6), and one scauper.
It must be clearly borne in mind that the style or character of the work is greatly influenced by the shape of the point used. The craftsman will be able, after a little time, to select the shape of tool which best suits his work. Once a tool is made up, and found to be good, to alter it is not desirable. To convert it to its old form is not easy. Rather keep an old one to experiment with, if needful, and never chance the spoiling of a proved tool.
For those who find a difficulty in buying tools and who wish perhaps to have them made locally, a good plan is to buy one good tool, and have others made to this model by the blacksmith, carpenter or other handy man. Old files can be successfully turned into quite good engraving tools. The point to remember is that the belly or point part of the tool be evenly shaped on both sides. If this is not attended to, the tool will always have a tendency to cut too much in one direction, or spring out of the wood.

A gouge, to be used as a chisel, that is, with a mallet, is used to carve away all wood round the engraving, so as to leave only the engraving in relief. This is always necessary when the printing is done direct from the wood block. It is not necessary when taking handproofs. A flat tool or small chisel is useful for lowering edges which fade into white, for preparing small plugs and for trimming straight edges.
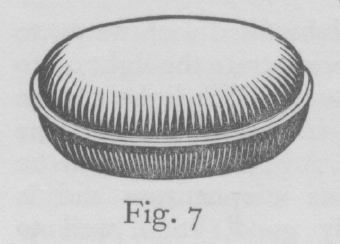 The
sandbag (Fig. 7) is made of two circular pieces of leather sewn
together and filled with fine sand. The sand is poured in just before
completing the last stitches. Any other durable substance can be used
instead of leather. On this solid yet easy base the block held by the
left hand can be turned about at will. It should be not less than
five inches across. To have it smaller may mean difficulty when
engraving large blocks.
The
sandbag (Fig. 7) is made of two circular pieces of leather sewn
together and filled with fine sand. The sand is poured in just before
completing the last stitches. Any other durable substance can be used
instead of leather. On this solid yet easy base the block held by the
left hand can be turned about at will. It should be not less than
five inches across. To have it smaller may mean difficulty when
engraving large blocks.
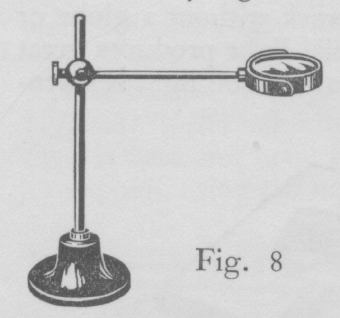 A
magnifying glass is not recommended unless the eyesight is defective.
When there is defective vision it is safer and better to use a glass
and avoid strain, so it must be included as a probably necessary
thing. A double lens should be used, and should be large enough to
cover a block of 2 or 3 inches. The stand (Fig. 8) allows the lens to
be turned away, raised or lowered at will. A watchmaker's glass can
be used (for one eye only) held in position over the eye by a piece
of string round the head. It provides only a small field of
view.
A
magnifying glass is not recommended unless the eyesight is defective.
When there is defective vision it is safer and better to use a glass
and avoid strain, so it must be included as a probably necessary
thing. A double lens should be used, and should be large enough to
cover a block of 2 or 3 inches. The stand (Fig. 8) allows the lens to
be turned away, raised or lowered at will. A watchmaker's glass can
be used (for one eye only) held in position over the eye by a piece
of string round the head. It provides only a small field of
view.
 Fig. 9
shows a globe filled with water, to be used at night to concentrate
the light on to the work. The light of the lamp is directly behind
the globe. A bull's-eye lens can be used as a substitute and is
equally good. It is well to shield away by brown paper fixed to the
top of the globe, or other means, all light that does not fall on the
block. It is most unrestful to look up from work into the direct
glare of a lamp; to work without a globe or bull's-eye with
artificial light produces great eye-strain and bad work. Good light
is essential at all times.
Fig. 9
shows a globe filled with water, to be used at night to concentrate
the light on to the work. The light of the lamp is directly behind
the globe. A bull's-eye lens can be used as a substitute and is
equally good. It is well to shield away by brown paper fixed to the
top of the globe, or other means, all light that does not fall on the
block. It is most unrestful to look up from work into the direct
glare of a lamp; to work without a globe or bull's-eye with
artificial light produces great eye-strain and bad work. Good light
is essential at all times.
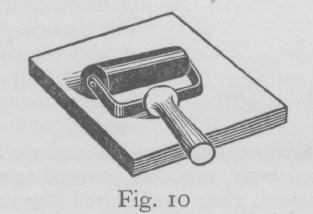
Fig. 10 shows the roller and slab used for inking the engraving when taking a proof. A leather roller is best but difficult to make; composition is generally used. An old method, the method of Caxton and quite good, is to use a dabber. The ink is dabbed on instead of rolled on. It can be easily made, a covering of thin leather filled with rags for padding, which must be quite firm, being all that is required (Fig. 11).

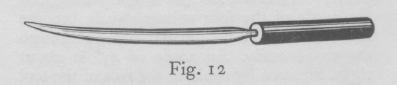
The burnisher (Fig. 12) is used for rubbing the proof off after inking the block. Steel is best, but bone will do, or the back of a teaspoon, using the bowl as a handle.
A supply of boxwood, proofing ink, an oilstone for sharpening tools and some paper for taking proofs will be necessary. The paper must be thin (India paper being the best) as it is very difficult to take a proof on thick paper.
The table or the bench where the work is to be done must always be firm. The craftsman should not be unduly bending over the work, but should be as upright as possible, the height of bench and chair being adjusted to enable the worker to see the engraving without either eye-strain or rounding of the back and shoulders. Be comfortable when at work.
See that the tools are sharp before commencing work. If sharp the point will always grip or 'bite' when loosely 'run' across the wood; if blunt it will slide over. Always use a spare piece of boxwood when testing tools. The face of the tool only must be sharpened (see Fig. 1). On no account must the sharpening be done from the underneath or belly part of the tool. Avoid bearing too much on the point; it is a quick method of sharpening, but the angle of the face will gradually become more upright and the tool will not cut through the wood easily. An angle of 45 degrees is about right. Sharpen by rubbing the face of the tool up and down the length of the oilstone. Any lubricating oil will serve for the stone.