Return to the Table of Contents / About this book
Colour Woodcuts John Platt
CHAPTER V PRINTING A BATCH OF COLOUR WOODCUTS
The batch of prints - Experimental printings - Setting out printing table - Method of printing Gradations - Sequence of printings - Correction of defects - errors in register - Note-book - Drying prints - Mounting and framing - Note on colour cartoon.
THE BATCH OF PRINTS
ALL the processes described in the previous chapters have been leading up to and preparing for the final stage, which is the actual printing of a batch of prints from wood blocks.
It should be realized that the entire procedure of printing has been evolved with a view to the simultaneous production of a number of identical prints. A number of sheets of paper are cut and damped, and enough colour mixed to print the whole batch; the large brushes act as reservoirs of colour, ensuring regularity of effect. Each sheet receives an impression from the first block; the next block is then taken and each sheet printed with this, then the next and the next until every sheet has received an impression from every block. No single print is complete until the whole batch is in process of being passed over the final block.
A batch of prints does not, of course, mean the whole edition. If the edition consists of one hundred, it may be printed in five batches of twenty. The number of sheets handled at once depends on the simplicity or complexity of the particular design. It wastes time to print less than a dozen, and there is a risk in undertaking more than thirty-five, as printing requires continuous alert attention and considerable physical exertion. A momentary error, due to tiredness, in the printing of one block may ruin a print which has received good impressions from several previous blocks.
Proficiency in printing comes by experience. The beginner must be prepared to practise printing hopefully and intelligently, as a musician practises at his instrument, until he has mastered the process and can confidently achieve any particular effect, tone, texture, or colour, wherever and whenever he wishes.
DEVELOPMENT OF THE DESIGN BY EXPERIMENTAL PRINTINGS
However carefully the design is worked out, experimental prints from the actual blocks will usually suggest modifications that would add to its interest and aesthetic value.
The variations possible in printing a set of blocks are so numerous that completely new ideas may be worked out during experimental printing. There is probably no medium in which experiments in colour and tone can be made so readily. The possibilities of the set of blocks must be tried out on single, experimental prints. The making of these is rather lengthy, but essential. It is a waste of time to launch out on a batch of prints until the best expression of the artist's idea that is available from the particular set of blocks has been discovered,and a 'standard' print produced. This may be technically imperfect-often it is made up of pieces cut from several experimental prints-but, placed behind a sheet of glass for protection, it can be referred to continually, whilst the batch is being printed, in order that the tones and colours may be matched exactly.
The methodical assembling of the appliances and materials required, and their arrangement on the table so that each item is ready to hand just where and when it is needed, helps greatly in the production of uniform and satisfactory prints, and saves much time and energy. The printing of a batch of prints should be approached in the same orderly, business-like spirit that Walter Wilkinson shows in his 'Sussex Peepshow', where he describes the preparations for renovating puppets after a strenuous season. "He takes off his coat, lays his company in a row; sets out on the bench the necessary tools, the chisels and gouges, the glue, the brushes and paint and the bottles of oil and turpentine. It is all as awe-inspiring as a surgical operation."
SETTING OUT THE PRINTING-TABLE
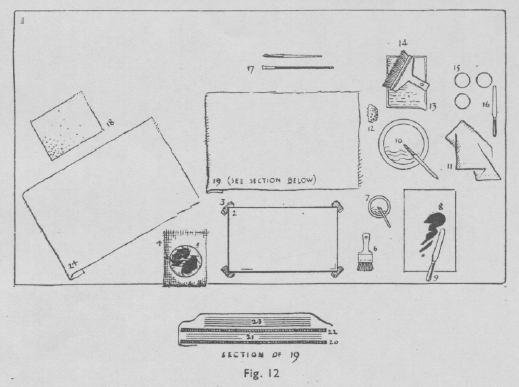
The setting out of the table for printing is given in Fig. 12.
- Worktable; plain wood or covered with linoleum.
- The block.
- Four neat pads of folded and wetted cotton rag. These keep the under surface of the block from touching the table, and prevent it from sliding about beneath the movement of the baren.
- Pad made of a half yard of butter-muslin folded to about 8 in. x 6 in., or a piece of engraver's printing blanket, pinned firmly over the front edge of the table, the heads of the pins being well out of the way of any possible contact with the baren. This pad is kept oily (with olive oil), and during printing the baren is rubbed upon it from time to time. This protects the baren from the dampness of the printing-paper, and helps it to move freely in printing. The baren is kept on this pad whenever it is not actually in use.
- Baren on the left side, away from the pots of water.
- Brush, in convenient position for picking up.
- Pot of rice paste with small stick for applying paste to block.
- Slab of 'opal' glass for mixing colours.
- Palette-knife.
- Shallow bowl of water with old, large water-colour brush.
- Cotton rag.
- Small, fine textured sponge.
- Flat dish of clean water for moistening the damping-sheets (an earthenware photographic developing dish is convenient).
- Damping-brush.
- Pots of powder colour.
- Clean palette-knife, or similar implement, for lifting colour from the jars.
- Clean brushes (1 sable, 1 hoghair) for washing out small accidents in printing.
- Piece of clean blotting-paper; same purpose.
- Piece of American cloth or rubber sheeting covering articles, as shown in diagrammatic section. That is (working from the bottom)-
- Sheet of plate glass; size about 14 in. x 18 in., thickness about 1/4 in.
- Required number of damping-sheets. If the printing-sheets become too dry during printing they are placed again among the damping-sheets for a minute or so. In any case, unfinished prints will be put back among the damping-sheets for the night.
- Sheet of plate glass.
- Sheets of printing-paper removed from between damping-sheets ready for printing.
- A piece of American cloth folded under and over a piece of plate glass, to take the printing-sheets as each one receives an impression from the block.
In addition to the above, about a dozen 'drying-boards' should be available. These are pieces of 16 oz. strawboard cut up into sections of about half imperial size. They are used for drying the prints when these are finished and adjusting the printing-paper if at any time it becomes too damp.
The 'standard' print should also be placed conveniently for reference. Individual readjustments of the layout of the table will no doubt suggest themselves, but the above arrangement sets out all the necessary appliances in a convenient position. The printing can now be begun.
METHOD OF PRINTING
Wet the block surfaces thoroughly by dabbing with a sponge, and allow the water to soak right in. The dry powder colour is mixed with water only, a glass slab and a palette-knife being used. The consistency will vary from a thick cream to slightly tinted water, according to the nature of the colour and the effect required.
Damp the brush with paste, not water. If still wet from being washed the brush should be well shaken and squeezed dry in a cloth. Take up a small quantity of colour with the brush. Apply dabs of paste to the printing-surface with the stick. Work both colour and paste well into the wood, brushing in various directions until the pigment is evenly distributed. Extra care is needed when the block is being coloured for the first impression, but once the block and brush are charged with the correct proportions of colour and paste, the colouring of the block for subsequent impressions is quickly and readily carried out.
There should be very little pigment on the block when it is ready to receive the paper-a thin film, a mere sheen. If the block becomes loaded with pigment this will squeeze up round the edges of forms during printing and make disfiguring ridges on the print. The brush should be held very lightly and upright for the last strokes, which must be made with care and uniformity in the direction of the grain of the wood, so that no streaks are left in the pigment by the bristles. A sheet of paper is then taken from the pile. It should be held between the second and first fingers, leaving the thumbs free to guide it neatly and quickly as it drops into the register marks. Allow the sheet to fall on to the block, take up the baren and begin to rub the back of the paper near the right-hand register mark. Then press hard and vigorously in order to ensure intimate contact between the paper and the wood. Rub in the direction of the grain of the wood and the fibres of the baren-cover. The pressure should be in proportion to the area to be printed and the thickness of the paper. A key-block, with fine lines only, needs light rubbing, but colour-blocks often require considerable pressure. It is necessary when printing any large area to stand well over the block and put one's weight into the pressure of the baren.
Hard pressure is also required to obtain a smooth, even texture, especially in a dark tone. Some colours, such as Prussian blue or ink, will give a strong tone at once, but with less powerful colours do not try to get a deep tone by one printing of thick pigment. A smoother and richer effect is obtained by printing the area twice at least. If the form is simple, lift the paper off the block after printing it once, re-colour the block and print again, but if the form is complicated even slight errors of register will be troublesome. To avoid them, do not lift the paper after the first printing, but put a heavy stone or lead weight on one end of the print as it lies on the block (choosing an 'island' to take the weight); turn back the other end over the weight, re-colour the portion of the block to be reprinted, allow the lifted part of the paper to fall into place again, and reprint. If necessary, the weight can then be transferred to the opposite end of the sheet and the other end lifted and reprinted in the same way. This use of a weight provides also a means of examining impressions during printing and allows the artist very close control of the result.
PRINTING GRADATIONS
To print a gradation of tone select a brush of a width suitable to the area to be printed, moisten it with clean paste, dip one end in colour, and apply it across the block in the direction required. The colour will gradate itself evenly through the brush as it is used. If the gradation is to fade away altogether, pass a tight roll of clean cotton rag, wetted and well squeezed out, or a brush moistened with clean paste, across the block where the gradation is to end, before applying the pigment to the block. For a very wide gradation use two brushes, one charged with stronger colour than the other.
As each sheet is printed it should immediately be placed, face down, on the plate glass under the rubber sheeting (24 in Fig. 12).
SEQUENCE OF PRINTINGS
Where a key-block is used print this first, as any errors in register in later blocks will at once be apparent.
Generally speaking, print small areas first. The paste in the pigment, as it sets, causes the paper to shrink very slightly. Large areas naturally shrink most; errors of register are therefore less likely to occur if large areas are printed last. On the other hand, as it is difficult to estimate correctly the tone of small pieces of isolated colour, it is sometimes desirable to print the large and generally-enveloping tones first. A balance must be kept between these two considerations.
Where over-printing occurs, the colour which is to 'tell' most must be printed last.
CORRECTION OF DEFECTS IN PRINTING
If difficulty is experienced in getting a smooth texture, remember that this depends on:
- The fibres of the wood being well soaked before you start.
- All water being wiped off the printing surface.
- Having paste, not water, in the brush.
- The paste being the right consistency.
- Heavy pressure of the baren; bringing about, by its rough yet slippery texture, an intimate contact between the paper and the wood.
- Delicacy in the final smoothing of the pigment with the brush.
- Thinness of the film of pigment.
- Keeping the baren oiled by rubbing it on the pad.
The best results are obtained when the grain of the wood, the brushstrokes, the fibres of the baren-cover, and the grain of the paper are all in one direction (the grain of paper is at right angles to the wire marks, i.e. lengthways on the uncut sheet).
Occasionally a rough texture is desired, as in the ground of 'Building the Trawler' (Plate XII). For this let the mixed pigment on the block be fairly watery, and use only slight pressure in printing so that there may be less close contact between wood and paper.
Brush streaks are due to the hairs of the brush being too coarse at their ends, or to the paste being of too stiff a consistency. Small smudges of paint can usually be removed from Torinoko paper if they are flooded immediately with clean water and washed with a stiff brush. It is not so easy to make corrections on Hosho paper, as this is more absorbent.
ERRORS IN REGISTER
Where the register marks have been cut accurately and carefully, errors in register are most frequently due to:
- Inaccurate placing of the paper in the register marks.
- Expansion of the paper when damped.
- Expansion of the blocks when wetted.
Remember that both wood and paper expand most across the grain. Blocks with a large engraved surface are naturally wetted more completely, and so expand more.
If the register seems out, hold the impression up to the light and look at it from the back to decide in which direction to deviate from the register mark. Often the error is so slight that it can be adjusted by merely putting the paper rather loosely into the register marks. If the defect is serious and the register mark really does not fit the design, it can be plugged by making a cut with a small chisel and inserting a piece of wood the width of a match end. Cut off the end and level it. Alternatively a new edge to the register mark can be built up of plastic wood. When this has quite set re-cut the edge.
If tire register mark is too near the design, cut a new shallow one just the necessary distance outside the old, preserving the latter in case it may be needed. However, do not interfere with register marks unless you are quite sure they are permanently out of position. The error is much more likely to be due to your paper being too damp or too dry.
NOTE-BOOK
As printing proceeds it is as well to note down, in a book kept specially for the purpose, details about the printing, such as the pigments and mixtures used. An interval will probably elapse before another batch is made from that set of blocks, and if these details are noted down they will not need to be rediscovered.
DRYING THE PRINTS
When the batch is complete the impressions should be placed between the drying-boards, and a weight such as the sheets of plate glass or some books placed on top. They should be left for at least twenty-four hours, until they are quite dry and flat.
MOUNTING AND FRAMING
A picture should be a focus of beauty and interest in the room. The frame should associate it with the architecture and furnishings and yet separate it sufficiently from its surroundings. The print, mount, and frame should form a single unit. As a rule the mount should be a little lighter in tone than the paper on which the print is made, and the aperture of a size to leave a narrow margin of unprinted paper round the picture. The scale of the picture will determine the width and thickness of the mount and the width of the frame moulding. A moulding about threequarters of an inch in width will be enough for most prints. It is desirable that the proportions of the mount and the kind of frame should be controlled by each individual design.
Prints may be kept in place on the backing-board of the mount, either by being 'hung,' a small folded piece of gummed strip being stuck under each top corner, or by being stretched. Prints should not be pasted down, as this interferes with the surface quality of the paper. Stretching is best as it allows the fibres of the soft printing-paper to remain free. 'Hanging' has the disadvantage that buckling, due to changes in the humidity of the atmosphere, is more likely to occur.
To stretch a print leave it between damping-sheets until limp. Place it in the right position on a white backing-board the same size as the mount. To prevent the print from slipping, place over it one of the sheets of plate glass, leaving about a half-inch width of one long edge exposed. Fasten about a quarter of an inch width of this edge down with a piece of white gummed strip (one inch wide) previously cut the right length, that is, about one and a half inches longer than the edge, pressing it down from the middle to the ends. Now move the glass to expose the other long edge, fasten this down, and proceed in the same way with the two shorter edges. The use of the plate glass prevents the puckering of the edges which might otherwise occur. The gummed strip should be moistened with the small sponge on both sides, paper side first. Put the stretched print between the drying-boards and leave until dry.
PREPARATION OF THE COLOUR CARTOON, DIMENSIONS OF PRINTS, AND SUGGESTED FIRST EXERCISE
It was assumed when describing the method of cutting (Chapter 3) that a satisfactory design had been made. Make your design as complete and definite as possible. Uncertainties lead to waste of time in altering and re-cutting blocks. The precise silhouette of the forms and the keyline, if any, must be absolutely fixed before the first block is cut. The tone and colour schemes should also be decided upon, although useful developments may be made during printing (see p. 26). For the design use any medium in which you can put down clean, definite effects. Poster colours are quite suitable, this medium lending itself to clear definition of mass.
The size of a colour-woodcut is controlled by the materials and methods employed. The average Japanese print is about 14 in. x 10 in., and it is seldom advisable to attempt to handle a sheet larger than about 180 sq. in. in area. However, a colour-woodcut much smaller than this is fully effective for room decoration. If a large picture is desired a multiple-sheet print (as made by the Japanese) can be designed. I have myself recently made a triptych, 14 1/2 in. high x 26 in. wide, and consider the multiplesheet print has good possibilities.
An artist as yet unacquainted with the technical practice may wish to make an experimental first exercise. Make this print of moderate size but not too small, or the baren will be difficult to use. A sheet about 8 in. x 10 in. is reasonable. Keep the design extremely simple, a single object on a plain background, a monogram or an emblem suitable for a book-plate, or an assemblage of related geometrial shapes, some flat and some gradated.
Return to Chapter Four / Move on to Chapter Six / Return to the Table of Contents