ONE caution should first be impressed on the learner. The composition should be modest in size. The craft entails, in the preliminary stages, considerable labour, and a large area means waste of materials and probable abandonment of the subject. But the teacher can make sure of this by supplying only small blocks.
On no account should lead pencil be used on the linoleum (or wood), as furrows might be produced, ruining the printing surface. Before using the brush a little Chinese white (water colour) should be rubbed on the linoleum to lighten the surface and remove the greasiness.
The print will be in reverse, so any lettering will have to be drawn backwards; a knight in armour must brandish his sword with the left hand, a fair English maid wear her engagement ring on the right hand, and so on. To obviate this difficulty, the line part of the composition should he traced on thin tissue paper. To overcome the greasiness of the linoleum, which may prevent the paper adhering a raw potato should be cut and rubbed over the surface.
The best paper for tracing is Japanese tissue, obtainable at a stationer's shop which supplies typewriting materials, but any thin tissue will do except tracing paper, for this cannot he pasted down properly. As it is difficult to manage a floppy piece of tissue, the tracing, which should have been made with a line brush and Indian ink, the ordinary water-proofed sort in bottles, must be placed face upwards on a thick pad of blotting-paper, and the (well-pasted) block brought down on it. The block should then be turned over, and the paper dabbed with a rag, until it adheres thoroughly. When thoroughly dry, and paste adheres best when dried under pressure, the paper should be rubbed lightly with the finest sandpaper until only the thinnest film of paper is left on the surface. This makes the tracing easier to see. The strongest paste is essential, or even glue which should, however, be used very sparingly, so that only a thin film of it covers the surface of the block.
The three-cornered knife is the only suitable tool for cutting the lines. The blade presents three surfaces forming the point, and the more perfect these planes, the sharper will it be. The knife probably is supplied roughly ground, so the operation of sharpening will be described, especially as it requires to be frequently repeated.
Oil a long flat oil stone, take out the metal blade of the knife from its handle, and, keeping the bevel in contact with the stone, move the steel backwards and forwards with a firm pressure. The blade should be frequently inspected during the sharpening to ascertain what is happening to the bevel.
While passing the steel along the surface of the stone do not press on the point of the blade, but rather on the heel of the bevel. The flat side should not be rubbed on the stone, the sharpening being confined to the bevel. The blade should not be stropped on leather; it is preferable to repeat the sharpening on a piece of very hard Arkansas oil stone, which will remove the wire edge, and give a hard strong point.
To use the knife, hold (and guide) it in the right hand, pushing against the back of the blade with the middle finger of the left hand. It should be noted that a left-handed student requires the knife to be bevelled on the other side. Cut with the flat side of the knife against the line, but sloping away from it, then turn the block, and cut along the first cut, so that a strip of linoleum (or wood) is removed, leaving a V-shaped ditch bordering that side of the line. Repeat the process on the other side of the line, not forgetting the ends. The cutting should be done with the utmost care, for on it depends the success of the print. Great force need not be used. The knife should not be used for scraping or removing waste wood, nor should there be any side strain, for that is liable to break off the point. The clearing away of the spaces, although the greatest pains should be taken, does not affect the result, being negative in character, for the spaces show white in the print.
 The
register marks (into which the printing sheet is fitted) should now
he drawn and cut with the knife held upright; they are shown in Fig.
1 on the key block. The surface should be removed from them with a
chisel or flat gouge to the depth of a postcard.
The
register marks (into which the printing sheet is fitted) should now
he drawn and cut with the knife held upright; they are shown in Fig.
1 on the key block. The surface should be removed from them with a
chisel or flat gouge to the depth of a postcard.
Now, with a small quick gouge, commence clearing by making a trench around the lines, and as close to the V-shaped ditch as it is safe to go. This gouge should not be pushed, if working on wood, but tapped with a light mallet. (Of course, there may be spaces too small for this gouge to enter.) The remaining spaces may now be cleared away with larger and flatter gouges, the gouge-made ditch enabling this to be achieved without injuring the lines. By constantly turning the block it is possible to cut always away from the lines.
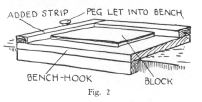
To keep the block steady, the worker will require a 'bench-hook,' to which a strip of wood has been added (Fig. 2). The bench-hook should be prevented from moving to the left by a wooden peg let into a hole in the bench or table.
 The last
operation in clearing consists in going round the lines with one's
smallest quick gouge, removing slivers of wood. The smallest spaces
may be removed with a very narrow chisel, and in these cases the
depth should be of the slightest, only the surface being removed.
Even in the widest spaces the depth need not be much more than
one-eighth of an inch.
The last
operation in clearing consists in going round the lines with one's
smallest quick gouge, removing slivers of wood. The smallest spaces
may be removed with a very narrow chisel, and in these cases the
depth should be of the slightest, only the surface being removed.
Even in the widest spaces the depth need not be much more than
one-eighth of an inch.
When the clearing has been completed, the film of paper should be washed off with a brush or soft sponge, and the block is then ready for printing the impressions required for the colour blocks.
Of the printing materials, the first in importance is the rubbing pad. The Japanese baren is most efficient, but the leaflike sheath of the bamboo which covers it soon wears out, and must be replaced by another. This must first be soaked in water to make it pliant. Before removing the old covering, examine closely the way it has been applied and tied.
In the absence of a baren, cut out a circle of thick cardboard about 5 inches across, and over this stretch a piece of stiff book muslin, or similar fabric, bringing the ends over the back, and tie tightly. The knot serves as a handle.
Paste will be required of wheaten, or preferably fine rice, flour. Use about six parts of water to one of flour. The flour should first be mixed with a little water to the consistency of cream, without lumps. Boil for about five minutes, then pour into a narrowish stone jar. Ink should be prepared beforehand. Break a stick of Indian ink into pieces and leave in water for three days. Then pour off the water and put the softened ink into a wide-mouthed bottle. A little pad of paper tacked to the bottom of the cork and damped with a drop of creosote, will obviate an unpleasant smell from the ink.
For making the colour impressions, blocks of linoleum or cherry wood should be at hand, and sheets of printing paper. With a wide brush take up a little of the ink placed ready in a saucer, and a little paste (in another saucer) and brush the key block with the ink and paste, including the register marks. Place a sheet of the printing paper (not tissue) on the block and rub with the baren or pad, interposing a piece of tracing or 'butter' paper between. The moving pad should describe Vs or Ws, not circles. If the impression is successful, paste it on a block as described above. Repeat the process until the blocks have each their sheet of paper pasted upon them. When dry, rub the surface with the glass paper as before, and oil slightly if the line does not show clearly.
The colour patches should now be considered. Two or more patches, if far enough removed from one another, may be cut on the same impression. As a rule, an inch of space should intervene between two patches. The block may be utilized later if space allows by pasting on another impression. If working with wood, both sides of the block will be used, of course.
Go round the colour patches with the three-cornered knife as before, cutting through the middle of the thickness of the line, so that two adjoining patches of colour will exactly meet. Do not waste away all the unused surface, as it may be wanted to support the paper; it will be sufficient to remove about an inch around the colour patches, which form islands on the block. The outer edge of the trench should be trimmed with a flat gouge and smoothed with glass paper; this prevents the pad from marking the paper by rubbing against sharp edges. Cut the register marks on each impression as described above.