 T will
be about as expensive and as much trouble to get the raw material of
tools as it will be to buy them ready made. However, a little
knowledge of tool making may not come amiss. A new tool may be
developed that will be the means of widening the possibilities of the
woodblock.
 My most useful tool at one time was made from a one-eighth
inch drill rod, a standard round steel much used in machine shops.
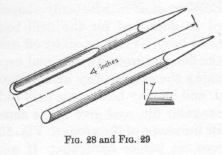
See Fig. 12 and Fig. 17. To make it, a groove is first filed at one
end of a four-inch length with a round or 'rat-tail' file. Fig. 28.
Then a tool like Fig. 29 is made. This is merely another piece of the
same kind of rod, one end of which is filed to a point to mount a
handle on, and the other filed to an angle of about 75 degrees. This
end is then heated red hot and plunged immediately into cold water.
That will harden steel to brittleness - too hard for practical
purposes. It is then polished with emery or sandpaper. Then a small
flame - an alcohol lamp can be made from a bottle and a bit of rag -
is applied to the rod, about one inch from the cutting end. Now, as
it becomes heated the steel changes color. Keep your eye on the
business end. This change of color creeps away from the flame along
the rod. It starts with a light straw, gets deeper and turns to
purple and then to blue. As soon as the straw color reaches the tip,
quickly plunge the rod into cold water again, and the tool is
tempered to the right degree to cut steel. It is then mounted on a
handle.
The other rod is put back in the vise, and the tool just made is pushed along its groove to smooth it, to take out the roughnesses left by the file. Without this touch the cutting lip would be serrated much like a saw. A small slip stone could be used for the purpose also, but it would take considerably more time. The more finished the surface of this groove is the smoother will the cutting edge be. Purchased gouges are often badly grooved - especially those made on a milling machine - a cost-reducing device for the manufacturer, and a so-called time-saver, but not for the consumer.
The more work done with a file on steel before it is hardened and tempered the less is necessary on the slower abrading oil stone or grinder. But you must not file the cutting end of the rod quite to an edge, for to heat a cutting edge to redness will ruin it. The other end of the rod is filed to a point for the handle. The grooved end of the tool is put into a hot flame, and when cherry red quickly immersed in cold water. Quenching is the technical term. Then clean with emery or sand-paper. It must be bright. The tip should be brittle hard. It can be tested by putting a file to it; if the file bites into it the hardening has not been done properly. Put the polished tool in the flame again so that one inch of the part to be tempered is exposed. Watch carefully the advancing straw color creep along as the steel becomes hotter. This time you will want a little less hardness than in the other tool, so when the tip is about to turn purple - it does it quickly - plunge it into cold water. Now the lip may be sharpened down to a cutting edge as mentioned in the 'Woodcutting' chapter.
 If drill
rod cannot be obtained, a small round file may be used for making a
gouge. The file is first heated red hot all over and allowed to cool
very slowly. Among tool makers this is called annealing. That takes
out its hardness and temper. When it is satisfactorily shaped it may
be hardened and tempered as described for the drill rod. Another old
file of the same size could have its end knocked off and ground like
the tip of Fig. 29, with the file cuts ground away, and used to
smooth the groove before hardening the gouge. Any garage man should
have a lot of old files around, and he may have some drill rod. For a
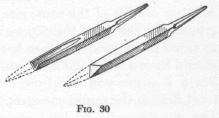
V cutter you could use a triangular file, and give it the same
treatment as the round one except for the shape of the groove. Fig.
30. The gouges could be bent up a wee bit before hardening. If you
happen to be friendly with a garage man, perhaps he would allow you
to use his vise and other tools, if you have none of your own. It is
a lot of fun to make small tools once you know the trick of treating
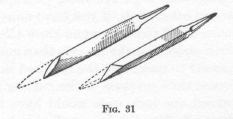
steel. It will be much easier to make gravers than gouges. The
elliptic or flat files will be easier to make into the required
shape. See Fig. 31. Remember to increase the acuteness of the cutting
angle as the tool widens. A chisel about one inch wide would have to
be bevelled to about 100 to work at all. Handles for small chisels
and gravers can be bought at Paulson's.
 Should
you want to change the shape of a hardened steel tool you would have
to anneal it first by heating it until it is red hot and allowing it
to cool slowly. For example, if you should want to bend up the
pointed end of a graver in order to have the handle clear the
woodblock, that end would have to be annealed for another inch to
make it safe to bend - otherwise the blade is very likely to
break.
If you attempt to modify the shape of a graver by first annealing it in order to file it, you may find when you harden it again that it will distort, especially if the cross-section of the tool is like the elliptic graver or 'spit-sticker.' It will be better to harden only the tip - about one-half of an inch. It will take a long time to wear a graver down that length.