 CONTEMPORARY artist who is greatly appreciated has
expressed the opinion that for an artist to print his own proofs is
folly. He thinks that the proper person to make them is the
professional printer. An artist, he says, should not bother with such
a troublesome task; he can never learn and apply all the subtleties
of the art. That was the Japanese ideal too. The Japanese artist
delegated not only the printing of the block to another man, but the
cutting of it as well. Many etchers and most lithographers do not
pull their proofs, and in the past there were still fewer who did. A
woodcutter would have some justification for following suit.
CONTEMPORARY artist who is greatly appreciated has
expressed the opinion that for an artist to print his own proofs is
folly. He thinks that the proper person to make them is the
professional printer. An artist, he says, should not bother with such
a troublesome task; he can never learn and apply all the subtleties
of the art. That was the Japanese ideal too. The Japanese artist
delegated not only the printing of the block to another man, but the
cutting of it as well. Many etchers and most lithographers do not
pull their proofs, and in the past there were still fewer who did. A
woodcutter would have some justification for following suit.
I have a private opinion that for the fullest expression of a print it is necessary for the artist himself to pull it. I do not imply that any woodcutter can make technically better impressions than a skilled printer. Naturally a man spending all of his working hours at an art or craft is bound to realize more of the potentialities of it than one who works at it only casually. The point I wish to make is that unless the professional proofer is an artist at heart and can get some warmth and vitality into the work intrusted to him the artist had better do it himself. No professional printer can take the same deep interest in an expression that the creator of it does. It is not in human nature.
So far, we have considered printing only in the manner of the early print-makers - that is, by burnishing the back of a sheet of paper over the inked block with a smooth piece of wood. If you have a press or access to one there is a different story to tell.
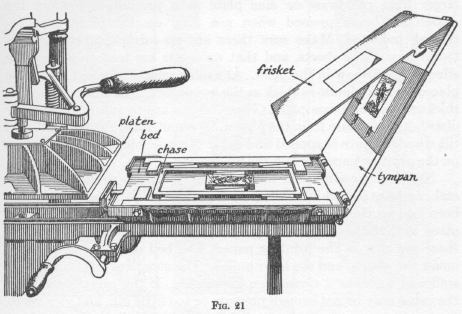
Fig. 21 shows part of an old Washington-Hoe proofing press. Such can be bought quite cheaply at times. I paid $50.00 for mine shortly after the war when I was given to understand that many were broken up and disposed of as scrap iron - no doubt for making shells, a more profitable business than making prints. These presses are usually found in engraving houses. One might advertise in the printers' journals on the chance of being able to get a machine.
For press printing, heavier papers, like the Fabriano, Matsumoto, Whatman and others, can be used than when rubbing off impressions with a burnisher. Assuming that only a few proofs, say fifty, are to be printed and that the block is in good condition and was well made, the process can be somewhat simplified by removing the tympan and frisket, temporarily. If a large edition, say several hundred, are to be made for some special occasion, or if the block is a poorly made one requiring much make-ready and overlay, then this contrivance will come in handy. But of that more anon.
First of all, the bed of the press should be free from dust and especially of gritty particles against which the block has to be scrupulously guarded. If the bed is dented or 'pustuled' the 'pustules' ought to be stoned down flat with the surface of the bed, and a smooth bed-sheet of metal - a brass plate at least 1/32 of an inch thick, or a zinc plate such as that used for etching and large enough to more than accommodate the largest block - placed on it. Then a number of sheets of paper - pages from a magazine are good enough, if clean - are placed on this. It is advisable to have the sheets no larger than the brass or zinc plate as a precaution against the woodblock being pressed when not fully on the plate, and becoming indented. Make sure there are no foreign substances between any of the sheets, and that no sheets are torn or folded; the effects would show in the print. At each corner of the bed should be placed a block almost as thick as the woodblock to be printed plus the thickness of the brass plate. These blocks are to insure an equally distributed pressure from the platen. Without them the platen would tilt when pressure is applied and cause the woodblock to shift enough on the printing paper to ruin the impression.
Now, the woodblock is inked as described in a previous chapter and carefully placed inked-face down on the printing paper that has been laid on the bed above the plate and padding sheets. Try to so place it that the impression will be square to water-mark lines, if there are any on the printing paper. The bed of the press is rolled under the platen, and the lever pulled. The complete pull ought to be sufficient to make a clean even impression. If the print is too light the cause may be not enough pressure or too little ink, and vice versa, too much pressure or too much ink. Assuming the inking to have been ample, a few more sheets are added to the padding until the pressure is sufficient to make a rich impression. If, on the other hand, the print went too black, remove some of the padding, or make an adjustment in the ink applied. But you will find almost without exception that the block is not equally thick, or apparently not so, for there are areas on the impression too lightly and some too heavily printed. So that first impression is pasted on the reverse side of the block - printed side up. Another impression is made. From this all the parts that are too lightly printed are cut out and pasted over the first impression on the back of the block, and so placed as to match the corresponding area - line for line. Another impression is made, and again the too lightly printed portions are cut out, this time a somewhat smaller piece than the first, and again carefully pasted over the weak area. This process is continued until the block is built up to print evenly. Now, it often happens that the block is perfectly made, of even thickness throughout, and yet an apparent unevenness of pressure results. This is because part of the cut is heavy with black masses, and another part, say the sky, is light, so that the heavy masses are too lightly printed while the sky is much too heavy. Large areas of solid surfaces always require greater pressure, and the open areas less. For this underlay, as it is called, it is naturally preferable to use thin paper for the proofing, for the more carefully this work is done - the underlay built up, the more satisfactory will the prints be. Fig. 22 illustrates the method graphically in three parts [1, 2, 3]. The left picture in each part represents a progressive state of the print, the centre picture the progressive print with the weak area cut out, and the rightmost the back of the woodblock of the subject with the cut-out portion pasted over the respective weak area. The cut-outs are outlined for the sake of clearness, and for the same reason an entire impression was not indicated as pasted down on the back of the block as a foundation for subsequent underlays.
In some cases certain areas of the block can be sand-papered down - a very little at a time. It may be necessary to tenderly sand-paper the edges of the underlay as they lay on the block, unless very thin paper was used for this preliminary proofing. 'Onionskin' is the stuff used by commercial printers for this purpose.
If fairly thin paper is used for printing proofs and only a few impressions are desired, it will be ever so much simpler to make but one or two underlays of fairly thick paper over the weakest areas and then instead of spending a lot of time in further work of this nature, to touch up the weak areas with a burnisher before the print is pulled from the block.
If more than a few dozen proofs are wanted, or if the subject is to be in two colors - chiaroscuro - or if heavy paper is to be used, the tympan and frisket serve a very useful purpose. Or, if the block is an especially bad one - having say, an injury in the shape of a small indentation, the matter can be somewhat remedied by using what is called overlaying, and for this the tympan and frisket are needed.
The tympan has a cloth stretched across it, and above that a width of smooth, clean paper. The frisket has a sheet of paper stretched entirely over it. The block to be printed is wedged in a chase, a square iron frame, above a number of sheets of padding paper - pages from a magazine. The chase in turn is wedged against the bed of the press with quoins or wood wedges, so that the block is about in the middle of the bed. The block is then lightly inked, and an impression made on the frisket. This impression, made merely to get the location of the block, is cut out with about an eighth of an inch margin. The block is inked again and an impression is made through the hole in the frisket on the sheet of paper stretched across the tympan. This too is just a light impression to serve as the substratum for subsequent overlays.
Three gauge pins are attached to the paper on the tympan, allowing a two-inch margin for the bottom and a one and a half inch one at the sides. The block ought to be wedged so that the bottom is toward the tympan if a vertical subject, and length-wise if a horizontal one. Keep a safe margin of paper on the prints; they are all likely to suffer accidents at their edges, which if necessary can always be trimmed down later. A two-inch margin is a good safety factor. A sheet of thin printing paper is placed on the two bottom gauge pins and against the side one. The block is now fully inked, the frisket flapped against the tympan and both down on the bed over the inked block. The bed is rolled under the platen and the impression made. There will be a fault in it - some parts heavily printed and some too lightly. We are assuming that the quantity of ink the block was charged with was just right. The parts of the impression that came out too lightly are cut out and pasted on the one made on the tympan in the corresponding area, as was done for the underlay on the block. It may be necessary to shim up the block with a few more sheets of padding. You can arrive at the proper thickness by adding one sheet after another until a proper resistance is had to the pull of the lever. Then these sheets may be put, with the exception of two or three reserve ones, under the block care being taken to get the block back to its exact former place.
Proofing is continued and the increasingly smaller pieces of the too lightly printed areas are cut out and mounted on the tympan until the proofs come out, sharp and clear - none of the areas too heavily impressed and all of them of an equal denseness. After each cut-out is pasted down, a page from a magazine should be put over it to prevent the excess paste from reaching the proof-paper. When the over-lay is complete a few magazine pages are placed over it to soften the edges of the cut-outs. It may be necessary to tenderly emery or sand-paper down the edges, for they may show in the proofs.
Once this work is done, the rest is simply a matter of inserting uniformly cut sheets on the gauge pins, and printing. Of course after each print or so a small quantity of ink should be added to the slab. Different papers vary in their capacity for absorbing ink, so it will be preferable not to change to different kinds of paper. Corresponding changes could be made in the quantity of ink fed but it is better to make the edition of one kind of paper, for it will save trouble sometimes when prints are sold at exhibitions. The buyer may have seen the subject on Vellum at an exhibition and when it is offered to him on Tamahachi he may quite likely object and refuse to take it. Experimenting with different kinds of papers is a natural sin to fall into if only fractions of an edition are printed at a time.
Now, as each impression is made, slip-sheet or interleaf it. Put either pages from a magazine or tissue paper over it, and do not disturb the pile for twenty-four hours.
If there is a sharp indentation on the face of the block that will not print, a small piece of rubber pasted on the 'hole' on the overlay may force the paper into it. The spot on the block would have to be inked with a finger tip, perhaps. It is fussy, of course, and a commercial printer with his 34,000 impressions an hour will be amused by the technique.
Sometimes it may be desirable to make the impression quite deep. It may help to give the proof a better quality. For example, in a snow scene a heavy impression imparts a suggestion of depth to the snow; it will suggest modelling for the slight shadow it casts on the paper around the black lines and areas. With proper handling one can suggest a cold crisp day, and with the identical block, a thaw. That is more than the commercial printer can do on his 34,000 per hour machine.
You may want to suggest a lighter tone to the sky than would show in the ordinary flat printing. This could be done with the overlay by adding all but the sky area to it, just as any area that had been too lightly cut could be darkened to some extent by thickening it on the overlay. In this process the entire block receives an equal amount of ink. There is another trick one can resort to to get lighter tones. It is called 'lowering.' In this process the area to be printed lighter is scraped down below the general level of the block, so that when the inking roller goes over it the lowered area is more lightly charged with ink, and when it is printed the pressure over it is naturally somewhat lighter.
Sometimes it happens that the prints show what looks like a wiped line with a ridge of ink outside of the border line. This is caused by the inking roller sliding off at this point instead of rolling. Do not bear down on the roller when charging the block.
For dry-printing the Japanese soft papers - Shidzuoka Vellums, Kochi, Hosho and the tissues, give fine results. The Zerkall 'Rembrandt' and 'Cranach' and the Italian Fabrianos may be printed dry as well as dampened.
