Eva & Ernest W. Watson
For our discussion of tools and equipment for the making of color "woodcuts" suppose we look at the objects on the table in the photograph.
First the blocks themselves which, by the way, are not wood but linoleum. The Watsons use both wood and linoleum, according to the requirements of the particular job. They prefer linoleum for most of their work because their designs usually exploit mass rather than fine detail. Linoleum can be engraved faster and in some ways it is easier than wood to handle. The belief that it is only suited to large-scale work is certainly belied by many of the Watsons' prints which have considerable fine detail.
Linoleum becomes harder with age as the oil dries out. By keeping stock on hand for several years the Watsons find the material even harder than many woods, and the engraved blocks stand up perfectly - even in the printing of large editions.
The Watsons use 3/16 inch Armstrong's white linoleum glued to a heavy cardboard backing, either 1/4 inch wallboard or a thick mill board. The blocks are thus about 3/8 inch thick, rigid enough and light to handle. The glue is spread on the back of the linoleum with a palette knife and the blocks are put in the press to dry overnight.
When dry they are sanded on the four edges to make them true and smooth. The face of the linoleum is scraped with discarded razor blades until it is as smooth as a piece of glass.
The original drawing, in very soft pencil or charcoal, can then be "offset" to the block. First the block is washed with household ammonia and while still damp laid down on the drawing and put under the press with as much pressure as possible. The pattern, offset from paper to linoleum surface, is in reverse on the block. The block is sprayed with fixatif and the engraving begun. If the offset is not clear and sharp the area to be in relief is brushed in with India ink, a good practice in any event as it makes engraving easier.
I noted that both in offsetting and in printing the Watsons first place paper on the press bed and then lay the inked block down upon it, reversing the traditional practice of laying paper down upon the inked block. "The reason for this," explained Watson, "is found in the different method we employ for register of color blocks. The use of the 'Finder' makes this procedure inevitable. The Japanese, you recall, cut notches on the face of the block and the paper is laid down in the block, fitting into a corner-notch and against a side-notch."
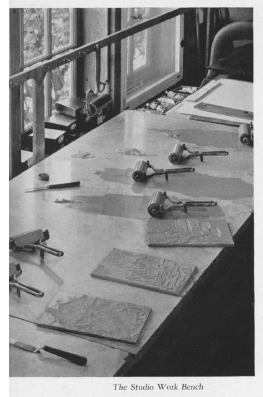
The method of "working up" a set of color blocks will be described later on, so we need only speak here of the engraving itself. The tools shown are of two types, veiners and gouges. The former are U-shaped and come in various sizes. They are for the real engraving work. The gouges - sort of curved chisels - remove the background after the outlines have been engraved. The Watsons do not use V tools, but occasionally the knife.
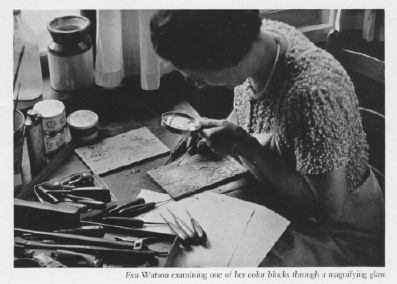
Except for broad background areas the cutting is very shallow. As the engraving proceeds, talcum powder is occasionally sprinkled on the block, then rubbed off with the palm of the hand leaving the pattern standing out clear against the white background. This is to enable the artist to foresee the effect of his engraving without actually pulling a proof. The photograph shows talcum applied to certain areas of the block that Mrs. Watson is engraving.
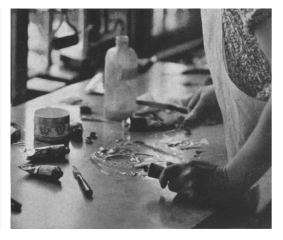 The
three cans on the table each contain one pound of "Mixing White
(extra heavy)". This is the only printers' ink used by the Watsons,
who mix it with high-grade artists' oil colours. In this photo
(right), Eva Watson - palette knife in hand - is shown mixing a batch
of color, adding color from studio tubes to a quantity of white from
the can. A few drops of linseed oil from the bottle are usually
needed to bring the color to correct consistency, though oil must be
used with caution.
The
three cans on the table each contain one pound of "Mixing White
(extra heavy)". This is the only printers' ink used by the Watsons,
who mix it with high-grade artists' oil colours. In this photo
(right), Eva Watson - palette knife in hand - is shown mixing a batch
of color, adding color from studio tubes to a quantity of white from
the can. A few drops of linseed oil from the bottle are usually
needed to bring the color to correct consistency, though oil must be
used with caution.
 Let us now take a look at those marble slabs where
the real creative part of color printing is performed. Note the piles
of pigment from which films of color have been "rolled-up" with the
brayers. When these ink films have been brought to the proper
consistency they remind one of satin. "The usual beginner's mistake,"
says Watson, "is to roll out too thick a film. One should use as
little pigment as needed, and this is likely to be far less than the
novice considers necessary."
Let us now take a look at those marble slabs where
the real creative part of color printing is performed. Note the piles
of pigment from which films of color have been "rolled-up" with the
brayers. When these ink films have been brought to the proper
consistency they remind one of satin. "The usual beginner's mistake,"
says Watson, "is to roll out too thick a film. One should use as
little pigment as needed, and this is likely to be far less than the
novice considers necessary."
The brayers on the slab are about 3 1/2 x 1 inch; some of them are of larger diameter. The one hanging on the rack is 6 x 1 1/2 inches, but the smaller sizes are more popular with the Watsons because they are more flexible for the very free kind of treatment they give their blocks.
The proper brayer is made of a gelatin composition, not rubber. Brayers of various sizes are sold by several supply houses. Larger sizes can be had from the American Type Founders, who will also recast old brayers. Brayers get hard with age and in extreme changes of temperature they "sweat" and refuse to hold the ink. To give good results the composition should be fresh and soft so that it makes perfect contact with the block.
When printing a large edition, the Watsons mix large batches of color and preserve them in tubes (empties can be bought from manufacturers of printing inks). If the inks are to be used the following day they can be preserved in little piles placed in a pan of water which protects them from the air. When the colors are to be put aside for a considerable time they may be placed in piles on a piece of glass and set on a shelf. The tough skin which soon forms on the outside will protect the pigment almost indefinitely, and when it is removed a week or a month later the color will be fresh and soft, ready for use.
Pure white gasoline or benzine is used for cleaning. For the sake of caution it is a good idea to keep the gasoline in a large oil can type of container and to burn the rags used in cleaning up and thus prevent the possibility of spontaneous combustion.

Examine prints by either of the Watsons and you will see to what extent their work is characterized by gradations. Those gradations look mysterious, not to say tricky. "The principle is simplicity itself," said Mrs. Watson, as she sketched these diagrams.
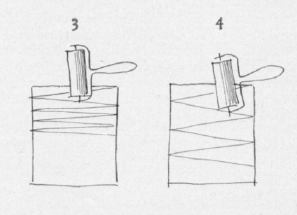 "Start
with the roller as in 3 and zig-zag back and forth thus (zig-zag
lines). That will give a rather abrupt gradation, the roller soon
discharging its color on the down end and piling it up on the top.
When you start with the roller further down on the block and direct
the path of the roller as in 4, the gradation of tone is less abrupt
and more extensive in area." Sounds simple enough, but it looks far
from simple when Mrs. Watson models a wave with her roller, or Mr.
Watson reproduces the graded shadow of a wind-filled
sail.
"Start
with the roller as in 3 and zig-zag back and forth thus (zig-zag
lines). That will give a rather abrupt gradation, the roller soon
discharging its color on the down end and piling it up on the top.
When you start with the roller further down on the block and direct
the path of the roller as in 4, the gradation of tone is less abrupt
and more extensive in area." Sounds simple enough, but it looks far
from simple when Mrs. Watson models a wave with her roller, or Mr.
Watson reproduces the graded shadow of a wind-filled
sail.
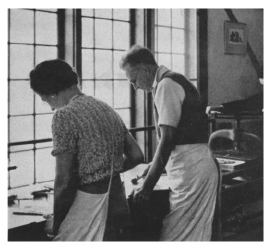
 Indeed
these artists handle their rollers with the facility of a brush. They
will pick up a roller and touch it deftly to a detail such as a gull
or a horse, "painting" a shadow on the wing or the head or enlivening
a color by the addition of a complementary color. Yes, it is
painting, painting with rollers instead of a brush! Their prints seem
to me to be a combination of relief printing and monotype. In some of
their subjects there is considerable "free" inking; in others flat
inking predominates.
Indeed
these artists handle their rollers with the facility of a brush. They
will pick up a roller and touch it deftly to a detail such as a gull
or a horse, "painting" a shadow on the wing or the head or enlivening
a color by the addition of a complementary color. Yes, it is
painting, painting with rollers instead of a brush! Their prints seem
to me to be a combination of relief printing and monotype. In some of
their subjects there is considerable "free" inking; in others flat
inking predominates.
Of course there is precedent for this method - the purist insists upon precedent - in Japanese prints. They often made use of gradations. Theirs were applied with the brush. Whereas the Japanese were profligate with their blocks - thirty blocks for a subject was common with them - the Watsons seldom allow more than six blocks for any design. Usually more than one color is applied to each block, sometimes four or five. So there might be as many as fifteen colors on the slab.
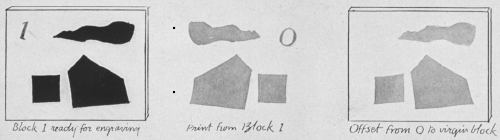
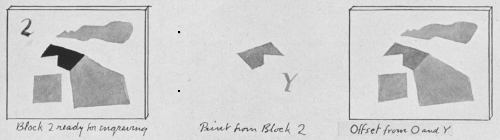
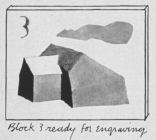
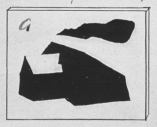
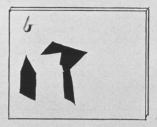
Now the question arises, "How are the several blocks engraved in the first place so they can be properly registered with the Finder?" Evidently the whole register problem begins when the artist is about to engrave his design on the second block of the series. For this he employs the same Finder. And at this point we come to the process of offsetting. Mr. Watson has made a diagram to show just how offsetting - and the Finder - enable the artist to work-up his pattern on the successive color blocks. [Ed. note]
This demonstration design shows three color values - a three-block job.

The design is drawn or traced (in reverse) onto the first virgin block and the areas which are to print the lightest tone are brushed in with India ink (1); then the background is cut away leaving them in relief. (Watson says it is always easier to engrave when the relief areas are in black).